'27 Chrysler Tub

Rat Rods Rule

Help Support Rat Rods Rule:

This site may earn a commission from merchant affiliate links, including eBay, Amazon, and others.

bob w

Still crazy after all these years!
Joined
Jan 2, 2008
Messages
13,197
Location
Stillwater, MN
4-2.jpg

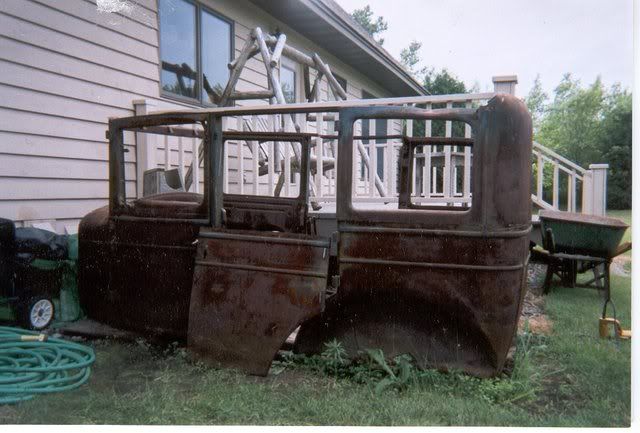
I have a disease. Whenever I get almost finished building a car, another build idea pops into my head. So, the notion of building a ground scraping tub crept in. I started watching eBay for candidate bodies and, eventually, the body you see above showed up. Naturally, I overpaid. I made the 200 mile trip to Oshkosh, Wisconsin, famous for Oshkosh overalls (Oshkosh by gosh, was their slogan) to pick this gem up. I almost asked the seller if I could just pay him for it and leave it there! But, in the end, I hauled it home and put it in the back yard. I took measurements and did a lot of sketches on graph paper.
 
2.jpg

Armed with my sawzall and angle grinder with a cut off wheel, I cut off everything that would not be part of a tub. Originally I intended to start with a Model A tudoor but the price was too high. At this point I was thinking I made a mistake using this body. It looked like it would be too square looking when finished.
 
17.jpg

Looking at it from the rear, at the inside, I realized I would have to narrow the door tops and make a cap around the whole body that was the width of a Model T tub. Otherwise this thing would just look like a cut off sedan. Also, the windshield posts would have to go in favor of some roadster-like stansions. I liked the dash though. It looks like a '32 Ford. Maybe this is where Henry got the idea for the Deuce dash.
 
3.jpg

The body appeared way too big to me. I wasn't building a freight train, I was building Tub. I have a reputation for building nothing but little hot rods. So, I removed about half the rear doors. Now it was starting to look in proportion to what I was after. You ca see some sheet metal caps resting on the top of the quarters.
 
12-2.jpg

I reskinned the rear door openings. THen it became apparent the if the wheels fit the rear wheelwells it would sit way too high for the look I wanted. So, I made new wheelwells sized to fit the tires I planned to use. I picked a mid 70' Monte Carlo rear end for a width that would tuck about half of the tire in the wheelwell.
 
16.jpg

At this point I was liking what I was seeing. The overall length was good and the severely laid back windshield helped reduce the "antique" look. I made the stansions out of steel. Same with the windshield frame. The bottom of the windshield frame is cut out of 1/8" by 4" steel plate with a sawzall. Probably the hardest part of the body modifications was removing the original windshield posts and smoothing the cowl to get it to resemble a roadster cowl. That's the end of this chapter. I'm still operating on dial-up and it takes 20 minutes to get a pic into Photobucket. My DSL modum should arrive tomorrow!
 
That thing is really coming together, I think you nailed the look so far. I want to build something similiar when I finish my truck. You building a frame from scratch or a donor? I feel your pain with the dial up but looking forward to more pics when you get time.
 
9.jpg

Here's a pic from the front. We installed DSL tonight and Photobucket no longer shows a "resize" option. So, this is a test. Also, none of the Avatars or icons show on the RRR site. Any suggestions? Someone let me know if this picture size is ok. Thanks,
Bob
 
on my screen it is about 25% off the page and you have to scroll over. killer build. I can't wait to see more progress
 
13-1.jpg

This pic shows the frame kick up over the rear axle. The top crossmember is temporary. You can see the front mount for the leaf spring. This build was unusual in that I built the frame and slid it inside the body. The bottom of the body actually wraps under the frame. Then it was welded together. A Speedway Motore T-Bucket door latch is visible.
 
10.jpg

The mid-70's Monte Carlo rear end is mounted on T-Bucket 26" springs. I ended up with 3 leaves, cutting the shortest one shorter. I put teflon buttons between the leaves. The shocks are Monroe racing shocks that look way too stout. However, they were available in extra light calibration and were the best shocks I had found for light cars. Speedway no longer carries them though. The bump stops are adjustable because I had limited spacing the wheel well. I needed the tire/ wheelwell spacing to be correct for a good appearance. The ride is quite good but on certain dips it can hit the bump stops.The gas tank was built by Terry, who is building the '31 Chev Coupe on another Build thread. It was on my Lakes roadster for some years but fit in here very nicely. The roadster got an oval tank. Don't know why this pic is so big???
 
Last edited:
19.jpg

I used a '38 Plymouth steering wheel and column. The '49 Plymouth gauges were left over from a '49 Plymouth project. I made the dash to closely resemble the original except for the gauge holes. There is a cable operated B & M shifter connected to the 350TH. I cut the shift stick down and put an early Ford knob on it.
 
Diggin' it!

Bob,
I'm really diggin' u're build because I have some '26 Dodge c-dan sheet metal that I'd love to do the same thing to! Thanks for postin'!!!

BoB
 
20.jpg

I found a row of 4 movie theater seats at a surplus store. Two ended up in here and two went in another project.
 
I really appreciate the comments, guys. This project consumed 3 times more MIG wire, sawzall blades and cut off wheels than any of my other projects. One of my goals was to sit low in the car and stay out of the wind, even with the low windshield. With the slanted windshield I get very little wind in the face. I can't keep my eyes open in the wind and I didn't want to have to wear goggles like I must do in my Lakes roadster.
 
I like it a lot!

It's simple ,neat, and youve got some killer fab work there. The theater seats are perfect. Dont let that new DSL go to waste, I'd like to see some shots of the whole car. thanks
 

Latest posts

Back
Top