A "Different" VW build, Or "How to make do with what you have"!

Rat Rods Rule

Help Support Rat Rods Rule:

This site may earn a commission from merchant affiliate links, including eBay, Amazon, and others.

Trimmer Len

Well-known member
Joined
Dec 30, 2007
Messages
45
Location
Peculiar MO
I have been in the Hot Rod biz for many years, but never had the budget to have my own until now. Part of the reason is finally getting smart with money, and the second being the wider acceptance of "low buck" cars. The third, and maybe the most important is the generosity of the people I work for, and the fortunate position I am in. Most of the cars we work on are big money builds, and now and then, perfectly good parts are removed and tossed aside, usually getting snatched up by one of the owners for a pittance, just to be sold off at the next swap meet. As the project started coming together, the owners, and a customer or two, got caught up in my excitement and the pieces started falling into place.

So to start this build thread, I thought I would post a list of donated and traded parts I have used or are waiting to be used in the build.

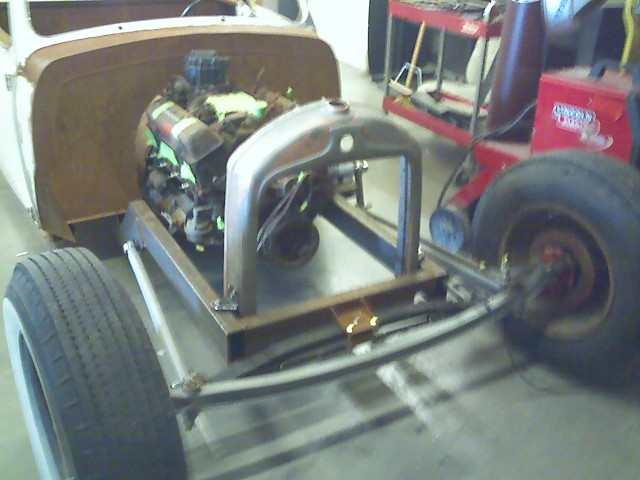
  • 350 SBC/350TH from 76' van- From boss #2 on the "Future Favor List"
  • Jaguar coil over shocks for the rear- From boss #1, gratis.
  • Chrome panhard bar on the rear, From boss #1, gratis.
  • early 20's vintage headlights and cool old lenses, from boss 1, gratis.
  • Unknown make and vintage grill shell, boss #1, gratis.
  • Full set of nearly new Dolphin gauges, cast offs from a customer, gratis.
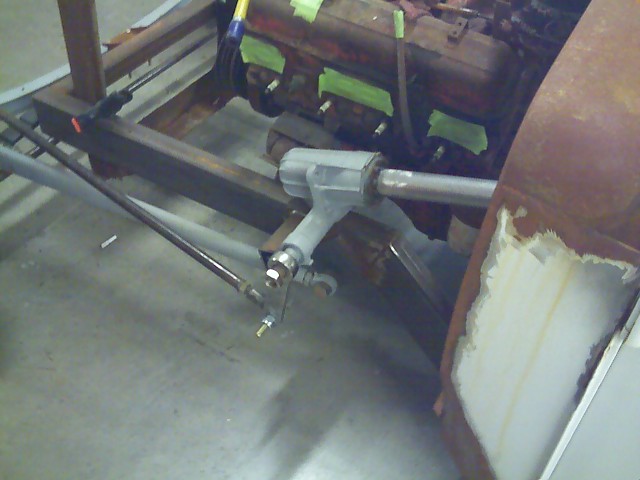
  • Early 70's Mopar steering box, already modded from a T bucket, from a co-worker, trade for recovering a bike seat.
  • Used aftermarket dizzy and wires for the SBC, same coworker, same trade.
  • Fuel tank from same T-bucket, same co-worker and trade.
  • Stock radiator from 47 Chevy truck, cast off from customer project, gratis.
  • Cool E-brake handle from 2 ton Chev truck resto, to be used as a shifter handle, cast off from customer build.
  • New fuel tank sender, leftover from customer build.
  • Brake and accelerator pedal from 28 seagrave fire truck, from boss #1, gratis.
  • Old ford spindles, from boss #1, gratis.
  • 3/4" hymes joints for radius rods, from coworker, gratis.
  • And the latest, New Comp Cams cam, lifters, push rods, and timing chain/sprockets, pulled from new engine for customer, gratis.(customer wants bigger roller cam and gear drive)
I already owned the body, and the rest I purchased. I thought the first pic should be the concept drawing I did in corel draw.
 

Attachments

  • Lens Rod_s.jpg
    Lens Rod_s.jpg
    43.4 KB · Views: 174
Getting started

This build started with a stock 67 VW body that spent the last 15 years buried in my old pole barn/garage. I dragged it out, loaded it up and hauled it to the shop. First task was lifting the body off the pan, which was not difficult because one of the last things I did to it years ago was take all the bolts out! The company's forklift helped a little, also:D
 

Attachments

  • First Day001.jpg
    First Day001.jpg
    38.4 KB · Views: 77
Then I started fabbing the firewall and cab back.
 

Attachments

  • Firewall-004.jpg
    Firewall-004.jpg
    38.4 KB · Views: 114
  • First Day006.jpg
    First Day006.jpg
    38.6 KB · Views: 80
  • First Day009.jpg
    First Day009.jpg
    44.7 KB · Views: 115
I then started cutting and welding up the frame rails.

Dont be jealous of my kick-ass frame jig!
 

Attachments

  • S3010847.jpg
    S3010847.jpg
    47.4 KB · Views: 92
  • S3010853.jpg
    S3010853.jpg
    54 KB · Views: 107
  • S3010854.jpg
    S3010854.jpg
    47.4 KB · Views: 90
  • S3010858.jpg
    S3010858.jpg
    88.6 KB · Views: 129
I then started fabricating the rear suspension. S-10 rear axle, Jaguar coil overs, and 4 bar kit I snagged unused off Craigslist for 150 clams.
 

Attachments

  • Rear End Fabbed Up002.jpg
    Rear End Fabbed Up002.jpg
    59.2 KB · Views: 102
  • Rear End Fabbed Up003.jpg
    Rear End Fabbed Up003.jpg
    62 KB · Views: 94
Once the rear was fabbed up, I started on the front. I purchased an A-bone front end complete from a local rodder. I later replaced the axle with a later model due to the model A being to wide.
 

Attachments

  • Front suspension-2.jpg
    Front suspension-2.jpg
    33 KB · Views: 62
  • Front suspension-3.jpg
    Front suspension-3.jpg
    37.3 KB · Views: 71
  • Front suspension-1.jpg
    Front suspension-1.jpg
    42.5 KB · Views: 103
A little more work and I have a rolling chassis.
 

Attachments

  • Roller002.jpg
    Roller002.jpg
    70.1 KB · Views: 123
  • Roller003.jpg
    Roller003.jpg
    52.6 KB · Views: 68
  • Roller004.jpg
    Roller004.jpg
    77.4 KB · Views: 72
I then started fitting the cab to the chassis. Being this project makes no money for the shop, it does not get to stay inside when we're crowded. So, I now have a rusty firewall.....
 

Attachments

  • cab meets chassis004.jpg
    cab meets chassis004.jpg
    88.6 KB · Views: 129
  • cab meets chassis001.jpg
    cab meets chassis001.jpg
    82.5 KB · Views: 153
Before I could do much more to the cab, ie: floor pans, tranny tunnel, I needed to have the engine and tranny in place. This was cool, as I got to see the stance for the first time. I did not manage to get detail pics of the motor mounts or tranny crossmember, but no real loss, as they are nothing special.
 

Attachments

  • Engine Mounted002.jpg
    Engine Mounted002.jpg
    65.5 KB · Views: 169
  • Engine Mounted003.jpg
    Engine Mounted003.jpg
    52.3 KB · Views: 183
On to the floor pans and tranny tunnel. I had also done most of the steering setup by this time.
 

Attachments

  • floorpan2.jpg
    floorpan2.jpg
    127.8 KB · Views: 121
  • 0126081654c.jpg
    0126081654c.jpg
    72.5 KB · Views: 118
Fitting the grill shell. I shortened the shell about 3 inches. I removed the excess where the frame would hide the joint. By this time my old digital camera shot craps, and I had to start using my cell phone camera. Sorry for the crappy pics.

PS: I have no idea what the shell is from, so if you recognize it, let me know.
 

Attachments

  • 0202081502a.jpg
    0202081502a.jpg
    89.8 KB · Views: 112
  • 0202081503a.jpg
    0202081503a.jpg
    83.7 KB · Views: 103
Last edited:
With the floor pans done, with the exception of the foward most part of the tranny tunnel(which I will finish with the cab off the frame), I wanted to see more cool stuff, so I fitted up the Speedway lake header kit.
 

Attachments

  • 0302081348a.jpg
    0302081348a.jpg
    76 KB · Views: 62
  • 0302081348b.jpg
    0302081348b.jpg
    77.5 KB · Views: 99
With the money I got from selling off one of my best model airplanes, I bought the needed materials to fabricate my bed. I have most of it done, but still need to fab up the mounting brackets to bolt it to the chassis. Fuel tank will mount below the shallow floor directly in front of the tailgate. Drop the tailgate to fuel up. The bed floor will be cabinet grade ply, routered to accept cargo rails. It will be mounted with slide on brackets to allow it to be easily removed for battery and storage access underneath. Open the tailgate, slide the floor back and lift out.

Bed sides and front ready to have attaching hardware fitted.
 

Attachments

  • 0310081736a.jpg
    0310081736a.jpg
    74.5 KB · Views: 77
  • 0310081737a.jpg
    0310081737a.jpg
    65.9 KB · Views: 69
  • 0310081737b.jpg
    0310081737b.jpg
    69.4 KB · Views: 92
Bed sides have had the hardware fitted to the bed front. I've also built the framework to mount the bed to the chassis and to support the bed floor, and fitted the hardware for it. I have also started fabricating the tailgate. It is built with conduit top and bottom, and 3/4" square tubing at the ends. To that I welded the panel with two nice bead rolls. Hinges are simple welded tabs.
 

Attachments

  • 0319081814a.jpg
    0319081814a.jpg
    73 KB · Views: 48
  • 0319081814b.jpg
    0319081814b.jpg
    86.1 KB · Views: 48
  • 0319081815a.jpg
    0319081815a.jpg
    70.3 KB · Views: 58
  • 0319081817a.jpg
    0319081817a.jpg
    71.7 KB · Views: 51
Next was to fabricate the tailgate chain mounting and such. Then cut the axle clearance openings, and have a look at it on the chassis!

This is as were I am at in the build now. I will add more as I go.
 

Attachments

  • 0322081330a.jpg
    0322081330a.jpg
    90.6 KB · Views: 74
  • 0322081329a.jpg
    0322081329a.jpg
    101.7 KB · Views: 156
  • 0322081329b.jpg
    0322081329b.jpg
    114.1 KB · Views: 121
  • 0322081329c.jpg
    0322081329c.jpg
    97.7 KB · Views: 79
Looks like it is gonna be a fun build and keeping track of just how little you can do it for will fun to watch. Don't know if you are aware but a 67 Beetle is a rare duck. It will drive the VW purists mad that you cut it up.... perfect! My VW project also is/was a 67. When VW gurus hear it was a 67 they tell me how foolish it was to cut it up or they just walk away... exact response I was hoping for. I will be watching this one.
 

Latest posts

Back
Top