International L122 B Binder Rat Build

Rat Rods Rule

Help Support Rat Rods Rule:

This site may earn a commission from merchant affiliate links, including eBay, Amazon, and others.
Been studying the split windshield a little more and the pinch weld looks pretty flat from the center you added out to about 1/2 way to the A pillar. I think with your sheet metal skills, you could do some fabricating and cheat that pinch weld on the outer portion (or even cheat a little on both the inner and outer part) and make those openings accept flat glass... Might want to cut a flat luan plywood pattern and play with it. Keep at it man. It's cool.
 
It drives!!!

https://youtu.be/yQ5pjQATsgE

Pretty freakin excited about this.
Sadly, I'm a few days away from the 6 year anniversary of starting the project :/

But still.

I'm even more excited that it appears everything works the first try!
I have leans on the inlet/outlet for the trans though. Apparently I have the wrong fittings for the 47re. I'll need to do some research to see what these are supposed to be.

Still a long list before its road worthy, but it's getting there.
 
I watched your build videos as well as the first drive. You should be proud of the job you did. Very innovative.
 
I just had to make one more video. Here's a picture from the video :D


https://youtu.be/_kH5CuqkV0E


Now, with that behind us......back to work.

I and to move the radiator and intercooler forward 1" to gain clearance at the crank pulley. Doing this messed up the holes alignment in the top of the grill shell. Also, all the haphazard welding warped the top pretty badly.
I ended up cutting out the top to relocate the radiator and intercooler.
Here you can see how bad of shape its in


I had a couple options. Cut the whole top out and start over, or skin it. I opted to skin it with aluminum sheet.
I snagged a piece of 1/4x24x24 to work with.

I made a paper template and came up with this.


I roughed up the surface a bit. (After working through the next few steps, I don't like this finish. I wish i would have done a straight brushed loo.pk with straight lines. But I'm not RE-doing it now. You'll see why in a moment :) )


With that done I needed to secure it.
I decided to go with normal pop rivets.
Lots of them.


These ones have clearance issues with the radiator and intercooler below.


I set the rivets, cut them down, then used the tig to secure them.


One thing I should mention.......I LOVE tig welding!

And now for the rest. Ugh. This is gonna hurt isn't it?!


Ain't half bad I think.


With that behind me, I needed to get the cooling system in order.
After fighting the hoses for a couple hours, I got the hooked up. Figured I better test with air prior to filling to make sure we're set.
It held 20 psi, so I'm confident it's a winner.


Tonight I figured I should make the overflow tank.
I bought two old fire extinguishers at a swap meet a few years back and had planned on using one for this. I can't take credit for the idea, I've seen it somewhere.

I forgot to take initial pictures, but you get the idea.
Here it is with the top pulled and the first bung going in.


Here's the top and guts. This thing was nasty bad inside!
I ended up holding vinigar in it over night, then tossing in a dozen bolts and shook the crap out of it to get everything to break up. Then rubbed down with a scouring pad. Cleaned to clean metal inside.


Plugged to test with water to see if they hold.


The last one is the inlet for the tank, the smaller one is for a sight gauge.

And here is the finished product.
I need to put some clamps on the hose, but it's pretty much there.
I'll mount it to the grill she'll right behind the headlight.
It has a small "filler" bolt in the top that I drilled a tiny hole in for ventilation.


Next, interior wiring.
Probably won't be many pictures of that because.......well.......its wiring.
 
Been plugging away at little stuff.
The last big cruise that happens the first Saturday of every month is next month. I've failed to make it to the other two shows I really wanted the truck in, so I'm pushing hard to make this one.
I got the bed sides sectioned to raise the fenders up for tire clearance.


Original


Marked out to cut


Brooke is hangin out playing in her fort (the two rear fenders leaning against each other)


Cut out


Back together.....
Except
HOLES! Giant freakin holes!
I don't know how I do this sometimes. Measure, measure, measure, and still screw it up.


Raised up a bit.


Passenger side turned out much better.
 
Time to actually mount the bed (instead of relying on clamps to hold it on) :)
When I installed the panhard bar, i centered the axle between the frame at ride height. I got it to within a 16th of inch. But I noticed the tire was closer to the inside of the drivers side fender than the passengers side.
I figured it was just poor original bed floor mounting that I did with the original smaller tires and brushed it off.

I also noticed when it was parked outside, from afar, the body lines weren't matchingup very well. The cab line was almost 0 to the frame, but the bed rails were closer to 3-4* down. It was throwing the whole truck off. Looked like the center was sagging. So rebuilding the mounts was in order anyways.
Now that I'm re-doing the mounts, I found the bed wasn't exactly centered on the frame, which accounts for some of the tire/fender clearance issues. But once I got it exactly centered, there was still almost 1" difference in clearance from one side to the other!
I measured the axle in 4-5 different places on each side, it's centered. Measured the bed in 3 different places, it's exactly centered, yet I still have 1" less clearance on one side at ride height!!l! :mad:
Oh well. I don't know why it's so much.
Moving on.


Rear lights!
:D
I had picked up some lights out of some 70's Ford station Waggon I was planing on stuffing into the rear fenders. But they just look out of place. I suppose 70's is just too new to fit the style of the truck.
I opted to go with tried and true trailer lights.


One hole, two hole, three hole, more holes!


Testing function


I opted for these things vs standard Ines because I wanted bright light. These are so low down, I needed them to be bright and visible.
The "halo" is the parking lights, and the centers light up for brake/ turn.
They sure are bright!

For the front, I'm utilizing the headlights for the turn/park lights.


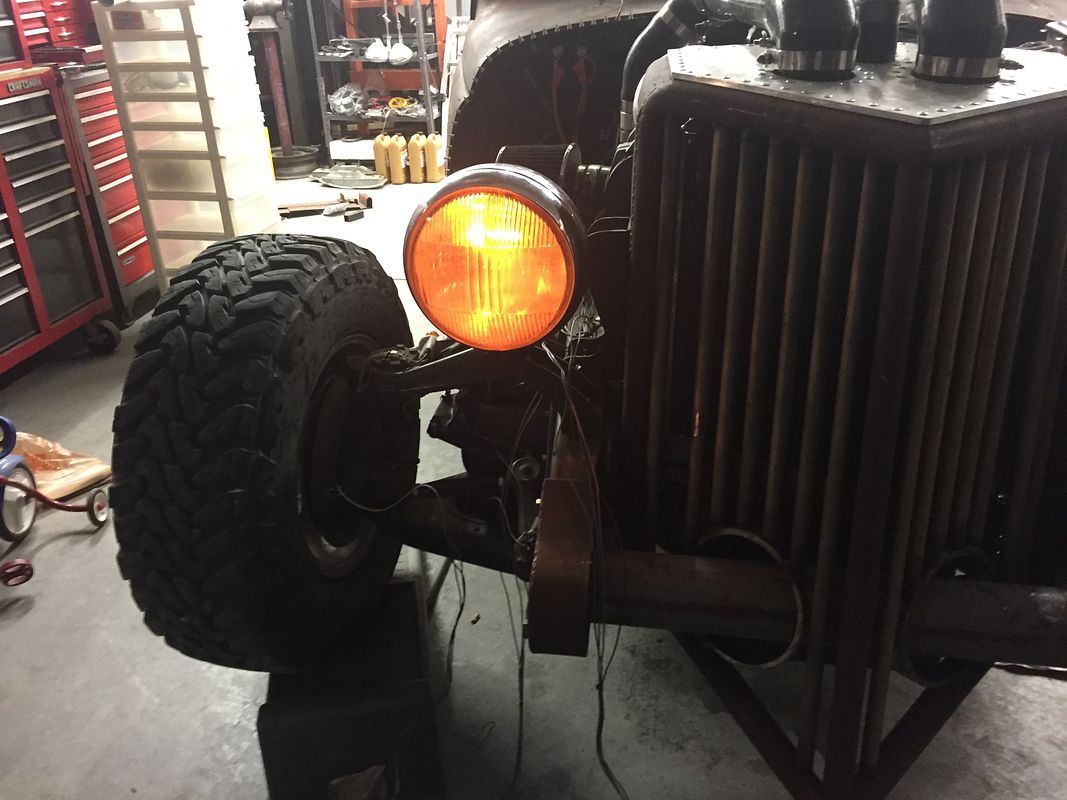
I really like he yellow parking light look. Gives it that old timey feel :)

I don't know the legality of having a flashing amber headlight as your turns, but I'll find out soon enough :)

I am going to retrofit projector housings (NOT HID's) into the original reflectors in order to gain better headlighting, since I live in the country.
The hopes is that I can maintain the old '35 Chevy headlight look, and still have better lighting.

I know the deavaetions on the original glass lens will distort the projector beam a bit, but I'm hoping that will be minimal.

Those are supposed. Show up tomorrow, so hopefully tomorrow night I can wire those up. I think it'll be a neat look.
 
Nice stuff, thanks for showing us.

I often seem to have a difference side to side in something, like you're having with the tire clearance. Often it turns out to be small increments in several areas that add up. Maybe the offset in the wheels are 1/8" off, one brake drum is a little thicker, and a tire is a little wider. Sheet metal on those old vehicles is always different from side to side.

The good thing is that after you quit measuring it, you'll forget all about it.
 
Got the projectors today.
So here we go.

These are Bi-xenon projectors, tho I'll be using halogen bulbs in them. H1 bulbs to be exact.
Those who aren't familiar with bi projectors, they use a single filament bulb, and when you flip on the high beams, a small shield flips up.
The sheild is what creates the cutoff to aid in blinding passing cars.
You can see this feature work on projectors when you are approaching a car, typically one up a hill slightly, and their ungodly bright lights make you want to stab your eyeballs out with a sword. And about the moment to can't take it anymore, and you reach for the high beam switch on your car to tell the moron he's not the only one on the road, BAM! Their lights go dim.
Usually this isn't them realizing that you pay taxes too, that's the transition from below their beam cutoff, to above it. It's usually a pretty sharp line.

I opted to use these just because it's easier to make high beams work with one bulb.


I had to drill a 7/8" hole to mount the projector.


I installed it temporally in the houseing and found I was about 3/8" shy of being able to install the original glass and ring.
I was planning on buying some brass tube and plate and tig brazing the extension on, but with only 1/2", I figured I could work with that.

I ended up drilling the hole out to 1 1/2" to let the back of the housing project slightly out of the reflector.
Then made a 1/2" thick spacer to mount the projector.


All buttoned up, here is the result. This is one headlight. Drivers side isn't started yet.
Low beam (note the cutoff).


High beam (with cutoff sheild removed.)


I'm stuck a bit now as the overall girth of the projector housing has blocked a lot of the amber park/turn lighting. However, the pattern in the original glass makes for a nice wide bright illumination. Here's a quick video.

I think I'll add another bulb holder on the bottom of the reflector for an additional park/turn light.
It's VERY easy to see with the headlights on, and don't thing visiability will be any issue at all.
https://youtu.be/UoH7kLRvXNc
 
So about the High/low selection now.
So, as normal, I have 1 wire for low beam. One for High beam.
The bulb is one filament. So, naturally, I hook up low beam power to the bulb. Easy right?

Now, the high beam in the headlight is just a small solenoid that flips up the cutoff sheild. It needs positive and negative.
If I hook the high beam to this solenoid, and press the selector on the floor, the sheild opens, and bulbs turns off, because the high beam is on.

Is there an easy way to setup power sowhen I hit the high beam, power is supplied to both high and low at the same time? But no power to highbeam wire when low is active?
I know a diaode could accomplish this, but I've never wired one in before. And I know I'd have to modify the switch internals somehow.
 
Is there an easy way to setup power so when I hit the high beam, power is supplied to both high and low at the same time? But no power to highbeam wire when low is active?
I know a diaode could accomplish this, but I've never wired one in before. And I know I'd have to modify the switch internals somehow.

If'n it were me I would just take the low beam circuit out of the dimmer switch and run it to the light directly. The dimmer is just a 2 pole switch if I remember right. Just use it as s simple switch for the high beam shutter relay. Clear as mud?[P
 
If'n it were me I would just take the low beam circuit out of the dimmer switch and run it to the light directly. The dimmer is just a 2 pole switch if I remember right. Just use it as s simple switch for the high beam shutter relay. Clear as mud?[P

That's exactly what I did.
Bama mentioned the same thing on my other thread. Simple fix. I think I was up too late trying to overcomplicate it :)
 

Latest posts

Back
Top