Party Rat Study

Rat Rods Rule

Help Support Rat Rods Rule:

This site may earn a commission from merchant affiliate links, including eBay, Amazon, and others.
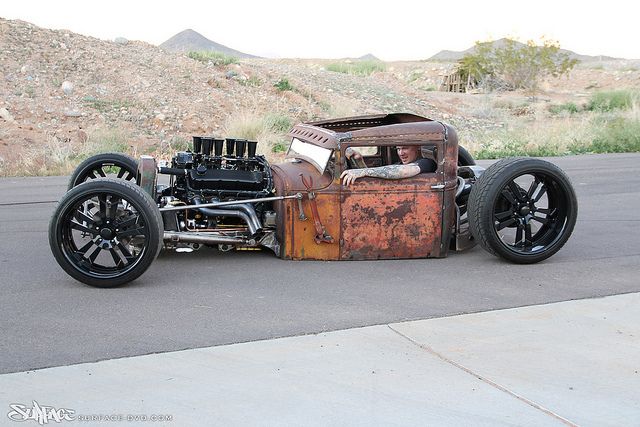
For those of you not familiar with the Partyka Rat here it is:


1deac0c42cf52507b7acf1de7943562f.jpg

Apart from those horrendous wheels, it is as cool as hell. [cl
 
Thanks to all you Vets this Memorial Day, I appreciate your service.

I had planned to get the rear axle installed but decided it would be better to get the engine and transmission installed first and then align the rear axle off of that instead of the other way around so I ordered some engine mounts and a transmission cushion and am waiting on those. I did get the rear airbag mounts welded in.

Damn, I desperately want to go out and build something just like this right now!
 
A little more progress getting the engine/trans mounted. This is a cross-member that had to fit just in front of the trans pan. A lot of time for this little piece!
 

Attachments

  • trans crossmember.jpg
    trans crossmember.jpg
    117.4 KB · Views: 53
These show the second step of four step plan for structural members to connect the rear subframe with the front frame rails. These pieces angle around the transmission and will hold the transmission mount right where they start to angle apart. There is a temp crossmember across all four rails right now. These 'angled' rails are again 3/16" wall.
 

Attachments

  • upside down.jpg
    upside down.jpg
    101.6 KB · Views: 75
  • rear.jpg
    rear.jpg
    100.4 KB · Views: 72
Last edited:
Here you can see one temporary crossmember holding the transmission mount bracket in its location. I couldn't quite get the final crossmember finished to hold that bracket as an odd July rainstorm ended my progress for the day but that will be the last piece to have the engine/trans mounting fully complete.
 

Attachments

  • front.jpg
    front.jpg
    83.6 KB · Views: 46
I finally have the engine and transmission mounts completely done. It wasn't much welding but a lot of setup time to get everything in position and being super fussy about leveling. I got the frame to within .05 degrees of level every direction so hopefully the time pays off in the end without anything looking too crooked. Here are some pics of the setup and some of the transmission crossmember and cushion in place.
 

Attachments

  • mountsetup.jpg
    mountsetup.jpg
    123.3 KB · Views: 64
  • crossmember3.jpg
    crossmember3.jpg
    112 KB · Views: 66
  • crossmember2.jpg
    crossmember2.jpg
    114.2 KB · Views: 69
  • crossmember.jpg
    crossmember.jpg
    122.2 KB · Views: 67
With the engine/transmission in I have the tailshaft angle of 4 degrees down and am able to get the rear axle installed. Here is a pic of the 4 link brackets welded onto the axle. Not many pics for this part. Next up will be welding the watts link setup to the rear axle. I'll try to remember to have more photos for that.
 

Attachments

  • axlebrackets.jpg
    axlebrackets.jpg
    79.8 KB · Views: 51
Here is the watts link going in. Tack welded everything to make sure it works smoothly and it does with the jack moving it. I'll finish welding it and hopefully it works when there is weight on it. I'm close to being done with the rear end! Just have to add some bump stops, reassemble the axle and mount some shocks.
 

Attachments

  • IMAG0567.jpg
    IMAG0567.jpg
    95.2 KB · Views: 63
  • IMAG0571.jpg
    IMAG0571.jpg
    98.4 KB · Views: 65
  • IMAG0568.jpg
    IMAG0568.jpg
    93.5 KB · Views: 63
  • IMAG0569.jpg
    IMAG0569.jpg
    77.7 KB · Views: 63
  • IMAG0570.jpg
    IMAG0570.jpg
    98.9 KB · Views: 63
Some further progress. Here is watts linkage all welded up solid. It works smoothly, really happy with how it came out.
 

Attachments

  • wattsright.jpg
    wattsright.jpg
    60.8 KB · Views: 61
  • wattsleft.jpg
    wattsleft.jpg
    66.8 KB · Views: 58
I got a piece of 2" by .25" wall DOM tubing and it took me a long time to find someone that was able to bend it. Finally found a custom shop near me that was able to do it. This piece is one of the main strength members for the center frame section.
 

Attachments

  • 2DOM.jpg
    2DOM.jpg
    47.1 KB · Views: 63
  • Frame3.jpg
    Frame3.jpg
    104.8 KB · Views: 74
  • Bent2Dom.jpg
    Bent2Dom.jpg
    95.8 KB · Views: 60
I cut a piece out of 1/4" plate and some support gussets to attach the 2" DOM tub to behind the engine for the front and the rear of the tubing is attached to the top of the rear subframe. (sorry the one pic ended up sideways...I don't know how to rotate it!)
 

Attachments

  • BackEnginePlate.jpg
    BackEnginePlate.jpg
    99.1 KB · Views: 63
  • UpperShock.jpg
    UpperShock.jpg
    90.2 KB · Views: 58
I've also got the rear shock mounts installed. This took a lot of thinking. The tops are supported with the 2"tube structure and are set angled out and also tilted to follow the arc they make. I had to get creative with the bottom mounts due to the amount of articulation and the inward angle the shocks would be mounted at. After much design and redesign I ended up fabbing up some brackets to mount on the lower 4 link bars that will hold a 1/2" bolt parallel to the bars. I then bolted a U-shaped shock mount at 90* to the brackets with a nylon washer to help avoid binding. I know they are angled inward quite a bit but I need the clearance for the airbags. I'm using Bilstein shocks and at this point I'm very happy with how it came out. It seems to work smoothly and does not bind and it is unique as far as I can tell...couldn't find anything like it! Might be a total loser once I get it on the road time will tell. Hopefully the pics will make it clear what I did.
 

Attachments

  • shockinstall.jpg
    shockinstall.jpg
    89.5 KB · Views: 63
  • LowerShock2.jpg
    LowerShock2.jpg
    124.5 KB · Views: 62
  • LowerShock.jpg
    LowerShock.jpg
    101.4 KB · Views: 59
  • wattsleft.jpg
    wattsleft.jpg
    66.8 KB · Views: 55
  • Shockmount.jpg
    Shockmount.jpg
    63.3 KB · Views: 57
Last edited:
I'll get some pics of the entire rear end together (with airbags & shocks in) to give you all and idea of how it all fits together.

Next up I've got to pull the engine/trans and do a bunch of finish welding and and some cleanup of a few areas then on to the front air-ride shocks!
 
One more thing before pulling the engine today. Had to connect the tubing with the bottom frame section. Spent some time deciding what I liked then cut out some brackets from 1/4" plate to weld at the tube bend. Due to the bend there was a gap so I cut a groove in the plate and hammered it to shape so no gap.
 

Attachments

  • 0105171454_resized.jpg
    0105171454_resized.jpg
    59.6 KB · Views: 45
  • 0105171454a_resized.jpg
    0105171454a_resized.jpg
    51.1 KB · Views: 45
  • 0105171457_resized.jpg
    0105171457_resized.jpg
    66.3 KB · Views: 45
  • 0105171504_resized.jpg
    0105171504_resized.jpg
    94.1 KB · Views: 50
Thanks for the encouragement guys. Got the engine/trans pulled and did some garage cleanup. Here are a few pics of the (almost) completed frame.
 

Attachments

  • 0105171554a_resized.jpg
    0105171554a_resized.jpg
    81.2 KB · Views: 59
  • 0105171555_resized.jpg
    0105171555_resized.jpg
    78.9 KB · Views: 54
  • 0105171555a_resized.jpg
    0105171555a_resized.jpg
    94.7 KB · Views: 69

Latest posts

Back
Top