I'm Gonna Build A Dragster!

Rat Rods Rule

Help Support Rat Rods Rule:

This site may earn a commission from merchant affiliate links, including eBay, Amazon, and others.
Hambfrontdown018.jpg

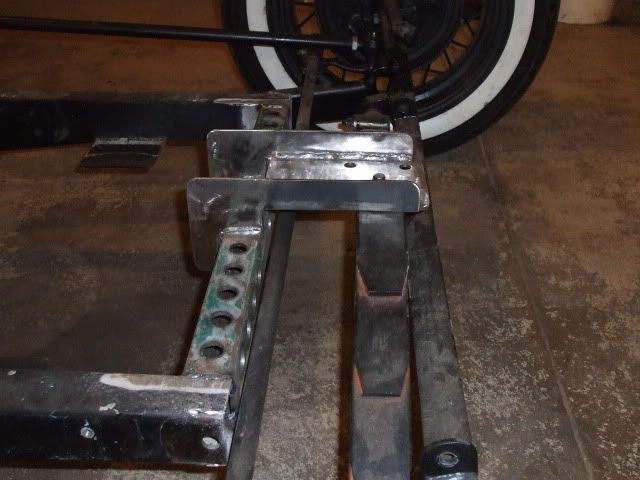
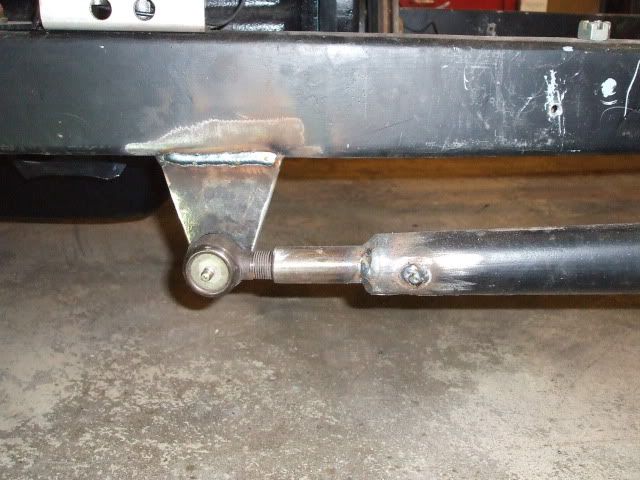
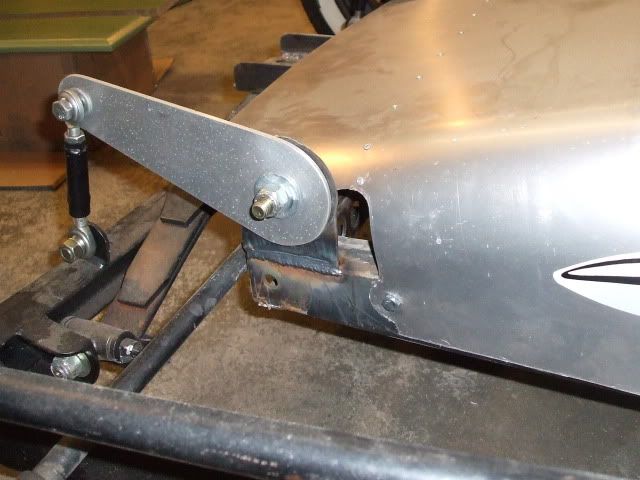
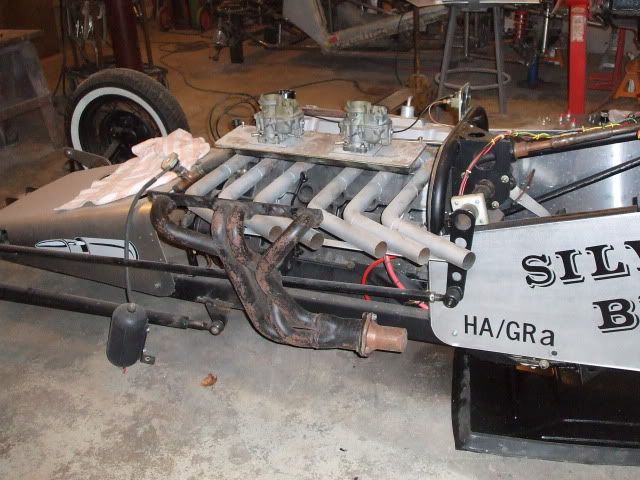
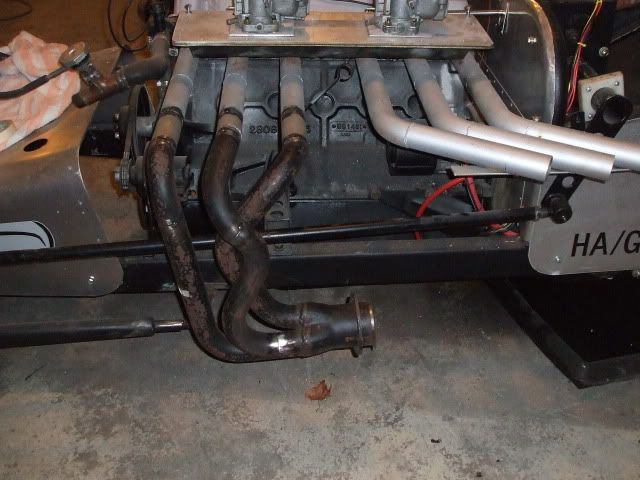
Got the front crossmember and spring perch in. It would be too light duty for street use but ok for drag racing. In the pic the tie rod is almost touching the crossmember. When properly aligned there is ample clearance. It did lower the front about 3" and make the car look more "racey".
 
Hambfrontdown017.jpg

I took the easy route and split the wishbones instead of making hair pins. Getting lazy in my senior years. Overall, it looks much better.
 
HambBones001.jpg

I was about to order some weld bungs for the split wishbones when I said to myself, "Stop! What do you think you're doing, boy? This is a mid-50's build. There weren't any bungs then". So I did it the way we used to do it. I had a nice, but somewhat bent tie rod with early Ford tie rod ends that my friend Jim had given to me. Made two stubs out of it. Since the hole in the wishbone is 1" and the tie rod stubs are 7/8" in diameter, that was too big a gap to fill with weld. Found a small piece of 1" o.d. tubing with 3/4" i.d. I was able to stick it in a drill press vice and drill it out to 7/8" i.d. Holes for rosette welding were made in the sleeve and the wishbone. Then it was all welded together.
 
HambBones003.jpg

The split wishbones have to attach to the frame. I made the round blank with a hole saw. The triangular plate is a quarter inch thick. Strong enough for the bracket. But the tie rod end taper should set in a piece about 1/2" thick, minimum. The round blank was welded to the back of the bracket plate then the hole was enlarged to 1/2" The tapered reamer in the pic was used to make the hole the same as the taper on the tie rod end.
 
HambBones005.jpg

The brackets were welded to the frame completing the split wishbone project. Some finish sanding and addtion of the pinch clamps and it's done. On to relocating and mounting the friction shocks.

Attention Experts: Has anybody here successfully painted over Formica? Please share your procedure. Thanks. Bob
 
Last edited:
I painted Formica about 20 years ago, in our old house.

Against my will and better judgement, I painted our kitchen countertops. I prepared it like painting a car with enamel. Cleaned with soap and water, wiped down with wax and grease remover, sanded with 320#, wiped again with wax and grease remover. I used a plastic primer from a quality supplier of house paint. (Sorry, I don't recall the product's name). Painted with an oil-based enamel (a putrid color my wife picked), and a couple coats of clear urethane. Aside from the color, they looked good, and stood up amazingly well.
 
FiatTaillights018.jpg

Relocated the friction shocks and trimmed the aluminum nose.

Thanks Doc F. I folowed your instructions. Then sprayed with Zinnzer bonding primer. The paint went on nice. I am painting a night stand/hutch for my 93 year old Mother for her room in a nursing home. My Christmas present for her.
 
DragsterIntake011.jpg

Started making adapter plates to change the intake manifold from 2 Holley 1 bbls. to a pair of Carter BBD 2 bbls. With the healthier engine going in it should need more carburation.

The con rod is used, from a pro mod engine, I believe. It's a beautiful piece of aluminum with titanium cap screws. Just a decoration now.

BTW, Dr. C, the refinished hutch came out real good. My little mama now has the prettiest half-room in the nursing home.
 
The changes look good, Bob. Bet you can't wait to try out that new mill. :D

Sounds like a nice gift that your Mom will get a lot of enjoyment out of.


Don
 
I'm glad your furniture project turned out well for you and your Mother. [cl

I've been watching this build and your Topo project, too. Nice work on both accounts.

Did you ever play BS poker with dollar bills? How about performance parts? I'll see your Pro Mod rod, and raise you a TF/FC. :D


IMG_1105.jpg
 
Bob, I swear you are the king of making really long threads that are still interesting! Just yesterday I read through your Plymmie`s build thread. Then tonight I read the Fiat`s, and the Silver Bullitt`s. In-freaking-sane :eek:

-Jake

Oh, nice dragster by the way :D
 
SeatSurgery007.jpg

One of my missions with the dragster is to make it look a bit more "period correct". The high back Kirkey bucket seat looked terrible. I had painted the upper part of the back rest flat black to make it "disappear". That didn't work well enough. A couple days ago I lopped the top of the back rest off. Then last night I saw Gastrick's interior and once again drooled over the seats. So, today I loaded a fresh wood cutting blade in the saber saw. set a can of WD-40 on the bench to lube the blade and trimmed the sides. Here's the cut line.
 
Last edited:
SeatSurgery009.jpg

Here's the seat and the pieces I sawed off. Hopefully it looks more vintage.

Johnson, Glad you enjoyed the build threads. I never know how much detail to include. I figure the experienced builders can get a chuckle out of my left handed, Polish, senior citizen techniques and less experienced builders might pick up a tip or two.

Dr. C, My friend Jim B. in Atlanta hangs out and helps out at John Kaase's shop on occasion. Jim is a machinist and a great engine builder, both for cars and racing outboards. He dropped the rod off when he visited. Waaay back in 1964 I had a set of Mickey Thompson aluminum rods in a .030" 327 sbc. That is my only experience with non-ferous connecting rods. I can't compete with you in the exotic racing engine parts contest.
 
Last edited:
DiggerLinkege001.jpg

I picked up a nasty cold. Lots of drippage. Did manage to build some carb linkage however. The BBD carbs had 5/16" holes in the throttle arms so I went with 5/16" rod ends. The linkage to the pedal on the other side of the firewall was a little sketchy so I upgraded/enlarged all that too.
 
DiggerLinkege003.jpg

Some of the other racers are telling me I'll lose .20 to .40 seconds in E.T. with my individual exhaust pipes. Years ago a guy gave me a set of sbc headers. Thought I'd see if there was any hope of using them. As luck would have it the 2nd and 4th tube of the header lined up wth the 1st and 3rd pipes of the slant 6. By moving the header forward the 2nd and 4th tubes lined up. That proved to be the better arrangement.
 
HambsterHeader004.jpg

Taking after zzrodder, but nowhere as skillfully, I sliced and diced until I got the header for the front 3 cylinders tacked together. Still need a long collector. The header for the rear 3 cylinders will have to be higher to make from for the front collector. Primary pipes are 39" long.
I took a 2 hour lunch break for the "Old Boy's Lunch" and coughed and sneezed on them much to their displeasure. Went through a box of Kleenex in the garage & generally felt like crap. But I had to see if this approach would work.
 
Well, there's something to be said for "Scavenging"

when it comes to exhaust and performance....not sure that the long tube into tube headers will do much for improving that "Scavenging" effect...but who knows, maybe you're on to something here??!! [S
 
You are right, Bob, exhaust scavenging and tuning can add some real hp to a motor. Some of the new drag cars are running mufflers and they say they run faster with them than with open exhaust. My 27 is just the opposite, when I uncap the headers it makes a totally different car out of it than when corked up.

If I even get around to building the little altered I want to do I think I will make the exhaust so I can try out different lengths of collectors to see what works best. I have heard that adding some length to the collector can improve your times.

Seat looks much better cut that way. :)

Don
 
Had a 64 GTO that was the same way....

You are right, Bob, exhaust scavenging and tuning can add some real hp to a motor. Some of the new drag cars are running mufflers and they say they run faster with them than with open exhaust. My 27 is just the opposite, when I uncap the headers it makes a totally different car out of it than when corked up.

If I even get around to building the little altered I want to do I think I will make the exhaust so I can try out different lengths of collectors to see what works best. I have heard that adding some length to the collector can improve your times.

Seat looks much better cut that way. :)

Don

found out that the primary tubes were too small....took off the hookers and put on Doug's and actually ran as fast with the headers capped as I did with them uncorked with the hookers....came down to the scavenging effect and the tube size.....sounded better with the hookers uncapped though...lol the Dougs uncorked had a less lobey / throaty sound....but it ran better both ways....simply good air in, bad air out!!
 
An old trick on our roundy round cars was to make the exhaust long, 3 or 4 feet, run it hard then look were the discoloration on the pipe was!!
And cut it there! Theory was thats where the backpressure was neutral,
and where you'd get the best effect!
Not sure I explained this correctly but it really did work!!
 

Latest posts

Back
Top