1955 Ranch Wagon Cruiser

Rat Rods Rule

Help Support Rat Rods Rule:

This site may earn a commission from merchant affiliate links, including eBay, Amazon, and others.
This may be a dumb suggestion but I had this issue on my 34 Caddy using a Speedway booster/master/pedal assy. - nothing worked including pressure bleeding - I found that it was missing a part between the master and the booster - it did move just a little, enough to pump up after several pumps. Drove me nuts trying to figure it out - could you have a similar problem with the excessive clearance on the pushrod between the master and booster?

I did check that today. But it seems to me that the master is not activating. It's worth checking again and then checking with the pedal depressed. Maybe I don't have enough travel? Thanks for the input.
 
This may be a dumb suggestion but I had this issue on my 34 Caddy using a Speedway booster/master/pedal assy. - nothing worked including pressure bleeding - I found that it was missing a part between the master and the booster - it did move just a little, enough to pump up after several pumps. Drove me nuts trying to figure it out - could you have a similar problem with the excessive clearance on the pushrod between the master and booster?

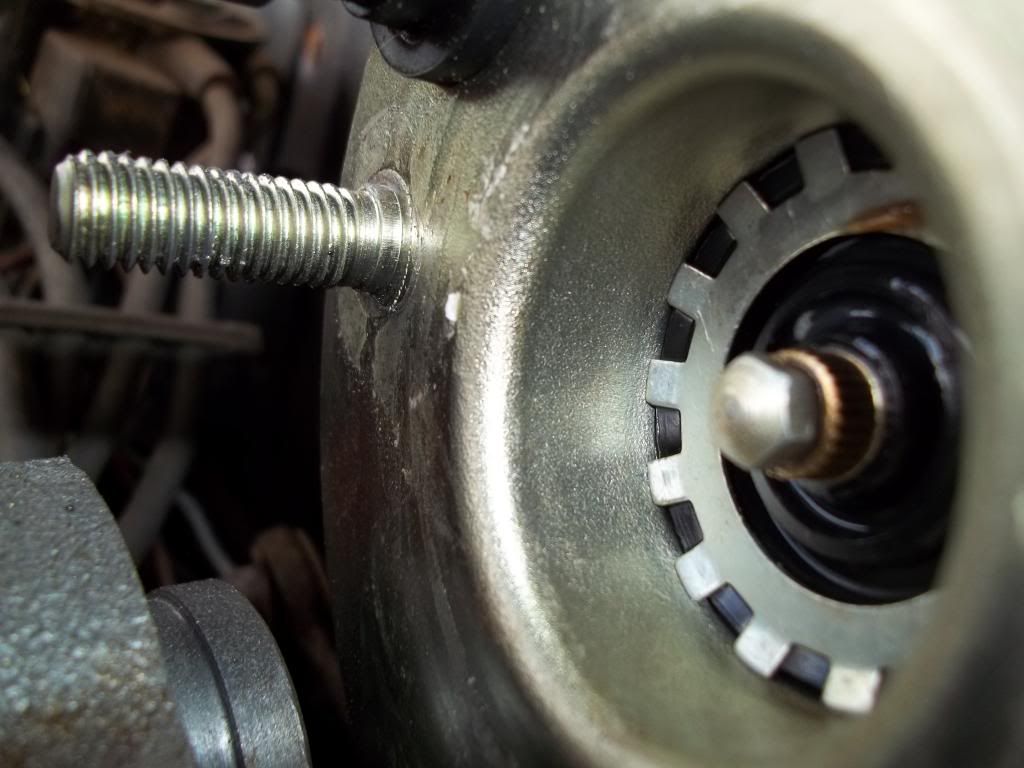
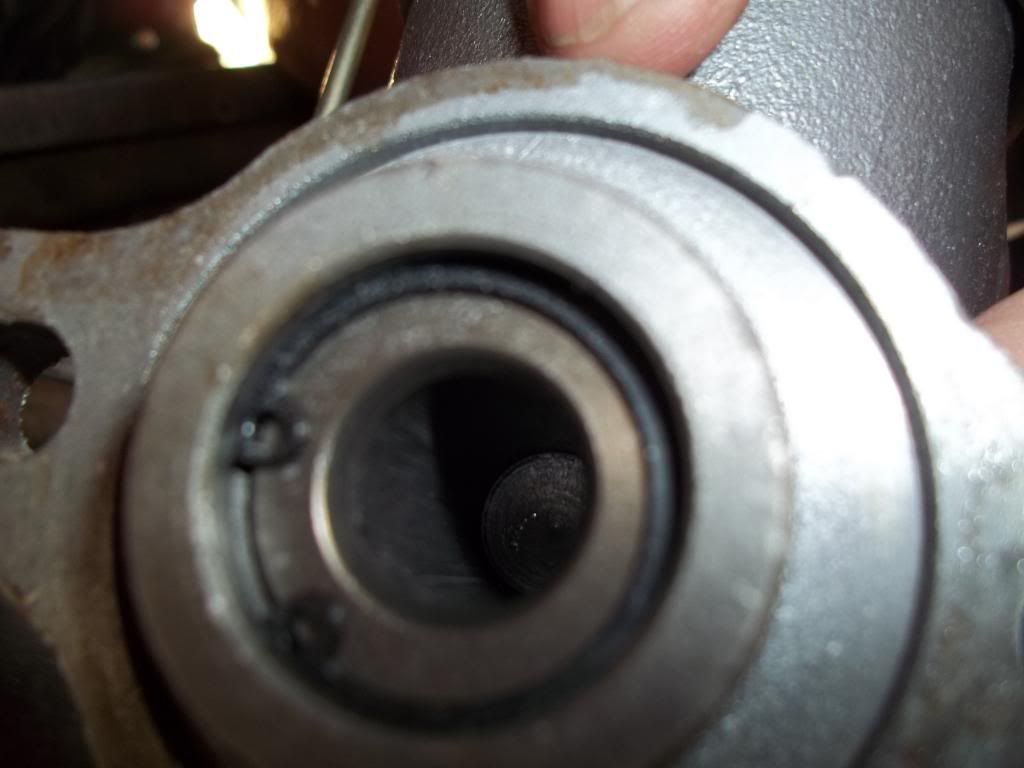
I believe you are onto something ZZ! My Speedway master/booster was missing the exact same piece! The pushrod from the booster wasn't long enough for the power style master cylinder. The difference is on a power style master cylinder, the plunger is recessed instead of being flush with the end. I found a old stripped socket that just fit loosely in the master's bore, then cut and ground it until it was just short enough for the booster pushrod to press again it. I was afraid that over a period of time the hard socket would wear the end of the booster rod off and let it slide into the 3/8" square hole in the socket, so I welded it shut, then took a drill and drilled a small dimple in the end just enough for the pushrod to sit in. After I did that, my brakes worked great. In Speedways catalog they say the Corvette style master comes with the adapter piece for disc brakes, but apparently they leave it out when you buy the master and booster together. I bought the hanging pedal with master and booster together. I didn't realize it was missing until I couldn't pressure bleed my brakes, and it had been a while since I had bought mine too, so I just made one.

Here's a few pics that show what I'm talking about:


You can see in the lower pic how far recessed the master plunger is recessed. It has to be about even with the "C" clip holding it in place to engage the booster pushrod. That's why I had to build the extension.

Hope this helps.
 
I went to SoCal Friday to get a new master. They had both types - the one with the deep recess in the piston and the one with the shallow recess. It really helped to see them both side by side. They also had the "sleeve" to take up the space in the deep recess so it can be used with a booster. The sleeve, which is a steel pin with an o-ring to hold it in, was $20. (I did get the new master - just in case. I'll be able to return it.)

When I removed the master that was the first thing I checked. I have the shallow recess master.
 
Here's a drawing of both masters and the sleeve. CPP has a really good brake system trouble shooting guide that I have been working through.
 

Attachments

  • master_adapter.gif
    master_adapter.gif
    20.1 KB · Views: 21
I made this out of clear polycarb and 1/8" neoprene so I could see if there were any bubbles. Cleaned both with alcohol and it self sealed with the vacuum. It's been on there for almost 2 hours and has held 22 pounds of vacuum the whole time. I think that is a good sign I don't have any leaks. I was thinking this would pull any air out of the master and prop valve, but I haven't seen any bubbles.
 

Attachments

  • MC vac adapter .jpg
    MC vac adapter .jpg
    117.5 KB · Views: 24
The vacuum stayed on until 2:00, when I took it off. The pedal is a little better, but not acceptable.

I ordered a reverse bleeder that should be here tomorrow. Hopefully that will solve the problem. Probably won't have another run at bleeding until Wednesday.
 
Dan
I saw in an earlier post that you started bleeding the brakes at the caliper nearest the master cylinder. I remember being taught to always start with the one fartherest away. Don't know if that would make any difference.
DK
 
Dan
I saw in an earlier post that you started bleeding the brakes at the caliper nearest the master cylinder. I remember being taught to always start with the one fartherest away. Don't know if that would make any difference.
DK

I was taught the same way! Going to the farthest first....
 
Dan
I saw in an earlier post that you started bleeding the brakes at the caliper nearest the master cylinder. I remember being taught to always start with the one fartherest away. Don't know if that would make any difference.
DK

Me too, I bled the first four times starting with the farthest rear. The post you saw was after I bench bled it and thought I'd start with the closest wheel to get any air out that was introduced when the master went back on.

I have the GM metric calipers with internal parking brake on the rear. I found out yesterday that these give lots of folks problems. (One guy was telling me his car was down for 6 months before he swapped the e brake calipers for the non e brake.) I went to several brake seller sites and printed out their bleeding and adjusting instructions. Spent 3 hours this morning trying to follow the various instructions and reverse pressure bled the whole system.

Now I have a pedal, but it's low. I think that means there is either air in the system or the parking brakes are still not adjusted correctly or both.

The reverse pressure bleeding requires a spotter to monitor the bubbles and the fluid level. The wife was helping out but she had to go to work at 10:00.
 
I had the ebrake calipers on my 33 and never did get them to work.
Had them adjusted correctly too.

Well, that's disheartening and I have heard that story from others. But, a couple other guys said they had no problem with them. I think I may be in the first category.

I worked on them this afternoon. They both lock the brakes within 1/4" of the stop, so I think they are correct. But I really don't know for sure. I have been looking for a good video, but haven't found one. The pedal still doesn't engage until about an inch from the floor.
 
Fan Shroud

While being frustrated with the brakes and needing something to to work on that would provide results I decided to build a quick and easy fan shroud.

Well, it didn't work out that way, but next time it will go a lot quicker and easier. I'll explain what I did and what I should have done.

I went to Home depot and got a gallon of resin, some fiberglass mat and fiberglass cloth. I also got some stretchy material from the thrift store.

What I should have done is gone to Sticky Stuff ( about 40 miles from my house) and gotten the resin he recommended and some heavier mat. The HD stuff is probably good for fiberglass repairs, but not so good for laying up panels. Bottom cloth ( the stuff they put on the bottom of couches) or speaker cloth is thinner and smoother and would save a bunch of time and material.

I cut a piece of plywood (3/4" mdf would have been better, but I didn't have any) the size of the radiator support, which is where I wanted to mount the shroud. My fan is 19" so I looked for something 20" and found a 20" flywheel that was 1 1/4" solid cat iron. I drew a circle on the plywood where the fan is in relation to the radiator support. Centered the flywheel over the circle and shimmed it up. Since the engine is at a bit of an angle, the top is further away than the bottom. Then I covered the whole thing in aluminum grilling foil. (photo 1).

I cut some 3/8 x 3 the height of the shroud and a piece of box tube that would fit on the bottom. The fan comes to the top of the shroud so I didn't need anything there. The fleece was stretched and stapled to the plywood. Resin applied and the aluminum wrapped pieces were clamped in place. (photo 2).

Photo 3 shows the big mistake. I should have turned it over and put the mat on the inside, instead of trying to build the thickness on the outside. After a couple layers of mat - the shape was pretty much lost. I sanded; then used long strand filler to smooth it up (photo 4). Sanded a lot more; then used short strand filler. Sanded, then filler. Then sanded some more. Another 10 hours of body work would get it nice instead of "OK painted flat black if you don't look real hard".

A hole saw cut for the hoses. A vibrating multi-tool worked really well for the cuts.(photo 5)

Then I glassed the inside (photo 6). I made the mounting holes really big and painted it.
 

Attachments

  • fan shroud1.jpg
    fan shroud1.jpg
    61.8 KB · Views: 33
  • fan shroud 3 .jpg
    fan shroud 3 .jpg
    95.4 KB · Views: 34
  • fan shroud 4.jpg
    fan shroud 4.jpg
    145.4 KB · Views: 33
  • fan shroud 5.jpg
    fan shroud 5.jpg
    52.5 KB · Views: 33
  • Fan shroud 7 .jpg
    Fan shroud 7 .jpg
    85.1 KB · Views: 33
  • fan shroud 8.jpg
    fan shroud 8.jpg
    77.5 KB · Views: 31
Fan shroud

The bottom piece was difficult to get in place until I figured out that if I removed the fan it would be really easy.

Some brackets were made to clamp the halves together and bolted and epoxied in place.

Rubber washers cushion the mounting bolts.

It really isn't the best looking thing, but I think it's going to work pretty well. There should be a piece that covers the opening in the center over the top of the radiator, but I don't have it and haven't made it, yet.
 

Attachments

  • fan shroud installed 1.jpg
    fan shroud installed 1.jpg
    62.8 KB · Views: 34
  • fan shroud installed 2.jpg
    fan shroud installed 2.jpg
    73.7 KB · Views: 34
I agree. It looks good.[cl
Another way would have been to make a plaster buck out of dry wall mud mixed with vermiculite. Use a wood rasp to shape then cover with gloss latex paint. Lay up your mat and once dry knock out the plaster.
That's the way the Ed Roth used to build his show car bodies.
Good to see you moving forward. Hang tough on the brakes as that seems to be a problem area for more then one build.
I have no doubt that you will solve it.
[P [P [P
Torchie
 
Iv'e seen worse from the factory .. seriously that looks fine.

Thanks - the photo doesn't show the sanding scratches and the uneven thickness. In reality it probably does look better that the factory stuff they're doing these days.

I agree. It looks good.[cl
Another way would have been to make a plaster buck out of dry wall mud mixed with vermiculite. Use a wood rasp to shape then cover with gloss latex paint. Lay up your mat and once dry knock out the plaster.
That's the way the Ed Roth used to build his show car bodies.
Good to see you moving forward. Hang tough on the brakes as that seems to be a problem area for more then one build.
I have no doubt that you will solve it.
[P [P [P
Torchie

Thanks, Torchie. I think I have the brakes working. For sure I figured out the problem, it's the rear calipers with the internal emergency brakes. I wish I'd researched them before I bought them. I'll do a write-up on it in the next couple days once I'm sure they're right.

I still need to get the clutch working (I hope it just needs to be bled some more) - then I'll be ready for a drive.
 
Clutch

I determined that the bracket I built to the manufacturer's dimensions actuated about 60% of the master cylinder stroke. So I built another bracket and moved the upper pivot to clevis dimension from 1.5" to 2.5". Had to reshape the clutch pedal to keep it even with the brake pedal.

So, with all that done, I can feel and hear the clutch releasing. The sound doesn't sound good though - kind of a clunk and scrape. Maybe it's traveling too far? Or? I have a friend coming by today who might know the answer. At least he can push on the pedal while I look at the clutch.
 
clutch

There is definitely a major problem with the hydraulic release bearing or pressure plate. The transmission will have to come out. :(

On the plus side, my friend pronounced the brakes OK - probably.

We started the engine and the fan shroud looks like it will work well.
 

Latest posts

Back
Top