40 Studebaker build pics

Rat Rods Rule

Help Support Rat Rods Rule:

This site may earn a commission from merchant affiliate links, including eBay, Amazon, and others.

RoddingRon

A man in his natural habitat....a Studebaker
Joined
Dec 8, 2007
Messages
1,626
Location
Lehighton,PA
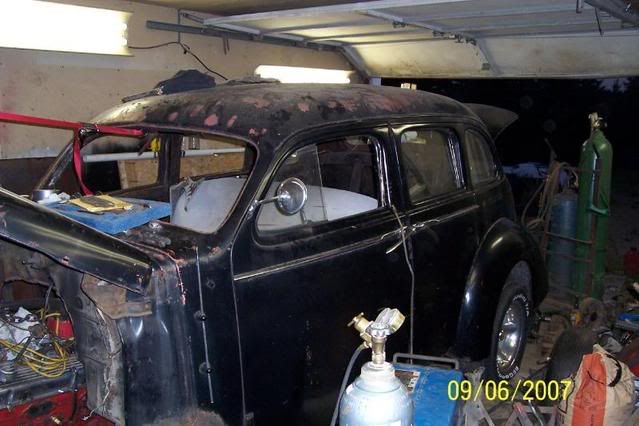
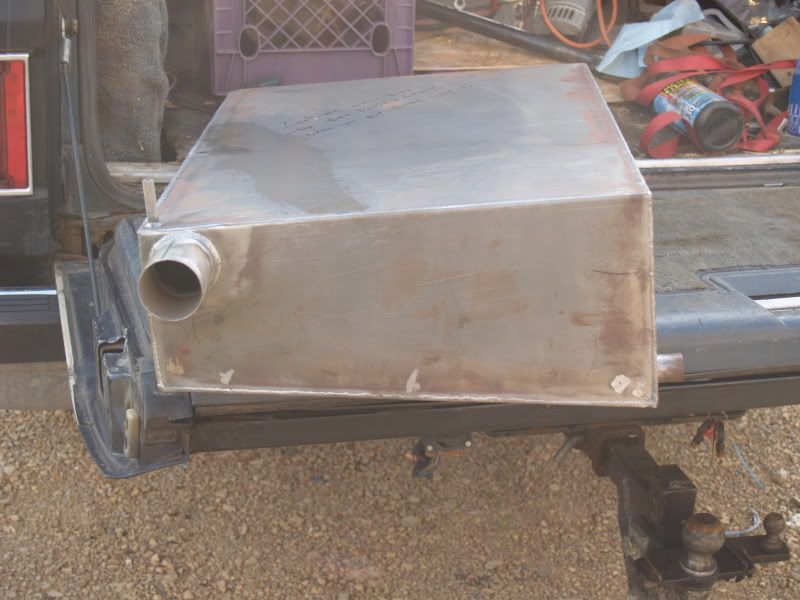
OK...since I'm new here, figured I'd show what I started working on...hopefully it will be on the road by spring (long as I can scrape together a few extra bucks between now and spring). I'll say this up front..it's a down and dirty / low buck (more like no buck) build. BUT...because I'm the safety chairman for the car club I belong to...IT HAD TO BE SAFE...no compromise in that department. Most of the money I'm spending on this one is mostly for safety related items...and if I can get on my soap box for a second...Safety should be the first and foremost concern when building any kind of toy that would be welcome on this board.

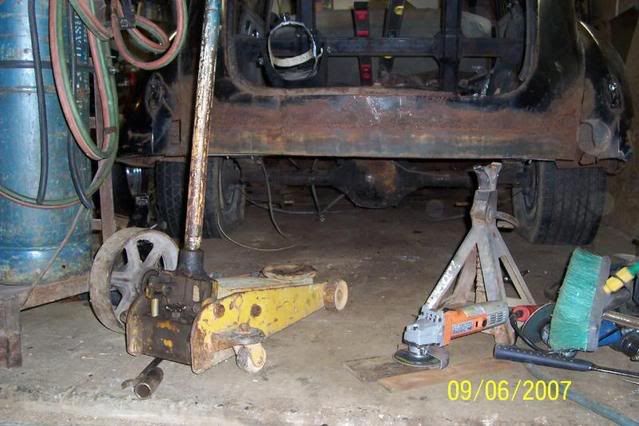
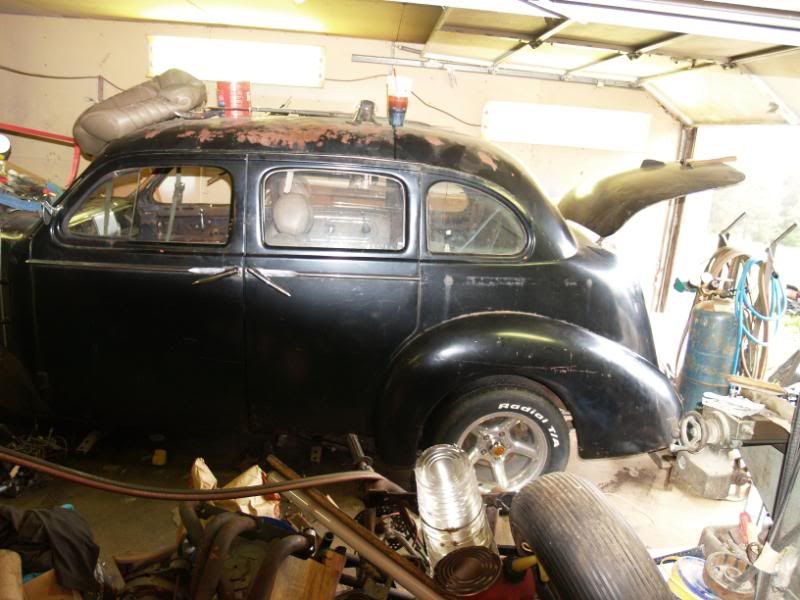
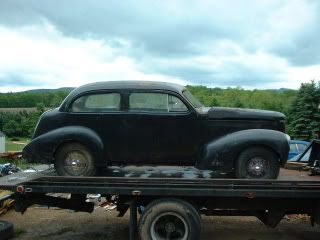
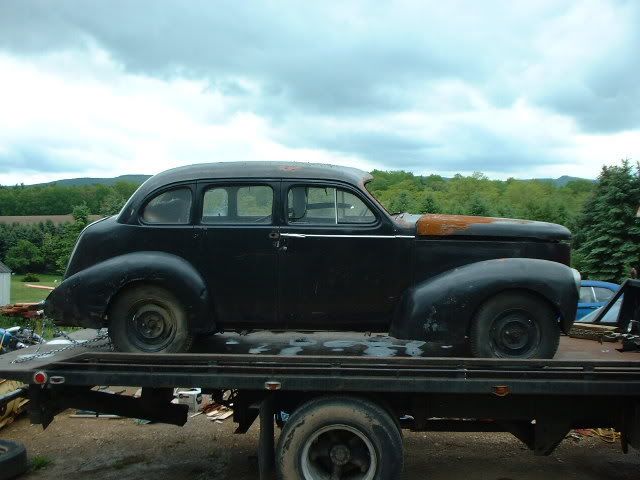
I started with a 400 buck Ebay buy. A 1940 Studebaker Commander 4 door sedan.

Picture008.jpg


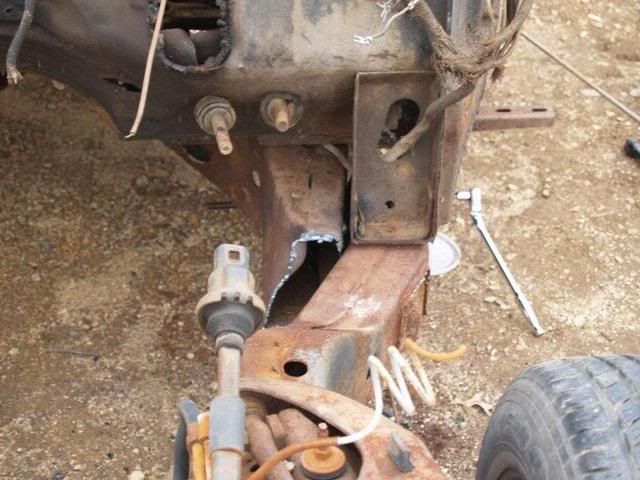
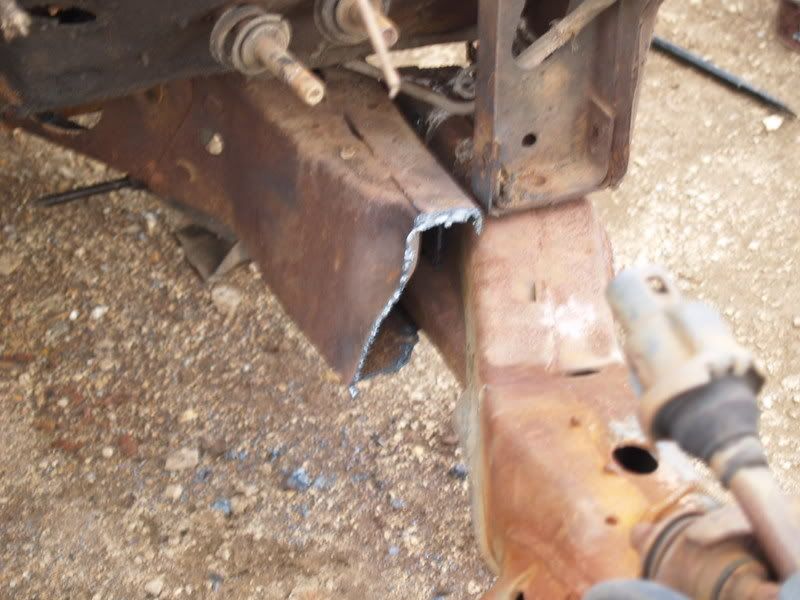
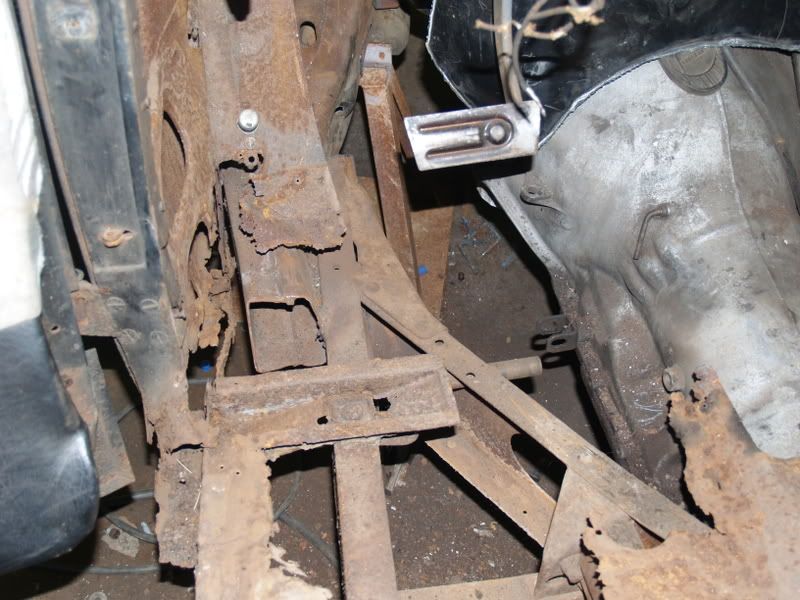
I was thinking about parting it out and use the money for another project, then I put it out for possible trade, but no interesting options happened, so I figured what the hell... and cut the front suspension off the stock frame (it had what they called a "planer" suspension...one of the first independent front ends, but not what I wanted for reliablity and safety)

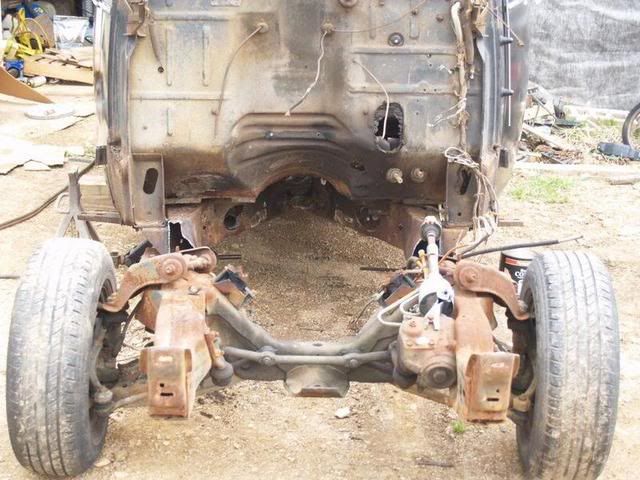
Here's the stock suspension before my brother in law and I started cutting

P4280200.jpg


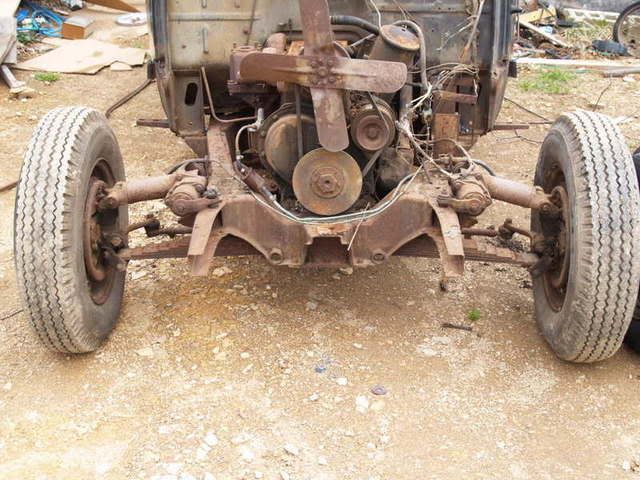
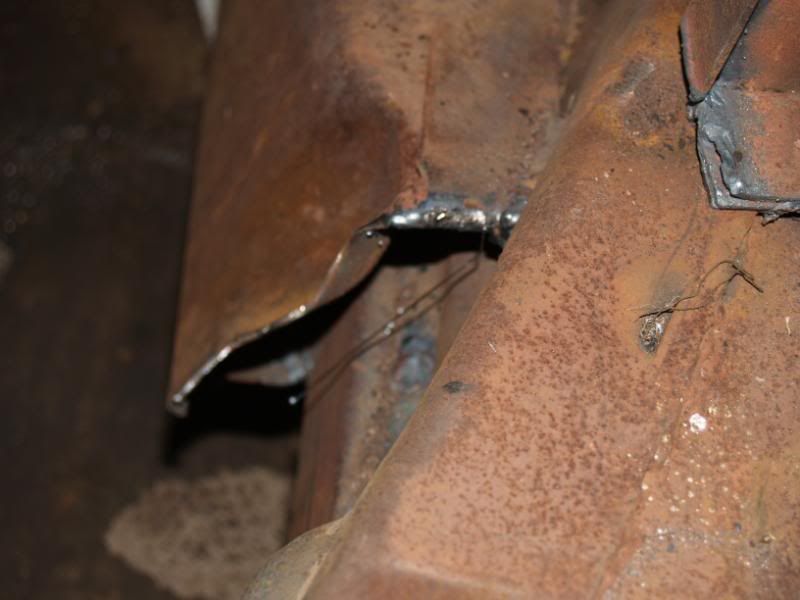
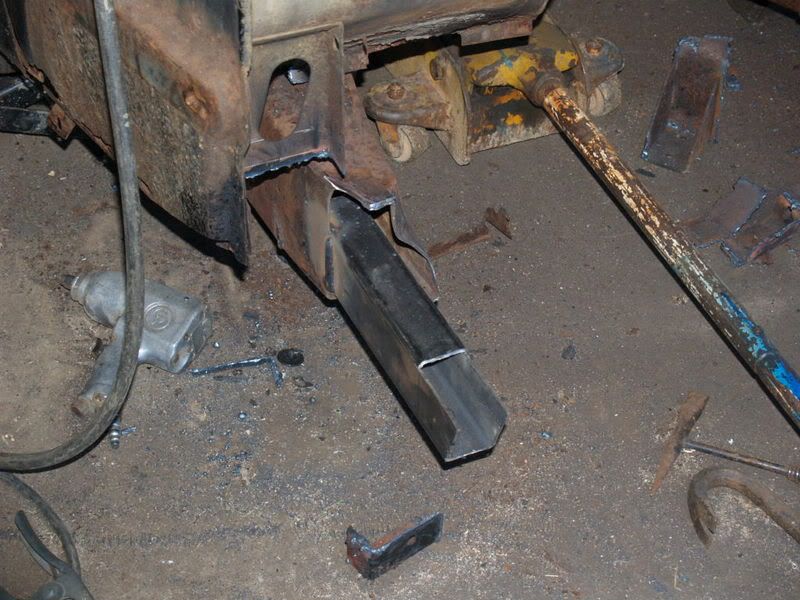
and here it is afterwards

P4280206.jpg


Yeah, I'm sure some of you are looking and thinking to yourselves I must be an idiot for cutting it apart on a dirt driveway, but as primative as it looks we actually had everything squared up and braced before we started cutting. We also had taken a bunch of measurements and had a factory service manual with factory dimensions for reference. Believe it or not when we got it rolled inside on the level floor (after it was cleaned out to make room for the car) we double checked all of our measurements and everything was right where it should be... the worst any measurement was out was less then 1/8 of an inch.

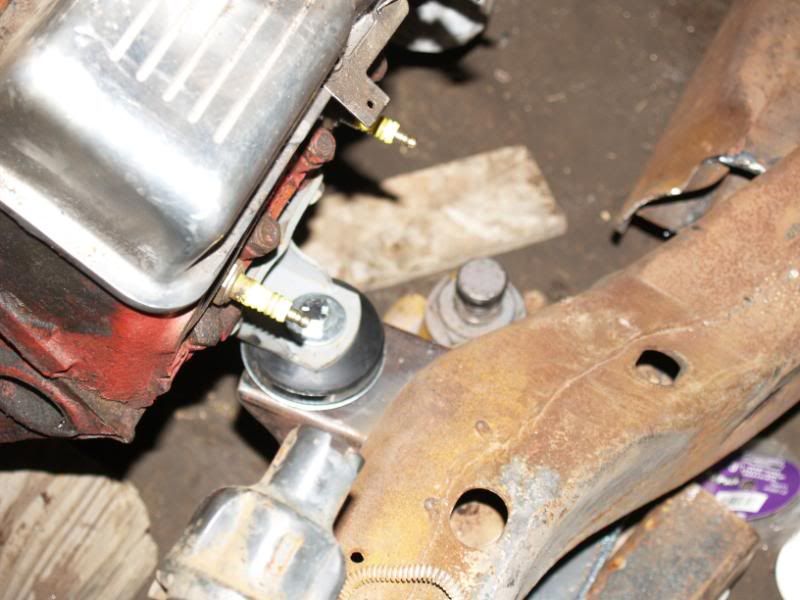
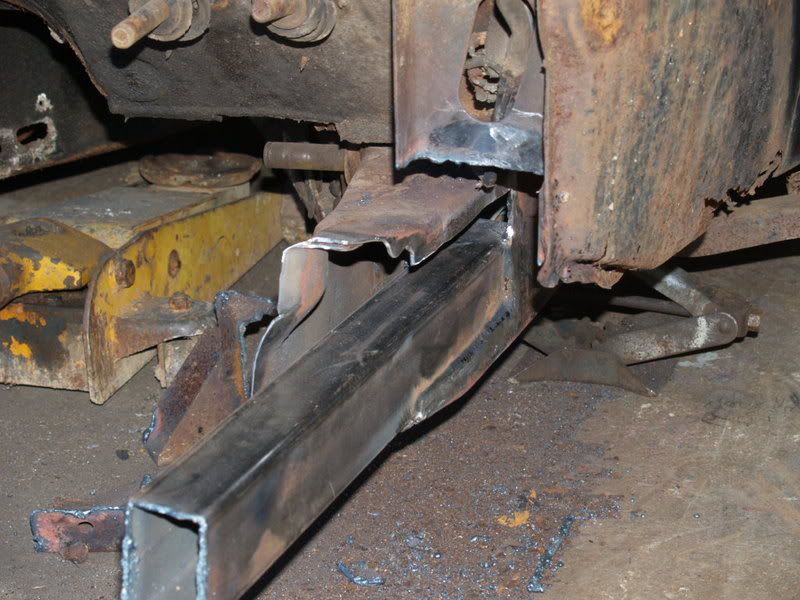
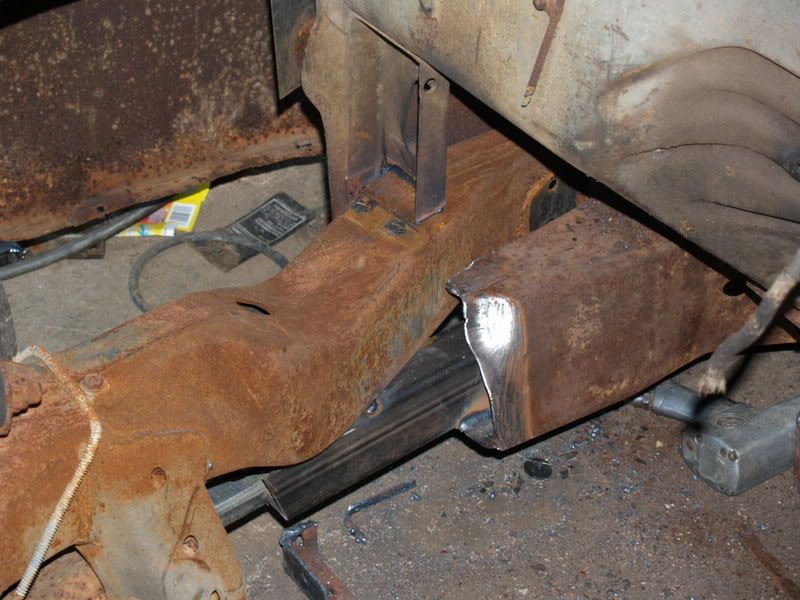
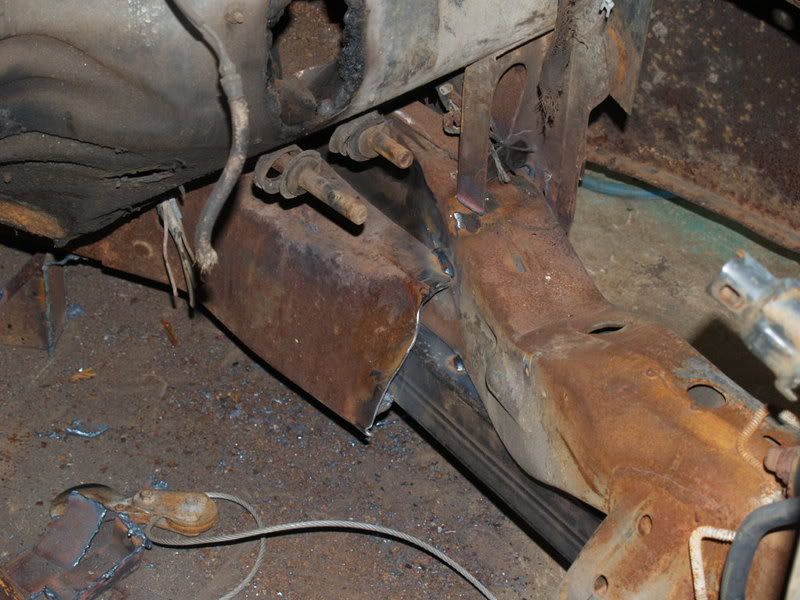
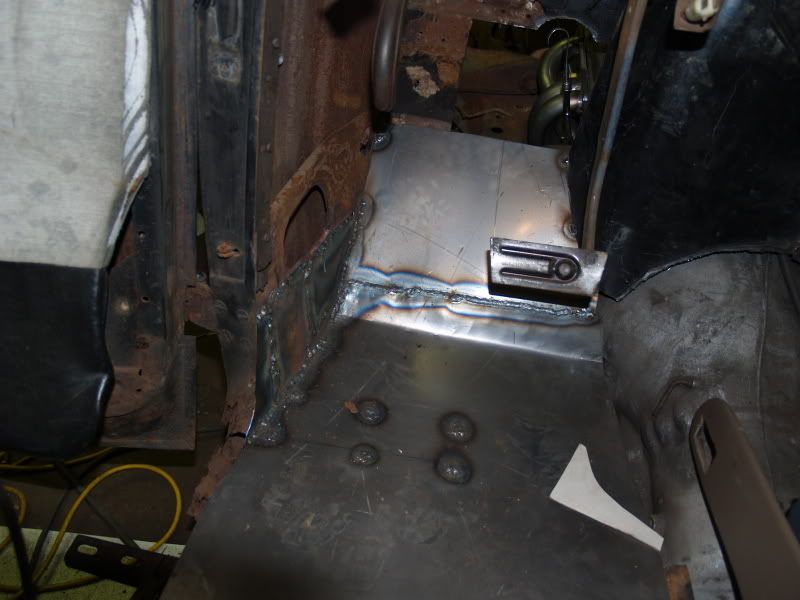
Once the stock stuff was out of the way, I rolled an S-10 front sub frame under it that I had laying around. A Camaro or Nova sub probably would have worked better, but the S-10 unit was what I had at hand and it had a factory disc brake set up I wanted. As a side note...the front of the S-10 fram has these ugly looking brackets for the factory bumper to mount to....they got cut off and when I needed front spring mounts for the rear end...they got recycled. They actually worked out pretty good for the front spring pockets and fit up in the factory frame where we could weld them up good and solid.

P4280209.jpg


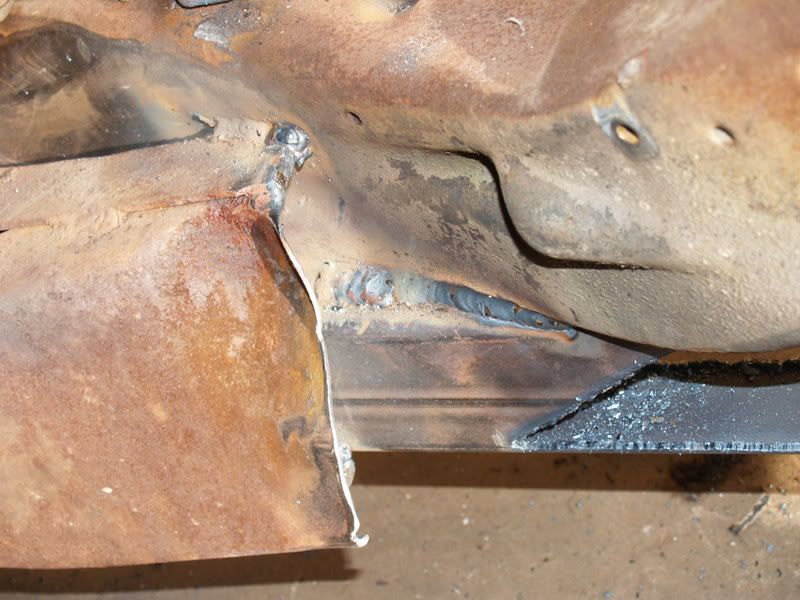
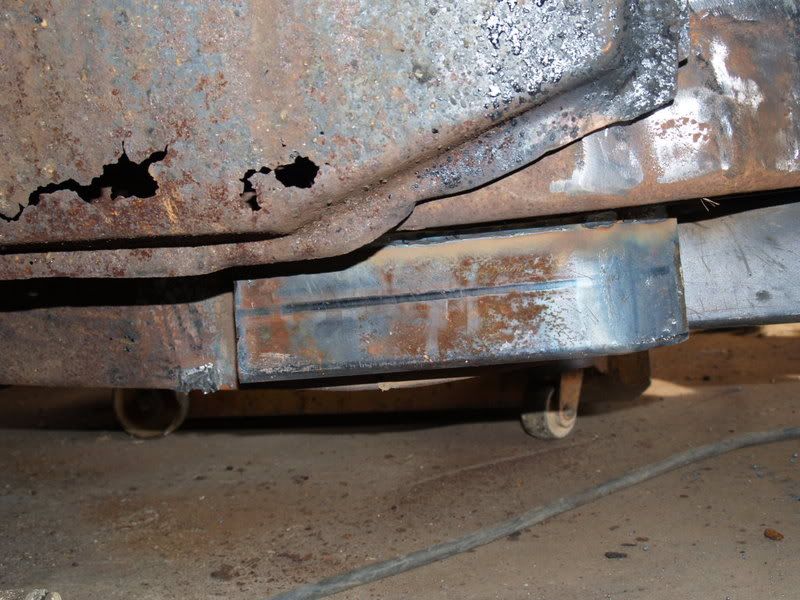
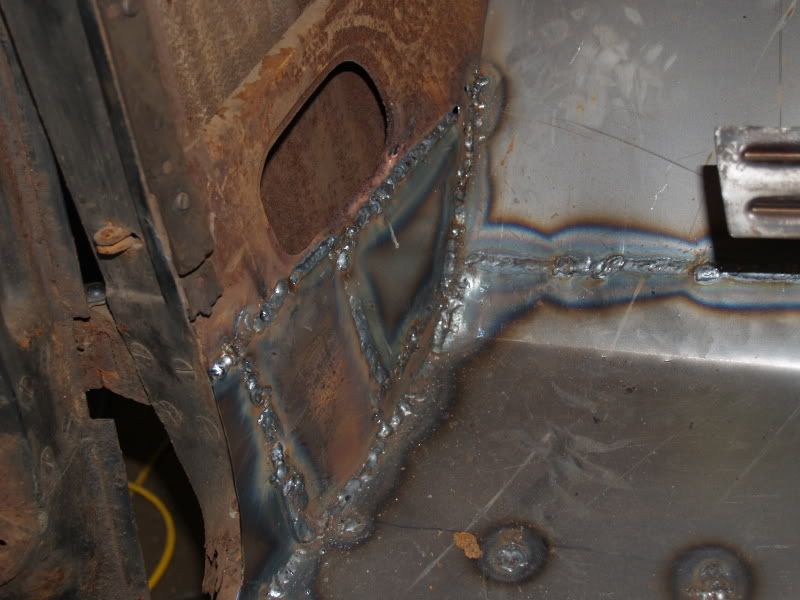
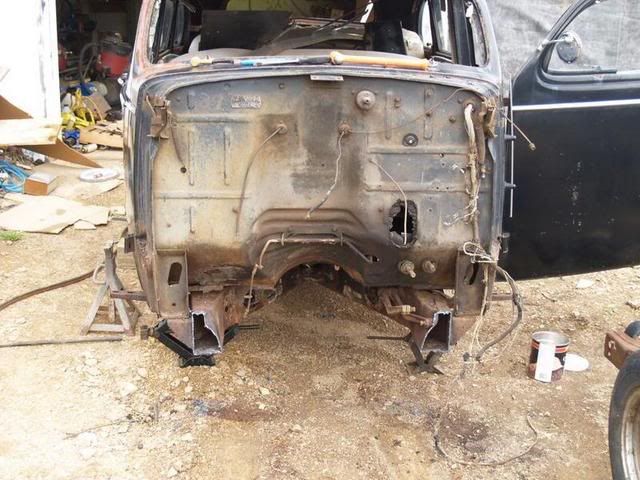
Once everything was measured and trimmed (and we figured out how to make the two come together the best way) we tacked the sub to stock frame and started the bracing tying the two together. The S-10 sub has a formed flange on the drivers side that points inboard, where the transmission crossmember bolts to. This worked out to our advantage. We measured the thickness of the flange and cut the stock frame so that the flange would slide into the stock frame. Also, we were able to slide a 2x3 tube into the factory frame on both sides and they helped support the S-10 sub from underneath. I have some good shots of the way everything fit together and how we welded everything up as it was going together...BUT they are on the hard drive of my other computer and I didn't get them up loaded before the motherboard took a crap. Once I get another mother board I'll get them up loaded to my photobucket account where I'm trying to keep all of the pics so they are available.

Anyway, I'll start typing on the next post so I can include some more pics of some of the stuff that's been done
 
Ok some more pics...here is a close up of the initial S-10 / Studebaker mating

P4280211.jpg


Now you see why I said a Camaro sub might have worked better, because the S-10 is wider then the Camaro sub, but with the 2x4 tube and other bracing and welding done it's not going anywhere adn once everything is finished up and the car is back together you won't see where everything was tied together unless you get it on a lift.

Here's a pic of where the S-10 flange I mentioned in the first post slide into the factory frame. Now underneath that is also the 2x3 tubing that was slid into the factory frame and welded up then this slid in on top of that and that was all welded up. I wish I could show better pictures but like I said they are safely hiding on my old hard drive until I can get them off of there

ImportedPhotos00092.jpg


Here is a shot of how the motor mounts were welded up to the S-10 frame..By the way did I fail to mention that this set up moves the motor back and down from where the motor would mount in an S-10? It really changes the center of gravity for the better on ride quality and handling.

ImportedPhotos00001-1.jpg


on the next post I'll show a couple of other pics, but not anything major...just some overall shots (what I could get in the garage)
 
Here is a side shot (sort of) of the car sitting in the garage.

car004.jpg


I still have to put lowering blocks in the rear (that's an S-10 unit also, but from a 4x4 since they are a little wider then the two wheel drive units)

car006.jpg


At this point, I have to do the tin work around the firewall and toe board area and fix a few spots in the factory floor. The plans are for a set of Benneville SSEi full power seats (for my old bones to be comfortable). I still have to wire it, but again being the cheap old bas....being cheap..I'm recycling the wire harness from an old Chevy pick up. Once the other things are done, I'm gonna do some sanding and some satin black will be the color of choice. As I get some of the other stuff done I'll post a few updates, and hopefully have a few shots of it out on the local roads before to much longer
 
Well since you asked

I've gotten some work done on it, but not nearly as much as I would have liked. I was seriously expecting to be driving it by now, but stuff happens.

I have gotten the motor and trans mounted (327 / th350). Just picked up a set of rams horns exhaust for it and have the rest of the dual exhaust ready to go on (when I make the 90 degree from the manifolds down). I have all of the brake lines run and finally have the master cylinder / brake pedal assembly mounted where I need it and where it will work (long story on that alone....maybe later I'll get into that).

The one thing that does have me happy is the interior. I picked up a complete tan leather interior from a Bonneville SSEi. Full power with all of the controls and wiring harnesses, console, shifter and lots of other little parts and pieces.....got it all at the local "U-pull it" for $40...plus about 3 hours of my time. The front seats, when I set them in, lined up about where the orginal seat tracks mounted, everything fit like it was meant to be there. I can sit in the drivers seat and look straight out the middle of the windshield and the leg room is working out better then I could have hoped (I thought the leg room would be more cramped like it was in my 39 Plymouth).

Here is a pic of the seats right after I threw them in to "test fit" them

P5032482.jpg


I've been working out the details with the dash....I wanted the original look of the dash....

Ebaypics046.jpg


BUT...I wanted the reliability and accuracy of newer gauges.....I found a set of 2" diameter gauges and have been adapting them to fit behind the original bezels (I promise to have some pics or that as it goes back together). The numbers for the speedometer and the other guages were cut out of vinyl and the font matched the original design real closely.

I'm also having a custom gas tank made by a guy in our car club (he does a lot of pressurized tanks for big companies, so I know he can make one that can hold some liquid)...actually should have that by the end of the week.

I still have to do the tin work inside and around the firewall, then install the seats perment, and do the wiring and I still need to get the front glass cut, along with probably lots of other things, but for now, I'll throw a couple of pics out, and once I get some to the other things going back together, I'll get some more pics for you guys

P5030231.jpg


P5032477.jpg
 
I mentioned in the original post that I had more build pics on my old computer that died...well I finally got around to buying a cable to down load the stuff from the old hard drive on this computer and figured I'd throw a couple more of those out today.

These are the first fitting of the S-10 sub to the farctory frame....it gives you an idea of how I had to "adapt and over come". Notice in the first pic how the S-10 trans mount had the lip that we notched the factory frame for it to slide into...

P4280212.jpg


P4280213.jpg


The next pics are of the 3x2 tubing that was slid into the factory frame to give lower support to the sub. Also you might see that the notch on the drivers side in the factory frame was moved upward so that the car could be lowered some more when the sub was slid in.

P5130245.jpg


P5130247.jpg
 
Next are some pics of the sub slid back in and the start of welding the two pieces together. With the 3x2 extending underneath the sub it gave a lot of weld area, and it gives the added support two different width frames need to be mated together.

P5130255.jpg


P5130256.jpg


In this one you can see that once everything was welded up between the two frames, the 3x2 was notched (for lack of better terminology). The bottom lip that was left extended was folded up and that was all welded up giving an angled transition from the sub to the factory frame. AND because I'm at least a little goofy...I have some of the factory frame where we cut off the stock front suspension.....I'm going to weld some of that back into the area where the two frames meet so it looks a little more finished....not that it's needed for structural stability...more for cosmetics then anything....but that ain't happening until over the winter when I pull the motor and trans back out to hopefully put a 700r4 trans in (over drive = gas milage increase)

P5210257.jpg


Because the sub didn't have a neat little lip formed on the passengers side for the trans mount, we took another piece of 3x2 and welded that along side the factory frame and undeath the sub as a ledger to help tie the two together.

P5210260.jpg
 
I finally got a weekend off work and got to work on the Stude. It's really late and I have to get up early for a car club meeting (tough to do working seconds). But a quick run down....got the exhaust run (at least to the rear axle), started rebuilding the floors and started mounting the custom gas tank I had made. I promise to have lots of pics when I get the chance to download them...hopefully tomorrow night
 
Not sure how I missed this one. Nice job on her so far. I'd really like to see some pics on how you did your gauges.
 
Not sure how I missed this one. Nice job on her so far. I'd really like to see some pics on how you did your gauges.


Bruce... I started fitting the new guages in the old housings, but once I saw I could make things fit with a little work, I stopped and haven't done anything else with them...so far. I got as far as sandblasting the housing, but really haven't done anything else for the paint and assembly. What little time I have had to work on the car, I've been trying to get the bigger stuff done (Also I guess knowing I have things thought through on the guages and knowing they will work, I wasn't to worried about finishing them right now).

When I do get back at finishing them up there will be some pics showing what I'm doing with them.
 
Time for an update

As I said above, I finally got some time away from work to do some work....on the Studebaker. I still have a long way to go to have it ready for the road trip in October to Charlotte for the GoodGuys show, but I'm gonna keep plugging away and hopefully I can have it reliable enough by then. I just feel happy to have finally gotten some time (more then an hour or two) to do some work on the car. I gotta say a real big thanks to my brother in law Donnie. He's been a real big help, and because he's got the welding certifications I let him do all of the suspension and other structurely important welding (I can melt two pieces of metal together that they hold, but it looks so much better when he does it).

OK...first off this weekend we got the block huggers and the rest of the exhaust run back to the rear axle. Nothing fancy, but we got them to run through the factory cut outs in the X member. No real detailed pics here, but again, nothing fancy.

P8163025.jpg


Here are a couple shots of the custom "holding tank" that was made by a guy in our car club. It works out to about 15-1/2 gallons. I could have gone a little bigger but then I would have had to fight when I finally get around to routing the exhaust to the back.

P8163022.jpg


P8163023.jpg


Here is one with the bracket welded on for mounting it to the rear cross member. The front mount will be finalized when the new shock mount (for the rear axle) is put in place.

P8173039.jpg
 
I started getting after the interior tin work. The floors were almost completely gone in one area and then solid as new in another area, so being the lazy bum that I am, I decided to keep the solid areas and rebuild around them rather then rebuild the whole floor...did I mention I'm a lazy bum.

Here is what I started with in the drivers area (or lack of)

P8163017.jpg


First I took two pieces of (16 Ga) metal and dropped them down so I'd have fresh metal to work with and attach to when I rebuild the lower (outside) cowl area and welded them to the inside cowl frame work. From there I started fitting the floor in the foot area. Also you may notice that the firewall recess looks familiar....its an old wheel barrow I cut up to fit. It gives plenty of distributor / rear of motor clearance and it also gives me a nice flat area to mount the gas pedal to inside. I thought it was a good idea and it did work out.

P8163029.jpg


Here a few more shots showing how I added to the inside cowl and did some more with the floor areas

P8173046.jpg


P8173044.jpg
 

Latest posts

Back
Top