Bamamav's 1947 Lincoln Club Coupe build

Rat Rods Rule

Help Support Rat Rods Rule:

This site may earn a commission from merchant affiliate links, including eBay, Amazon, and others.
Yeah, I'm kinda rethinking that decision. I found some new floor pans on eBay, so I may just go that route. I've got a section of the lower rocker that I have to rebuild first, then I can tackle the floor.
 
Been a while since I updated........been busy on a lot of things besides the car, but got in some work time recently, just not a lot of pics. Just about have the floor patches welded in, ran out of welder wire, so have to get more before I can finish that job. Jumped over to plumbing the brakes, got a little bit done on that. Doesn't look like much progress, but progress is progress I guess. I'm afraid Skull was right, Do one thing, then find three more that I want to change. It'll all come together, just may take a little longer than I wanted it to...


Plenty of parts to work with!


Here's a couple of hours work to get the look I wanted. Still in the assembly stages, nothing is tightened down yet.

 
A little revision....

Decided I didn't like the way the lines came out of the master cylinder, so I re-bent the front one to place the uprights closer together. Also bent the line the adjustable prop valve is in so I could mount it to the fender.


Then once I had that fixed, I bent up the line to the other front side.


Worked it around to the Tee. Now just need to attach the stainless flex lines to the wheel cylinders when I get the new ones. The loop is to take up slack in the line and provide a way to make the final adjustments when I fasten the lines down.


Next will be running the rear line.
And still need to paint that ugly orange engine black!
 
That is one great lookin car! I'm glad you redid the brake system and fixed the "lug nut" situation. Other than that I'd be driving! Keep up the good work Bamamav..
 
Got a little time yesterday to work on the rear crossmember for the shocks. Figured out there was only one place it would fit with the staggered shocks.
I'm using Mustang II spring plates, Maverick lower spring plates repurposed to upper shock mounts, and fox body Mustang rear shocks. The crossmember is a piece of 2x2 tubing.

Started by putting the pieces in place and clamping to get a feel for it.


After some careful marking, took everything down and started welding


After welding, a coat of spray paint to make it look a bit better

 
I then put it back into place so I could drill the mounting holes in the crossmember and frame. Didn't get around to that part yet, will finish it next time. Went ahead and mocked up the shocks, everything fits fine.


Shocks fit at a factory looking angle. I am planning on the same shocks, they have a helper spring on them to help support the weight. I used the springs off of these on another project. I figured the short Mustang II leafs might need a little help since the Lincoln is probably a bit heavier in the rear.

The rear brake lines are not finished yet, I still have to get wheel cylinders so I can hook up to them and bend to fit. I also plan on removing the original rear spring mount when I pull the gas tank off.
 
I haven't updated this in a while, just not a whole lot been going on. Have been doing small things as I get time and feel like it.

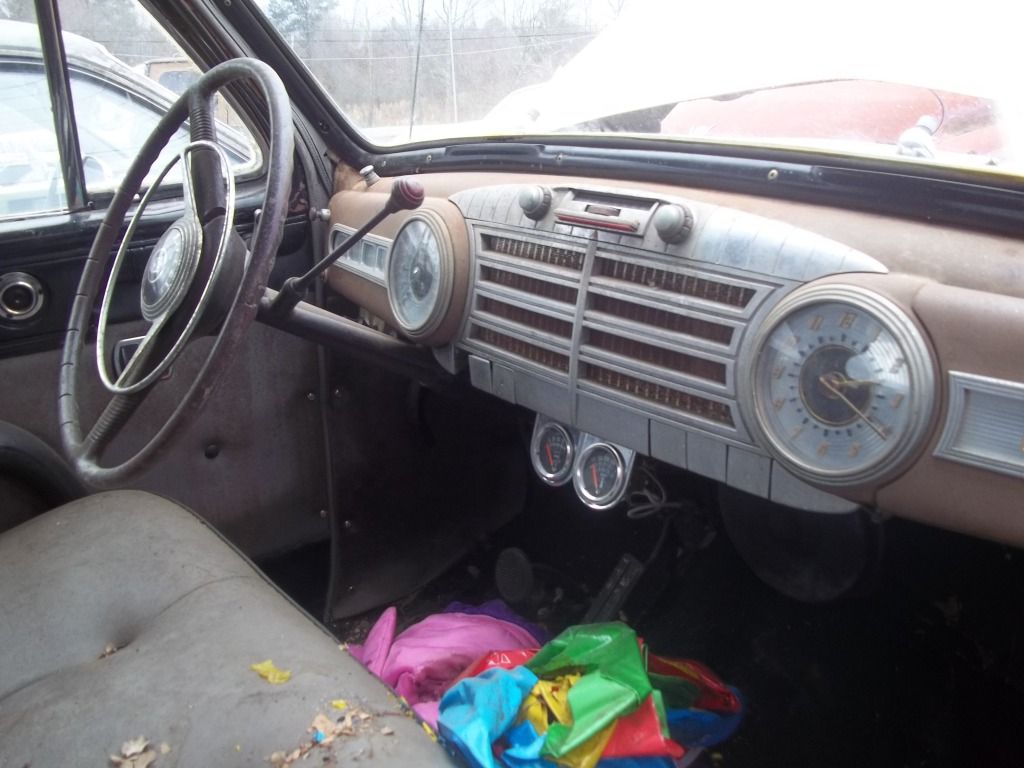
Well, yesterday was yukky. You know the kind of day I'm talking about unless you live in desert country, cloudy, high humidity, light sprinkles every now and then, just waiting on the big rain to blow in here tonight. Arthur was making his presence known, the carport was damp from the previous nights rain, so I didn't want to lay on the floor like that, so I decided to give the dash another try. Some judicious sanding with finer grit paper,{ I thought I did this last time}, and she smoothed out real nice. A couple of coats of paint, and it's beginning to look as I have envisioned it. While it was drying, I took another stab at the trunk latch. Found some of those cut to fit throttle return springs I had bought, so I cut a long piece off of one of those and bent it up to fit. And it ended up being 1/8" too short like the original broken one, and not strong enough, either. Disgusted with that, went back to my now dry dash and fitted the gauges back in, they will have to come out for final wiring, but I had to see how they looked clean against the black dash. I think that it turned out pretty nice.

Here's a pic of the dash when I got the car:


And now, in it's new color:


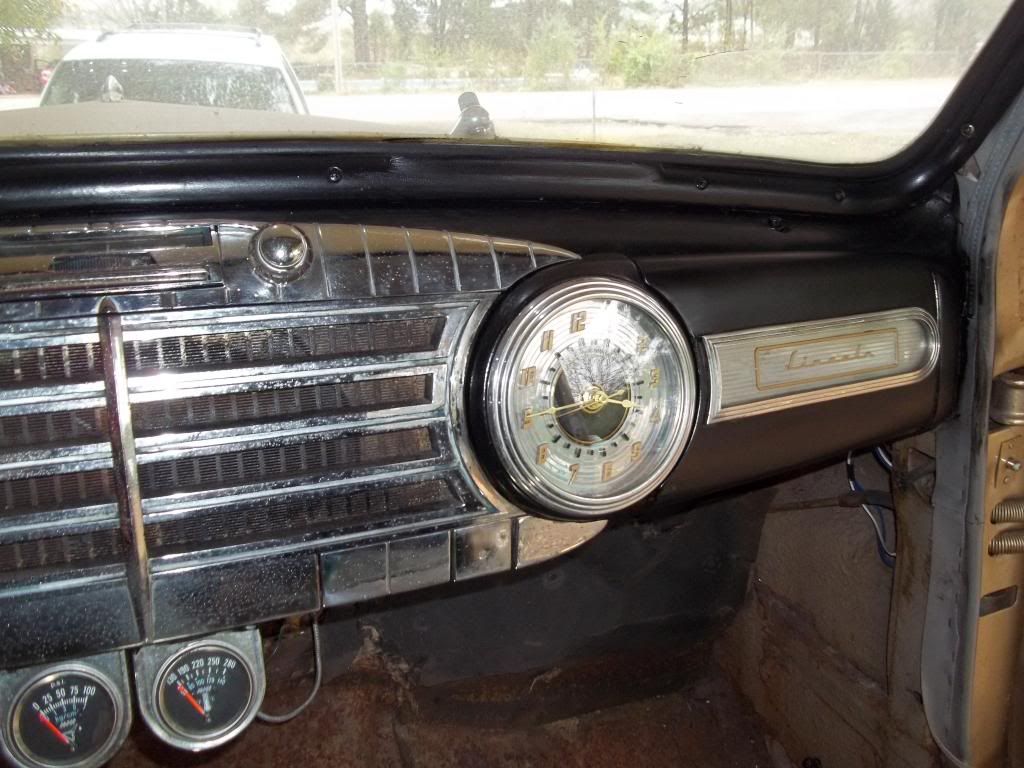
I still ended up with a bad place, I didn't see it until I got to looking at the pics. A little sanding and another coat should fix it. Hard to see with the light coming through the windsheild, and a trouble light inside. Going to have to get me another one of those quartz flood lights.
OK, that's it for this week. More info as it becomes available!

OH, those under dash gauges will be leaving as soon as I wire up the in dash ones. The steering column and wheel will go bye bye too, being replaced with a GM tilt column and some kind of aftermarket wheel
 
A little update

Saturday, I was going to start on the wishbone drop, but a few showers came through before daylight and blew into the carport, so the floor was too wet to lay on it under the car. I then decided to work on the trunk latch. I had already cleaned and dissembled it a while back, but putting it back together, the spring broke on the catch, it was just too far gone. I had tried making a spring out of a carb return spring, but it was not strong enough. I happened on a spring Sat morning that looked strong enough, so with a little rebending, got it to work just fine. I put the latch back together, oiled it up, and installed it in the trunk lid.


Install went OK, but when I tried to shut the trunk, the latch wouldn't work. As best as I could tell, the latch pin is too short and in the wrong place, and of course, the screws holding the latch pin in won't come out, they will have to be drilled. Figured out I could get it to latch by setting it to the first click on the latch, then pushing the trunk lid down, it would catch and hold. OK, touch the release lever, it would release like it should. I then put the outside button assembly on, and again, it won't work. Seems as though this thing has been pried on and sprung so badly it will never work right.

Looks like I will be doing a custom latch after all. Wasted half a day fooling with the stock one. Oh well, some days you're the windsheild, some days the bug.....
 
Good to see you back at it Bam.
That's the beauty of these type builds. There is always something to work on:)
Have a great Holiday.
Torchie.
 
Well, it seems like it's been forever, but we now have an update!

Yep, with sucky weather, no money, and no incentive to get out in the cold, it's been a while since I worked on the old girl. Yesterday was sunny, temps in the low 50's, I couldn't let the day go by without doing something. I've been selling some stuff on eBay this winter that I would never use, and was able to buy a few needed parts with the money. Here's a box full of brake parts from www.rockauto.com that were just calling my name to install!


Here is the drivers side stripped to the backing plate:


Now I remember how much I hate drum brakes! Clips and springs and doo hickeys, arrgh. Glad I left the other side together so I could see how all this stuff goes! Any ways, here is the completed drivers side. New parts look and fit great!


Now to the other side.....
 

Latest posts

Back
Top