String wrapped steering wheel - what I did

Rat Rods Rule

Help Support Rat Rods Rule:

This site may earn a commission from merchant affiliate links, including eBay, Amazon, and others.

Sam_Fear

Brother Rat
Joined
Oct 11, 2008
Messages
12,478
Location
Dixon, IA
It was suggested I make a Tech of what I did. Well, I won't call this a Tech, but it is what I did, the info I found, and what I learned.

(NOTE: some of the pictures in this Tech are borrowed from other sites, I will list links to those sites when I go over where I got my info)

Wrapping was done on ships wheels and railings for grip, called Coxcomb.

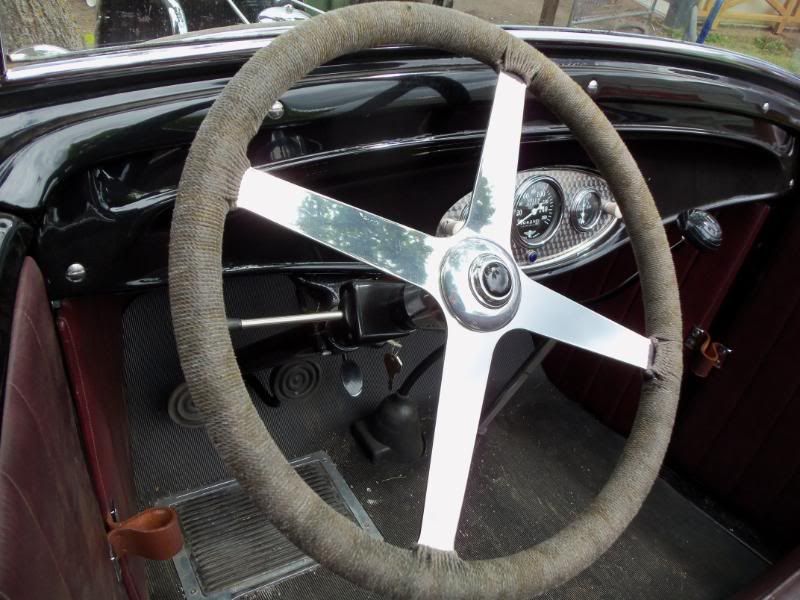
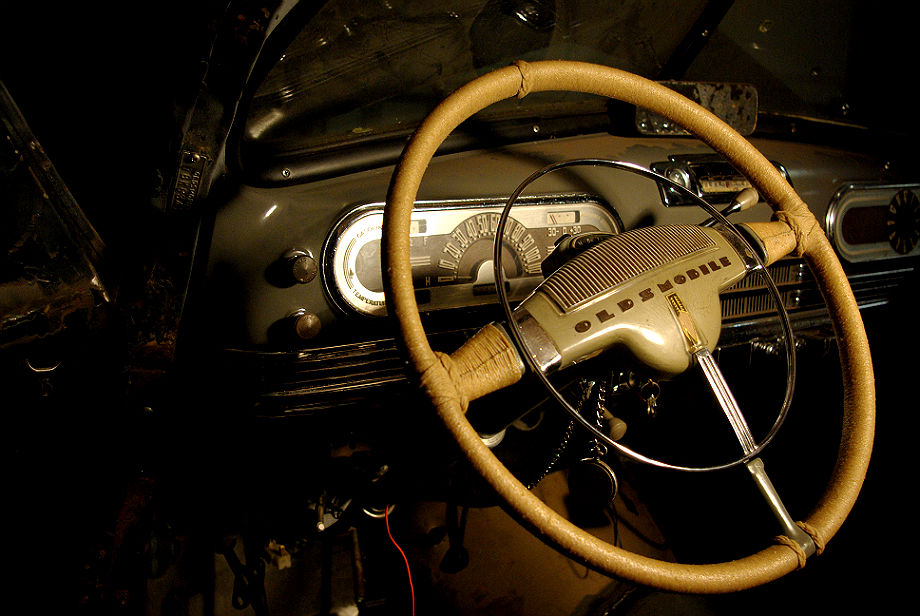
This is a pic of my finished wheel.
attachment.php


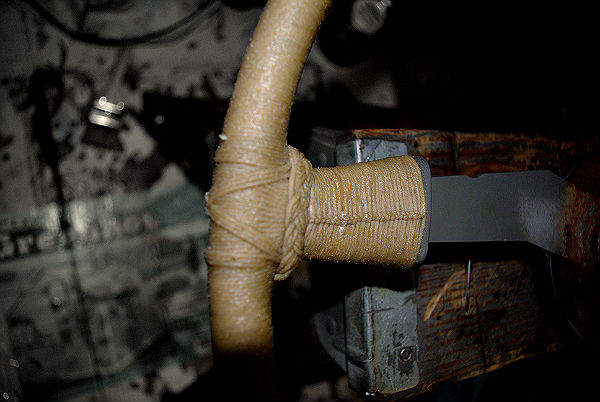
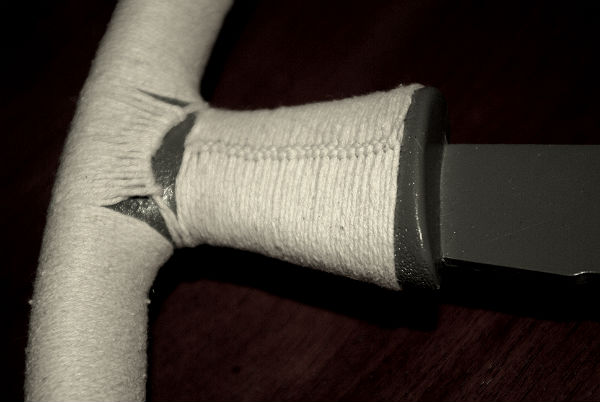
Here are a couple close ups of the T.
attachment.php

attachment.php


What I did:
First I filled the cracks with filler and smoothed it and spray bombed it.

For string I went through about 400ft of cotton twisted string (not sure what size). I did a simple wrap on the rim starting at the thin spoke. To start I simply laid the end of the string along the rim and started wrapping over it. Kept the string tight and cinched it up every few turns. When I got to the other spoke, I tied another string around the spoke and then wove the main string under on both sides most of the way across the spoke width and then tied it off. This is how I started and ended the large section also. Like this:
attachment.php


Next I wrapped the 2 spokes. This time I used a Simple Reversing Half Hitch (I'll get to what that is later). I started by tying off to the other string, then wrapping, and cinching up, but this time I used a needle. At the end, I just took the needle and stuffed the end of the string up under the wrap.

If you look, I had a lot of wheel still exposed at the T. So I came up with the !X! looking wrap to fill some of that space.

The last part were the Turkshead knots(I'll explain these more later too). Sailors would put one of these knots at the top of a ships wheel to easily find straight ahead. Mine is really there to cover a string splice and luckily the splice came right at the perfect spot. The bottom two are there to cover up the fact I didn't get the starts even. The other two spokes got them to finish covering up the exposed wheel. Those two were hard to get right - they were in a difficult spot, they were big, and they needed to cover up a wide area.

After all that I covered it all with 2 coats of Helmsman Spar Urethane - clear.

Somehow I caught on fire so I'll have to continue later...
 
Last edited:
Fire's out so I'll move on to where I got my info and what it all means. There really isn't much about steering wheels but there are a few coxcomb and turkshead tutorials and sites.

About the only thing I found on car wheels is a 2 page thread I found on the Hokey Arse Macrame Board (H.A.M.B.) - http://www.jalopyjournal.com/forum/showthread.php?t=576060

This is a big site about rope work - http://www.frayedknotarts.com/ With this page being the most useful page about Coxcombing: http://www.frayedknotarts.com/tutorials/coxcombing/coxcombing.html

There are also many sites/videos about wrapping knife handles that might give ideas.

So how about the info I used for my wheel? Well, for the rim wrap, I just uh... wrapped it. For the 2 spokes I used a Simple Reverse Half-hitch and got the tutorial here: http://www.frayedknotarts.com/tutorials/coxcombing/simple.html

(I tried using a Ringbolt hitch, but it left big gaps along the knot - maybe because my string was so small - tutorial video here: http://www.youtube.com/watch?v=tHPeKSq7ReY&feature=youtu.be)

And for the Turkshead knots (also known as a Wood Badge Woggle in the Boy Scouts), I used these two tutorials:
http://www.forgottenwarbird.com/5_strand_turk.htm
and
http://www.golden-knots.com/tie5x4.html
and also this page: http://www.stanpope.net/braid.html

I only use single strand coxcomb and turksheads. There apparently are both you can do with more than one rope, but I though I should keep it simple the first time out.

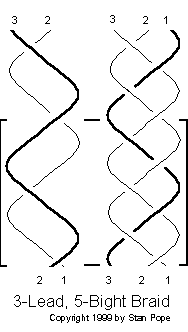
When referring to turkshead knots I saw them called things like 'a 3-lead 5-bight knot' or 'a 3 strand knot'. The lead or strand refers to how many times the rope loops around the object for one complete winding. The bights are how many bumps (for lack of a better word) are on one side of the knot. After one complete winding the rope follows along side the original winding as many times as you want.
3_5braid.gif

Notice on the above, it works from bottom to top - so the #1 pass ends where the #2 pass begins eventually creating a complete 3 pass loop. To the left are the first 2 passes and to the right is the 3rd pass.

Next I'll go into what I learned as I did it, what I will try next time and what I won't do again.
 
Last edited:
So this might ramble a bit... what I'll do next time (I already had a guy suggest I should do his wheel), what I won't, and what I tried this time.

First, I will use braided instead of twisted string. When pulling the twisted string through something it would slightly unravel a bit more each time. No big deal when I wrapped the rim, but it got to be difficult after several passes on a turkshead.

I'll use bigger string next time too. I like the look of the small tight wrap, but the knots in the coxcomb are too tight and the turksheads are probably harder to make look right.

And as I mentioned before, I tried using a more complicated knot for the coxcomb on the spokes, but it had to big of holes along the knots - this might have been because of the small size of the string also.

It would have been easier if I would have kept the loops around the spokes from cinching up so far when I was wrapping the rim. It would have left a smaller gap to cover with the turkshead.

I did try a more complicated 4-lead turkshead around a spoke, but the twisted string was unraveling too much so I went back to a 3-lead.

After I practiced making the 3-lead 5 bight turkshead for a while, I caught on that I could add bights, two at a time, as needed to fill it out.

When making turksheads, the more passes you intend to make, the loser you need to make the knot at the start. It gets tighter the more times you pass the string through it. You can kind of mush it around a bit too, to get it the shape you want. After you finish the first knot and maybe half through the first chase is a good time to even the bights out. All the knots I made on this wheel still could be moved around and I am relying on the urethane to hold them in place.

I'm sure I'll think of more later. Ask questions, I might have a vague idea.
 
Sam,

Thanks for all the info. I'm heading out to get some braided string. I'm sure you'll see it on the '48 firetruck roadster -if I can do it, that is.
 
I used 'medium' twisted string which was a little bigger than #21 braided string. Not really sure what the #21 means, but that's what it was.

I worked on the wheel over about a months time, usually at the end of the day while watching TV. There was a lot of trial and error, and a big learning curve, especially with the turksheads. Now I could probably do one in a week.

I had planned on coxcombing the rim instead of just wrapping it, but quickly figured out that the tiny ridge of knots on the outside of the rim would be uncomfortable and it would suck trying to lace it with the knots on the inside of the rim.

When doing turksheads, the # of bights can be added to by repeating the pattern (after doing a couple you'll see a patten to it) as you need to fill up the wrap. I followed the 3-lead 5-bight pattern and added 2 more bights on my bottom turksheads. More on the big spokes.
 
I went to the upholstery supply and got some cord. The stuff in the photo is 5/32 tissue welt. Seems a little too big. It's strong, braided, and pretty grippy -stays where it's put. 250 yards for $25. Should be enough to play with. I need to varnish a sample and see how tissue whelp takes the the varnish.

I also got some black braided nylon that's smaller in diameter, but I haven't tried it yet.

I tried some coxcombing from the website and came to the same conclusion you did - the simple wrap looks and feels best. The French wrap (spiral) is tight when the knot is on the outside, but when it spirals to the inside spaces open up on the outside. The other one would work with the knots on the outside, but they don't feel or look all that good.

Thanks all the research and the help.
 

Attachments

  • DSC03209.jpg
    DSC03209.jpg
    124.7 KB
  • DSC03210.jpg
    DSC03210.jpg
    108.1 KB
I did a sample and covered it with urethane. It definitely stayed put on the piece of conduit I used. Seems like it will work pretty well.

The tissue welt feels a little - tissuey? maybe rough. Another coat(s) might smooth it out. Not crazy about the color, but I noticed I have some dark walnut stain. Staining some will be the experiment.
 
Are you using Spar urethane or a poly? Spar supposedly is better for outdoor apps and that's why I chose it. Mine is rough right now but I'm sure after a little use it will smooth out. Ya gotta figure this was originally done for grip.

I'm still trying to find somewhere local that sells a larger braided string or twine (like sisal).

If you don't plan to do any knots, seems the twisted stuff should work just as well. Like this pic from the HAMB thread. Looks like it's twisted?
100_0724.jpg
 
I used Poly, because that's what I had and I wanted to see how it would look, feel and hold. I'll probably use spar when I get there.

I stained some with an oil base walnut stain. I like the look. Haven't got the poly on it though. Maybe I'll wait until I get the spar.
 
I got some spar urethane - sticker shock - and coated three samples.

The light colored one is the braided tissue welt. The one next to it is stained with dark oak. The one at the bottom is braided black nylon.

They could be smaller - I think 1/8" would be better. I don't like the nylon at all, but it would work. I do like the stained one, which is what I'm going to do.

But first, I have some cosmetic repair of the wheel.
 

Attachments

  • DSC02632.jpg
    DSC02632.jpg
    59.8 KB
Looks like it took the stain real well. The Spar by itself looks splotchy? Does that tissue welt soak up the spar like a sponge? The string sure did. The first coat I didn't even use a brush, just dipped my fingers in the can and drizzled it on (wearing gloves). The second coat I brushed, but still put on heavy.

Also, after it was all covered, I flipped the wheel every so often until the spar started to thicken so I wouldn't have big goobers of it on one side.
 
It stained really well and pretty consistantly. I made a loop out of TIG rod that held it under the surface of the stain can and just pulled it through. The problem is going to be what to do with 100' or so while it's drying.

It did soak up the spar like mad and I kept turning it to keep the drips at bay -easy on the conduit, not so easy on the steering wheel? It has a nice feel when it gets dry.

The nylon took the spar pretty well, also. I was thinking it would just run off.
 
I assumed you had stained it after you wrapped it, but I could see that route going bad quick - eventually staining parts of the wheel you didn't want stained.

Flipping the wheel wasn't too bad. I went through about 10 pairs of latex gloves. I laid the wheel flat on a step stool by the middle - just had to be careful not to get drips on my gloves and then touch the wheel.

For me, the spar was easy compared to the turksheads knots.
 
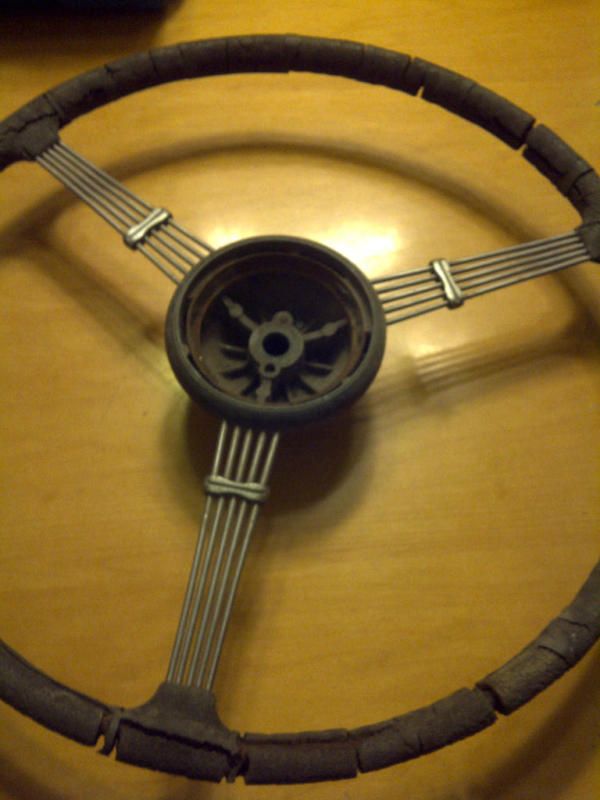
When I first saw this thread I was impressed. When we got something to try it out on I saw this thread in a whole new light! We still have some work ahead of us but I think this is the route to go. I posted in the "What is this" forum to find out what it came off of.

Incredible work Sam!

SteeringWheel.jpg
 
I saw the pic in the Whatsit thread and instantly thought that would be a good one to wrap. The rim is really rough!
 
When I first saw this thread I was impressed. When we got something to try it out on I saw this thread in a whole new light! We still have some work ahead of us but I think this is the route to go. I posted in the "What is this" forum to find out what it came off of.

Incredible work Sam!

SteeringWheel.jpg

Paul,

I have done wheels in similar condition - it is a looooong process. I use JB Weld or PC7 to fill the gaps. Then bondo to fill the little stuff, then primer, then, then 2 part finishing putty or spray filler and more primer before the top coat. Lots of sanding and shaping in between.

I have the center of my wheel as done as it's going to be and it only took a few hours instead of a few days to do the rim.

Of course, it may take the rest of my life to get the wrapped intersections. Turkshead knots seem to be unobtainable right now.
 
steering wrap

The steering wheel wrapping is really cool, I enjoyed reading all the details about it. thanks for sharing it. Uhhh, how much to do mine , I don't have patience anymore, my aadd is really acting up lately, maybe cause I'm only getting 2-4 hours of sleep a night.
 

Latest posts

Back
Top