Todd
He's just one of them Rusty-Chainers!
BOO-YAH! thats cooler than the other side of the pillow.

The pipes have always been in the plan, I've just been holding my cards close
It's going to be a real pain in the scrote, but I'll make it happen somehow.... [S
Is that the "more is better" theory ?
You need to pose a normal sized person next to it so we can tell its true size.
I'm anxious to see it with a hood top piece.

Define "normal-sized"
I here by officially announce that I am no longer or for that matter never have been a car builder/body man/tin knocker, I just give up!!!!You need to pose a normal sized person next to it so we can tell its true size.
I'm anxious to see it with a hood top piece.
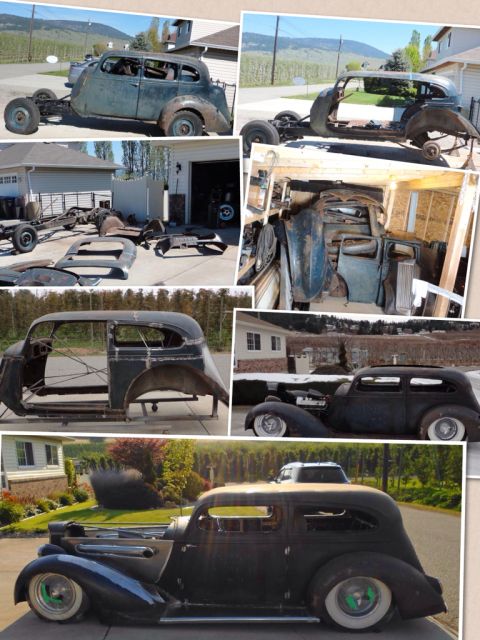
So, you went from this:

To this:

And now you're here:

Wow [dr[cl
It doesn't look anything like the Packard you started with, in the best way!
Bracing ?? I don need no steenkin' bracing !!
Took a ton of measurements before any cutting started. I'll assemble the pieces on a dolly beginning with the rear section, welding the shortened rear door pieces in, then put the cowl together, join the rockers then tackle the roof. The Caddy build was a good learning course though rebuilding the rear into a flatback will be an extra wrinkle.
Measure, measure, measure is the rule here, all the way up to doing the doors, there will be tweaking.
Yes, I'll be building a frame, it's just easier than making all the changes I want to do than it is to modify the stocker. That way I can build the frame to fit the modified body and get the ride height I want.
At this point my wife looked out and asked me why I was scrapping this car!! Apparently she doesn't share my vision for the end result.....


 . It took a lot of tweaking and running changes to the hinges to get them to move the hood up and forward properly, more fine tuning needed yet, but it does basically work..... I need to hit the boneyard and find a suitable hood latch with a release cable and spring that pops it up when released.
For somebody that's just making it up as you go...you sure have a good eye!!! Tell me something tho. When those hinges fold to the down position, do you have some sort of indexers on rear section of your hood frame or will the front hood latch suffice in keeping the hood down???
Enter your email address to join: