1963 Belair, Perth Aus.

Rat Rods Rule

Help Support Rat Rods Rule:

This site may earn a commission from merchant affiliate links, including eBay, Amazon, and others.

swichez63

Member
Joined
Nov 29, 2010
Messages
12
Heres my 63 chev. I bought her 3 years ago as a stock, Australian Built, 1963 Chevrolet belair, 283 small block, 2 speed glide and a set of 14 inch 100 spokers...
From there I got a front disc conversion (HQ holden i believe). I then got my airbags done. 1/2" 350 extreme valves, 10gal tank, 2x AirZenith OB2 comps, AVS switches. Then Ive shaved all 4 doors, only running electric poppers, '59 caddy tail lights, shaved hood and boot badges, shaved rear quarter badges. Also I added spats and twin aerials, with foxtails!
Oh, at that point I also got a donk, designed by a mate, built for me. 383 small block, afr heads, roller cam, punches quite hard for a very mild motor, the dyno printed at 460.1hp and 477.5ft/lbs at the fly wheel...
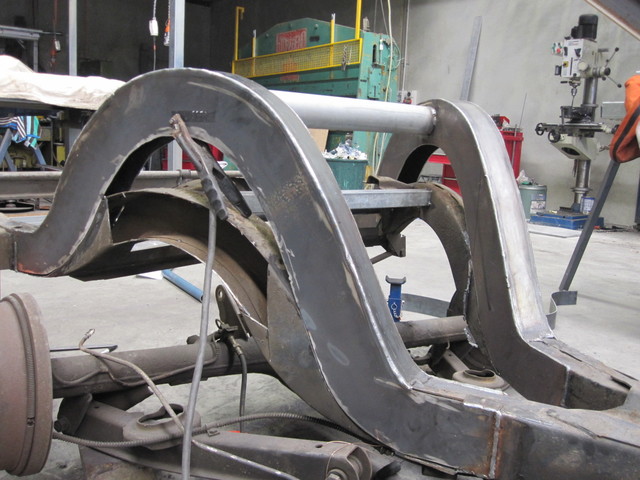
By this point we would be at the current mods happening... Im halfway through notching the chassis to lay flat on the ground, with 2 inch drop spindles arriving in 3 weeks to lay the front out. once thats done Im cutting out the whole boot section of the car to fit the new rear end, then the sheet metal process will begin to hide things.
The interior is off to be trimmed in a nice aged red chesterfield style leather. The floor pan and headlining will be sheetmetal painted black, no carpet or anything to contrast the leather. The bumpers are going to have 3/4" cut out to pull them closer to the body and there will also be afew other lil mods...
ANd ofcorse, im going to paint it rusty! Heres pics all the way from when I bought it to now...
 

Attachments

  • 140620081969.jpg
    140620081969.jpg
    87.5 KB · Views: 53
  • 08122009269.jpg
    08122009269.jpg
    67.4 KB · Views: 47
  • belairclean01.jpg
    belairclean01.jpg
    64.2 KB · Views: 45
  • belairclean02q.jpg
    belairclean02q.jpg
    67.1 KB · Views: 62
  • p9110069p.jpg
    p9110069p.jpg
    118.7 KB · Views: 61
  • img2714y.jpg
    img2714y.jpg
    108.2 KB · Views: 58
  • 310520081883.jpg
    310520081883.jpg
    73.9 KB · Views: 46
Heres some pics of new progress, got the bottom and top trailing arms mounted, and also the shocks are mounted... The next thing will be mount the panhard rod and also the top bag mounts, also my 2inch drop spindles are in transit from california all the way to me in Perth...
 

Attachments

  • p1010069w.jpg
    p1010069w.jpg
    111.1 KB · Views: 33
  • p1010077x.jpg
    p1010077x.jpg
    117.1 KB · Views: 30
  • p1010072g.jpg
    p1010072g.jpg
    134.7 KB · Views: 28
  • p1010070a.jpg
    p1010070a.jpg
    117.5 KB · Views: 33
  • p10100740.jpg
    p10100740.jpg
    123.8 KB · Views: 36
Oh and here is some pictures of the notch, i wanted to notch it quite alot so i decided on a 210mm notch haha, a little overkill but i like the look of it!
 

Attachments

  • p9110071.jpg
    p9110071.jpg
    117 KB · Views: 29
  • p9110072.jpg
    p9110072.jpg
    115.3 KB · Views: 28
  • p9110078.jpg
    p9110078.jpg
    124.5 KB · Views: 34
  • img08350.jpg
    img08350.jpg
    101.2 KB · Views: 34
  • pa090073.jpg
    pa090073.jpg
    125.4 KB · Views: 38
Its the Australian built version, they all run Impala rear decks. I had this very discussion when I was in LA 19 months ago with Barry White, and he was trying to tell me what model car I had and we argued for about 10 minutes before he believed me haha.
Yer Im pretty happy with the way the notch turned out, Im quite happy overall so far as this is my first attempt at chassis work.
 
chassis is almost done, just gotta fully weld everything and get my new brake bracket adaptors for my disc brakes should get back from the laser cutters in afew days...
p1090081r.jpg

p1090089b.jpg

p1090084i.jpg
 
body goes on for its first test fit (to see how much exactly needs to be chopped away) in less than 24 hours! rather excited. Its got 1 month till the show i want to go to is on, so there will be lots of progress really quickly, fingers crossed...
 
Sheetmetal is all held together, needs to all be tweeked a little to fir perfectly, but ill do that when I weld it tomorrow, also I painted my roof... Pics.
p1300111.jpg

p1300109.jpg

p1300110.jpg
 
This is some really cool work, thanks for sharing your project with us. [cl
I've also always got a kick outta the fact that is seems like most of what you guys build down there seems to be based on 4 door cars. I see that trend picking up here as well but I think it's more because we are running out of 2 door buildable shells.

Cheers mate, its awesome to look apon all the good builds on here so its an honour. About the 4 door thing, 2 doors cost such a pretty penny over here. 4 years ago, when i was 19 and bought the 4 door, it was $18000, you couldnt pick up a 2 door for less than $40000! But ive grown to love my 4 door and wouldnt swap it for a 2 door anyday haha. also it means I can have suicide rears...[cl
 
Just the rear doors will be suicided, but thats not for afew months yet... It is a paint, basically I did 2 coats of the paint, waited for it to dry and applied the oxidiser, ill get some more pics today.
 
Nice, I looked at a four door impala once(IIRC it was a 1964). Sadly, I was under 18, and my mom bit my head off when I told her I wanted a 40 year old car.

How difficult is it to do rear suicide doors on cars like this?

Anyway lookin` good. I hope my rambler turns out as good this one is heading.

-Johnson
 

Latest posts

Back
Top