International L122 B Binder Rat Build

Rat Rods Rule

Help Support Rat Rods Rule:

This site may earn a commission from merchant affiliate links, including eBay, Amazon, and others.
Great build. This is exactly what I was shooting for when I started my Harvester project. But, I took too long to strip it down and the truck grew on me and I had to keep it all intact. I actually liked it better right after you chopped the top before you channeled the rest of the cab. To me it was a better balance of height to length of the truck. But I still love it just the same.
Can I ask you for some advice. I really want to add the brass touches to my Binder. Just the Cab cranks and handles and maybe the headlight bezels and tail light bezels as well. It's the finish I've been looking for but didn't know it can be done on the cheap. Can you please tell me exactly how it's done and where I find the brass brushes with wood handles?????

To each is own ehh :rolleyes::D I REALLY like extreme chops that are basically unrealistic to make anything but a show piece that you trailer to the show, then scoot around, but i also wanted to make this truck half usable. Heck, im so lazy that i don't want to take the topper off my ram 2500 long bed to haul over sized items, so i figured id make the rat so i can do just that :)

As far as the brass accents, its actually pretty dang easy!
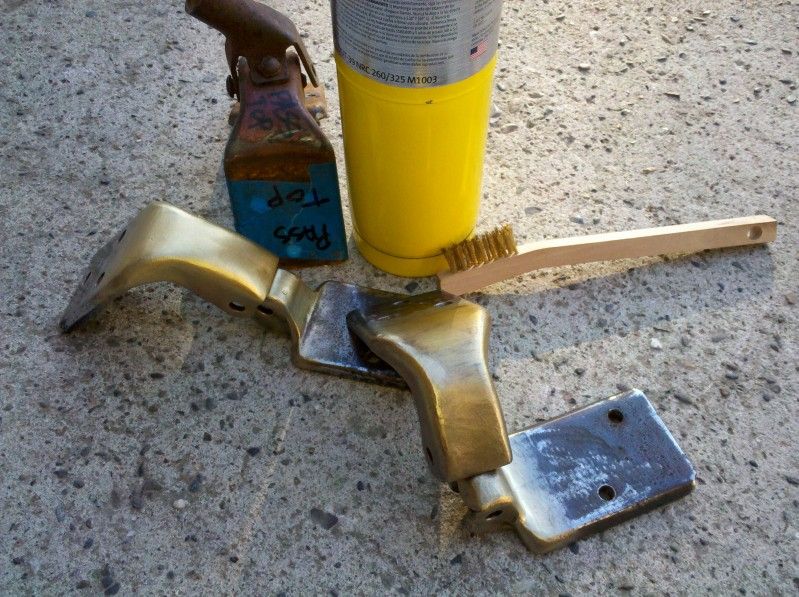
I found brass brushes, REAL brass that is, at home depot. It comes with a 3 pack and the other two aren't brass. I have found the wood handle ones work best as the plastic handles ones get hot and fall apart after a while.

I thought maybe id be smart and buy a real brass wire wheel (which are pretty hard to find) and mount it in my drill but the brass is so soft, that doesn't work well either.

Look around at your local home improvement stores for the right stuff. MAKE SURE that your actually buying actual brass and NOT brass coated steel. You'll know the difference because the coated steel is much stiffer (just as stiff as normal steel wire) then brass. Also, I noticed that the real brass brushes bristles are packed much tighter then steel.

I got on ebay and found TONS of brass brushes and i spent time asking the seller if they knew if it was real brass or not. Most sellers don't know since the product isn't in their possession.


With all that behind us, heres how you do it.
Get yourself a plumbers torch and a small can of MAPP gas. Home improvement stores will have these as kits for pretty cheap.
On bare steel, i ran it through my bench grinder with steel wire wheels to clean off all the milling oil.
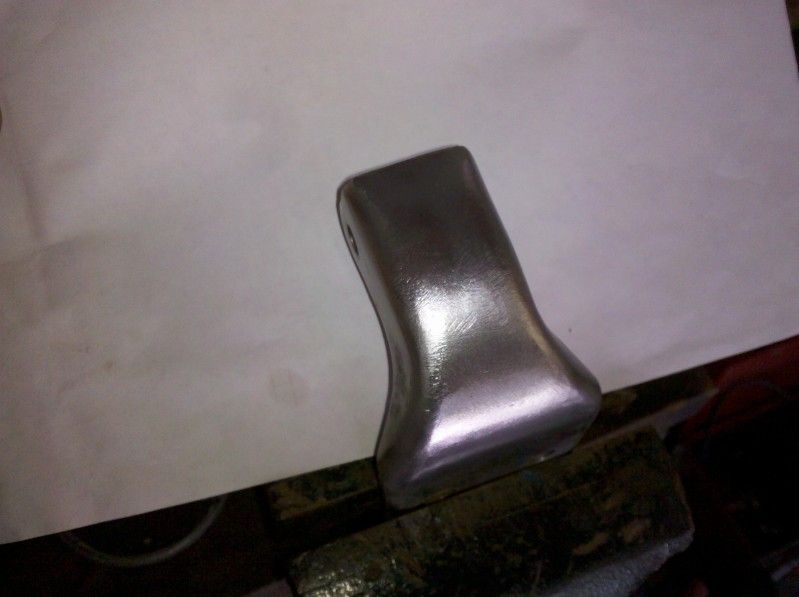
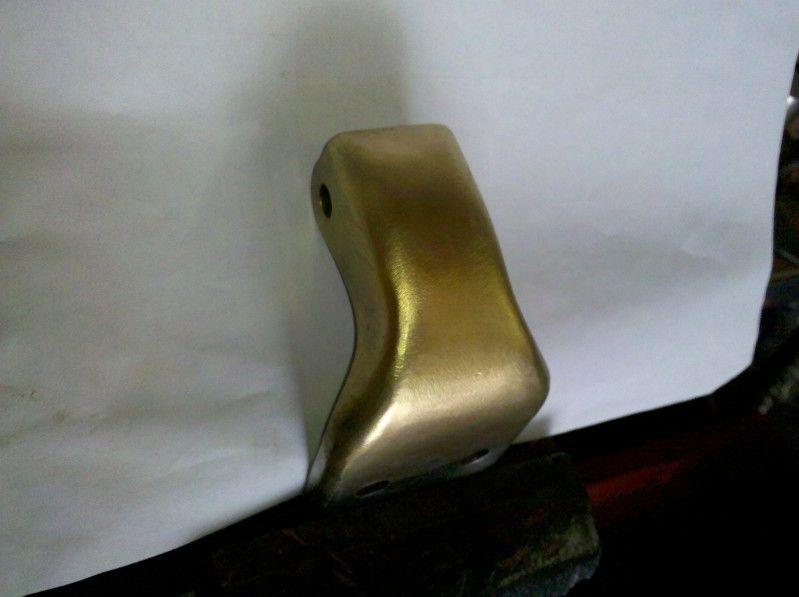
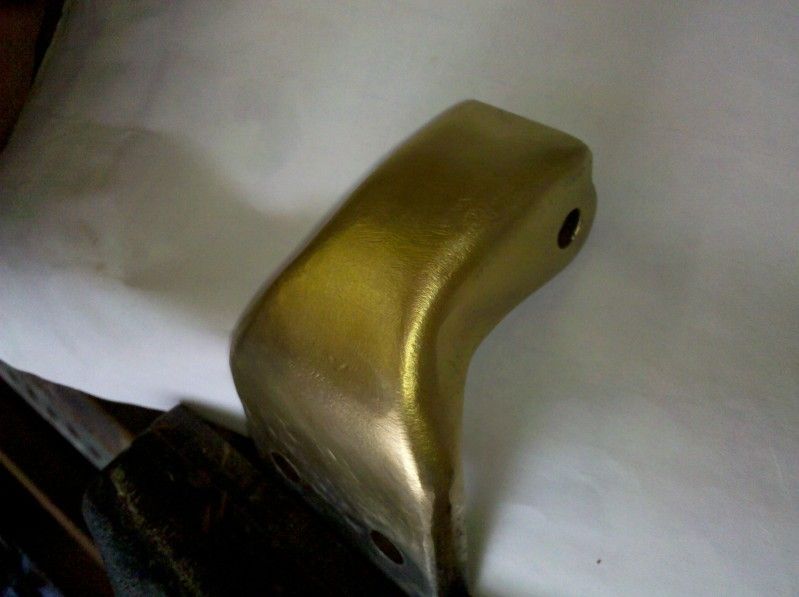
Now, heat a spot thats a couple inches wide for a bit with your torch in one hand, and the brush in another. Start rubbing the brush over the hot metal and you'll start to see the brass transfer once the steel gets hot enough.
Ive found that hotter isn't any better, so just heat, brush, heat, brush back and fourth till you get the coverage you desire.
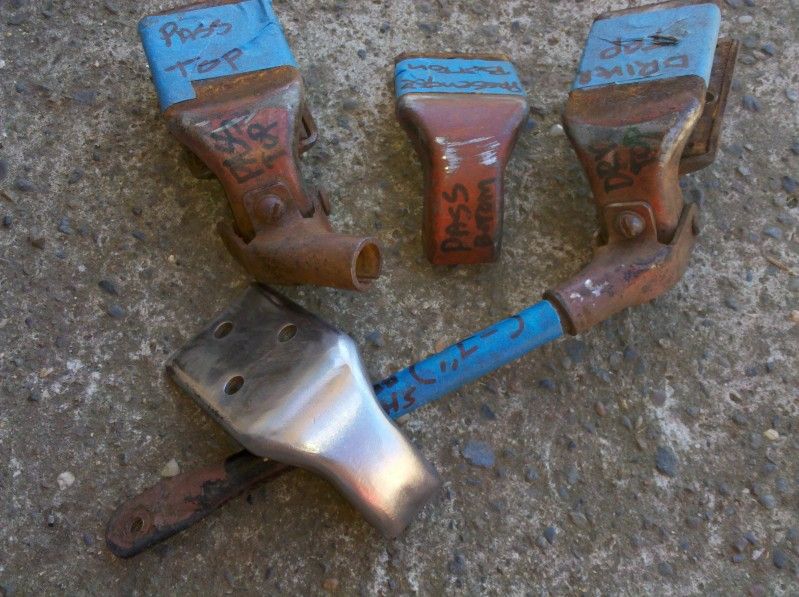
Its going to be very time consuming if you want to do alot! It took me about 45 minutes for a headlight trim bezel.

For chrome, REAL chrome, i didn't grind or wire wheel anything off. Heck, i didn't even take my handles off the truck. Heat and brush, that's it.

There's a video on you tube of a guy showing how its done.

This is the brush you want:
BRN-203softbrassbrush.jpg


Here's the video. Don't make fun of the pour guy, hes onto something here :)
http://youtu.be/mFK9H4AG_Ww
 
Thanks for the reply and advice. This sounds too cool. I'm really curious if doing this over bare metal will keep it from rusting. Some of the parts I have I want to do will be exposed to the elements. Also, sounds like you can touch the handles up pretty easy if the finish starts to wear off. I'm going to do a small piece of bare metal and expose it to rusting conditions to see how it reacts. If it doesn't rust then I'm gonna be really excited. Gives me a new direction I've been looking for. Also, Home Depot only had the tiny welders brushes or at least that I could find.
 
Thanks for the reply and advice. This sounds too cool. I'm really curious if doing this over bare metal will keep it from rusting. Some of the parts I have I want to do will be exposed to the elements. Also, sounds like you can touch the handles up pretty easy if the finish starts to wear off. I'm going to do a small piece of bare metal and expose it to rusting conditions to see how it reacts. If it doesn't rust then I'm gonna be really excited. Gives me a new direction I've been looking for. Also, Home Depot only had the tiny welders brushes or at least that I could find.

Dang! Forgot to tell you the brushes aren't in the tool dept, their in the paint dept. few bucks for the 3.
The small welders brush is what I started with and it works fine. Till you wear the brush out.
I found that rubbing sideways worked best, opposite of how you'd brush your teeth. You end up smashing all the bristles to the handle cause you gotta use a bit of pressure.

I tracked down the guy that made that video and he said he learned it from an old blacksmith. He said the blacksmith had built a fence with details like this all over if over 15 years ago and it is still in one piece!
I would be interested in your rusty findings during your experiment.
 
looking good.i like the idea with the running boards too.the brass deal is pretty cool as well.ive always been a sucker for different colored metals used together.
 
If the metal still rusts, I may try putting a clear coat over it. I don't want the gloss so maybe a clear satin or with flattener in it. I'm about to send my door hinges off to a guy who is gonna rebuild them with iglide bushings. I'm gonna hold off sending them to him until I try this. If it works well, I will do the hinges before I send them to him. Brass hinges and door handles would look sweet against a flat black cab. I will try home depot again today. You said the paint department. Was it the large brush you posted the pic of? I found a pack of 3 small platic handle brushes in the paint area yesterday but only 1 of the 3 had brass bristles. That's not what you were referring to was it? Did you try Harbor Freight?
 
If the metal still rusts, I may try putting a clear coat over it. I don't want the gloss so maybe a clear satin or with flattener in it. I'm about to send my door hinges off to a guy who is gonna rebuild them with iglide bushings. I'm gonna hold off sending them to him until I try this. If it works well, I will do the hinges before I send them to him. Brass hinges and door handles would look sweet against a flat black cab. I will try home depot again today. You said the paint department. Was it the large brush you posted the pic of? I found a pack of 3 small platic handle brushes in the paint area yesterday but only 1 of the 3 had brass bristles. That's not what you were referring to was it? Did you try Harbor Freight?

All i could find was the 3 pack of small brushes. I had to go online to find a big one like the one i pictured. Get the 3 pack (one is brass, another is stainless and the last is something else) to try it out first. I was so excited to try it that i couldnt wait to have a bigger brush shipped, so i just got the small one at depot.
I did try harbor freight and everything i found there was brass coated steel. I checked a few different HF's and all had the same steel stuff :(
 
Hey, tried it out today. Went and bought a nice little gas torch and a couple of the small brushes. I cleaned up the two bottom hinges and went at them. I only covered what's gonna show and will paint the rest. Think I'm going to clear them as well. Gonna do a few test pieces and leave one bare, one with clear gloss, and the last with clear satin. I'll expose the untreated one to moisture and all that good stuff to see how some patina looks on it. I'll do the hinges and other parts in whichever one I end up liking best. Thanks for sharing the trick. The tunnel looks sweet btw.

IMG_20120630_162115.jpg


IMG_20120630_163546.jpg


IMG_20120630_170945.jpg


IMG_20120630_170956.jpg


IMG_20120630_183515.jpg

Those turned out killer!!!!
Pretty cool trick I'd say!

Let us all know how the moisture test goes after a while.
Thanks for sharing!
 
I really like the look, and the low buck behind it, but I too am curious as too how thick that brass really is on the "plating" and how it will hold up.
 
The brass brush thing is one of the first "tricks" blacksmiths learn. It provides a lot of punch to otherwise black iron.

Brass brush "plating" is only a few molecules thick (not really measureable) , whereas, commercial brass plating is closer to .002-.010. The brass brush plating will wear off if it is handled and doesn't provide any scratch resistance.

How well it holds up comes down to the clear coat. When the clear coat wears off or gives up, the brass will follow. Rattle can UV inhibited clear coat will hold up for a while if it sees sunlight, longer if it doesn't. Shorter without the UV inhibitor. 2 part UV inhibited urethane top coat will have the best life.

Looking forward to your testing results.
 
For those of you following and are aware of the frame horn ugliness debockle, I've came up with a solution.
I figured the easiest way to make this thing look a little better was to cut the frame horns back even shorter. In oder to do that, I have to modify the front brace. I have to have the front brace to keep the frame from flexing with the torque the steering box will put on it.
I'm poor, so caveman technology is the winner, so I went to the local cave man parts store (home depot) and bought some solid bar stock.
I went with solid since bending tubing in a tight radius will never work.

I went through the garage looking for something solid that I can bend the bar around. The swivel pad off the tip of my floor jack was just the ticket!

I tack welded the jack pad to a welding table, then went to town bending the cherry red bar around it.
Ya know, for a por guys method, the rings turned out pretty dang nice!

Now I have a couple rings to weld into the grill shell for my frame brace to pass through.

Here's the progress.

photo-180.jpg


photo-181.jpg


photo-182.jpg


photo-183.jpg


photo-184.jpg


photo-185.jpg


photo-186.jpg


BTW, you don't want to be the guy that has to remove this grill shell! It's a PITA, and it doesn't come with instructions! :rolleyes:

More photos to come later once I put the bars back in and get the frame horns cut back more.
 
Last edited:
You keep amazing me. Nice rings you made. A creative guy like should be able to find an artistic way to shroud/hide the steering box. Fake fog light, reversed headlight bucket, or ???
 
Got one frame horn shortened. Now you can see the final (I sure hope it's final) look. Looks TONS better!!!
photo-188.jpg


photo-189.jpg


photo-190.jpg


Just gotta make sure I dont rear end anyone! I'd hate to see all this work go to waste! :eek:


P.S. nobody will look at until they read this, but never mind the angle of the air cleaner. I changed the angle of the grill shell to match the body and bed lines, but haven't touched the air cleaner yet. Each will match the other upon completion.


P.P.S. ya know, you really gotta admire those auto designers! I know all their design is on a computer, and it takes a mere second to modify this or that body line to make it all flow together, but damn, I would NOT want to do that for a living!
 
P.P.S. ya know, you really gotta admire those auto designers! I know all their design is on a computer, and it takes a mere second to modify this or that body line to make it all flow together, but damn, I would NOT want to do that for a living![/QUOTE]

Maybe not but i bet youd be a shoe in with the work you do. RR
 

Latest posts

Back
Top