1952 F-6 Build

Rat Rods Rule

Help Support Rat Rods Rule:

This site may earn a commission from merchant affiliate links, including eBay, Amazon, and others.
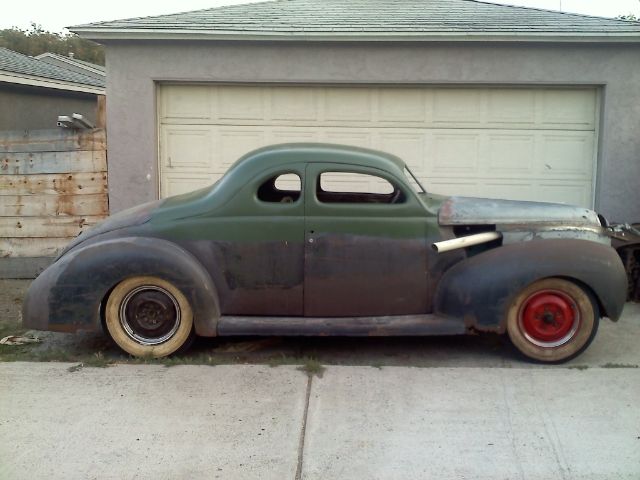
I am leaning towards leaving the grill stock so that it is easily identified as a 41 car front. Torchie.

I agree.The grill defines it (in my opinion) and I would keep it. It gives a look Ford never dreamed of... and that's the whole idea, isn't it?

Whatever you do, I like how you're doin' it. [cl

.
 
I agree.The grill defines it (in my opinion) and I would keep it. It gives a look Ford never dreamed of... and that's the whole idea, isn't it?

Whatever you do, I like how you're doin' it. [cl

.

Thanks Dr Crankenstien. As I said at this point that's the way I am leaning but in the spirit of customizing lets look at some other options as well ....
Here are some pics with the hood from the truck combined with the 41 fenders.
The advantage to this is that very little work(If any) would be needed at the rear of the hood but a lot would be needed for the front.:eek: As opposed to the 41 hood and fender combo where the front fits great and all the work is on the back area.[S
I suppose that if I had a set of F series front fenders the easiest thing to do would have been to make some sort of custom grill. But I don't.
Last pic shows kind of what could be done to fit the F hood to the 41 fenders. A whole lot of metal that would need to be broken up with either a floating horizontal bar above the original side grills or perhaps a verticle griil that mimics the original 41 but narrower.
As always comments are welcomed:D
Torchie.
 

Attachments

  • IMG_0194.jpg
    IMG_0194.jpg
    53.2 KB
  • IMG_0196.jpg
    IMG_0196.jpg
    77.2 KB
  • IMG_0168.jpg
    IMG_0168.jpg
    59.1 KB
  • IMG_0198.jpg
    IMG_0198.jpg
    78.6 KB
Do you have the remains of the '41?

If so, I'd be tempted to slice the cowl and piece it to fit the (narrowed) car hood. Easy, right? :rolleyes:

.
 
Do you have the remains of the '41?

If so, I'd be tempted to slice the cowl and piece it to fit the (narrowed) car hood. Easy, right? :rolleyes:

.
Great minds think alike Crank:D
The only problem is that I don't have the cowl/firewall from the 41. I can get at a 48 but they maybe different as the 46-7-8 hoods were wider than the 41.

I have looked at the set up with the F hood and the 41 fenders all weekend and I agree with the comments about using the car hood with the car fenders. That is the look that I am after.
What I believe is going to happen is that I am going to take the rear portion of the F hood and graft it onto the 41 Car hood. Ideally I will be able to slice it far enough forward to use the F hood mounting system.
Easy right[;)[;)[;)

But as I said earlier this part of the build is going to have to wait until the fenders I am going to use are here and mounted in place. I hope to get back to welding on the top this week and get it finished up.
Finances are beyond tight right now so I am using what materials I have to move forward on this and the boat project.
Thanks for the input all and keep it coming.
Torchie.
 
Or fab up some vents, like the 40's cars have.... Wouldn't take muck, flat stock, worked to meet the hood line then cut out the vents or get some louvers stamped in, that'd be sweet!
 
Great replies and ideas guy's.
My goal in using the 41 car hood and front sheet metal is to have some guy pull up next to me at the gas station and procede to tell me about the truck that his _ _ _ _ _ (you fill in the blanks) had that was just like mine. Then I know That I've done a good job of it.[ddd
Hopefully I will know more about the ETA on my fenders this week.
Torchie.
 
Todays effort.
Got the rest of the box more or less mocked up. Not too bad for doing it by myself.
You can see where the 41 car frame kicks up over the rear axle unlike the original truck frame. I will have to modify the box floor to allow for that. The plan is to run a cover over the box so the floor won't show any way.
Also the area under the tailgate will need some love as well. The girder that runs under the gate from side to side is missing in the pics plus I will be using bumpers as well so that will help to visualy lower that rear area as well. As i said in an earlier post parts of this box are good and others not so good(Sounds like my Dr's discription of me) so I may be on the lookout for a better one. We will see what shakes loose......
Torchie.
 

Attachments

  • IMG_0009.jpg
    IMG_0009.jpg
    98.4 KB
  • IMG_0010.jpg
    IMG_0010.jpg
    86.3 KB
  • IMG_0011.jpg
    IMG_0011.jpg
    90.6 KB
Now that my eyes have settled down after the injections I started to revisit the chop to start finishing up things.
Wow!!!:eek:
I have know idea what happened here but some times you've got to take a step back to move forward.
So out it all came.
Torchie.
 

Attachments

  • IMG_0089.jpg
    IMG_0089.jpg
    63.7 KB
  • IMG_0093.jpg
    IMG_0093.jpg
    67.2 KB
  • IMG_0095.jpg
    IMG_0095.jpg
    87.7 KB
Now that my eyes have settled down after the injections I started to revisit the chop to start finishing up things.
Wow!!!:eek:
I have know idea what happened here but some times you've got to take a step back to move forward.
So out it all came.
Torchie.

Not like others have not had to cut out and begin again... I know I did :eek:
 
Not like others have not had to cut out and begin again... I know I did :eek:

It happens DR. It just a little more frequent than it used to be:mad:

Well at least it's not on the wooden boat. You screw up a piece of Mahogany and it's one more stick for the burn pile....;)
Torchie.
 
Pics say it all.
Got the filler pieces out yesterday and after a night of relaxing(the metal that is) this is the story today.
Rear half is down and in and the front half is up and out. :eek:

With the door tops mocked in place the rear half is the better fit. Door gap is better and will alow for the top to be tilted in.
Rather than trying to use part of the A pillar to fill the gap I have started to fabricate the need piece. This piece will fit into the gap replicating the upper roof frame area. Once trimed the gutter piece will lay on top.
Plus I am thinking a relief cut on the front piece from the split towards the winshield is in order
Hopefully more tomorrow.
Torchie.
 

Attachments

  • IMG_0118.jpg
    IMG_0118.jpg
    65.5 KB
  • IMG_0122.jpg
    IMG_0122.jpg
    59.1 KB
  • IMG_0123.jpg
    IMG_0123.jpg
    62.4 KB
I usually clamp some 1/8" wall 1" square tube in the top of the doorjamb helps out alot.

Great minds think alike GJ:)
I had some in there and took it out right before I took the pics as I wanted it to show what was going on. But as I recall I had some tubing in there when I did it the first time as well.:eek:
So this is my story and I'm sticking to it.
I think that with out any relief cuts other than the one at the upper windshield posts when I tacked those filler pieces in place I was forcing the metal to go where it didn't want to. That's why the gutter that I posted the picture of became so out of whack.
Give me some tubing and some clamps and I can make anything fit:):):)

So this time I am going to make the relief cut and then clamp the jamb for alignment. I bet that it will work better.
It's funny but the other side fit together better
Guess I will go back to just chopping square tops after this one.:eek:
Torchie.
 

Latest posts

Back
Top