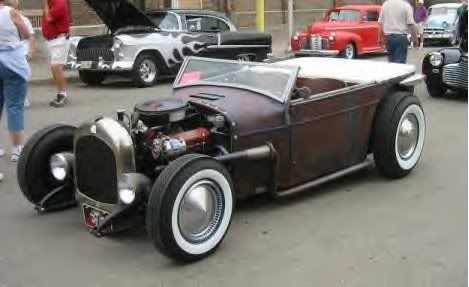
'27 Chrysler Tub

Rat Rods Rule

Help Support Rat Rods Rule:

This site may earn a commission from merchant affiliate links, including eBay, Amazon, and others.
22.jpg

The tires are Coker bias plies on new steel wheels. I picked a blue that sorta matches a little of the original paint on the body. The headers are made from a Speedway kit. I cut apart some T-bucket muffler inserts and put them in the header cones. The headers are sprayed with VHT clear header paint and they turned gun metal blue.
 
Last edited:
tubb.jpg

I paid a lot of $$$ for the '27 Chrysler radiator shell on eBay. Thought it would give the car some identity. The Chevy Van front axle (narrowed about 4 1/2 inches) is mounted on (I think) early Dodge frame rails and springs. The Dodge frame ends at the firewall where 2 by 4 box tubing takes over. There is a 5 core vintage brass sprint car radiator which is way too small for the radiator shell. That's why I made vertical grill bars. The rediculous air cleaner has been replaced with an old chrome unit, on top of a Q-jet. Steering is '67 Econoline, up the side draglink style. Anglia headlights. The upper shock mounts are Dodge truck; a lot like Ford truck units.
 
Last edited:
tuba.jpg

The tail lights are a combination of semi truck cab roof light housings with '59 Caddie lights jammed in the ends. Because the front wheels are 14" and the rears are 15", I have different Plymouth hub caps front and rear. The tonneau cover was made by the daughter of a long time hot rodder who is the fiance of a young traditional hot rodder. She did a great job.
 
Last edited:
tub.jpg

Here we are at Back to the Fifties last year.
Here's the story about the engine: I called in answer to an ad in our MSRA newsletter for a 327. It was sold but the guy said a friend of his, a guy nicknamed Fireball (from his drag racing days) had one he might sell. I went to Fireball's townhouse and found a 70-something fellow in very ill health. He said he had the engine built several years ago and put it in his son's car. He didn't like the way the kid was treating the engine so he took it back. Fireball then disassembled the engine to check its condition. He wrapped each piece in oiled cloth and stored it all away for 10 years. Now he was so ill he wanted to clean house. In the end, he gave me all the engine parts he had. Some of you will gag when I tell you this: I reassembled the engine using the original bearings and rings, which looked perfect. I figured the engine wouldn't know the difference if I didin't say anything to it. Months later Fireball called me and gave me all his motor manuals and chevy performance books. Then he moved into assisted living.
 
Great build Bob.... would like to see more of your stuff next time I'm in the valley. Sounds like there's quite a rodding community over there now.

Ron
 
Very Nice !!!

Very nice build, great transformation from where you started to the finished car. :cool:
In your first set of photos, especially #4, there are some nice rides in the background.
Fiat, pickup, coupe... Any information on those ??
Again, nice job.. '22
 
22dodge, The Fiat has morphed into a Crosley Wagon. It is covered in the Build Secton a few pages in. There's a pic of the Fiat there. The pickup is a '38 Dodge with a 327sbc (almost all my junk has sbc'c). There's a pic in Tripper's thread calling for pics of member's cars. The coupe is actually a chopped '49 Plymouth 4 door. It is pictured in the thread titled chopped 4 doors. I think that's in the Fotos section.
I like your roadster a lot. I is one of my favorite styles of hot rod.
 
Man that thing is awsome! I love those seats! How did you build it so fast? That is amazing! Great job!
 
rab71, It takes me about 1000 hours to build a rod. It would take me 3 times as long if I had to do bodywork worthy of paint (haha). I'm an old retired guy that only does 2 things, play hockey and build hot rods. So, I usually start building one in the late summer, early fall and have it driveable by the following May. I drive it for the summer, put it in the back garage and start another one. It's a sickness I tell 'ya. The back garage is full now, so I can't build any more 'til I sell something. And, I can't seem to pick one to sell cuz I like them all. I'm the kind of guy that would much rather have five rods with $5,000 in each than one rod with $30,000 in it. That way I have five times the building experience and pleasure. Sorry for the long answer to a short question.
Bob

As to the seats; I bought a row of 4 movie theater seats from a surplus store. So, of course I had to build 2 rods to use all 4 seats. It's only good logic and responsible recycling.
 
TubCO002.jpg

One truth about rodding is a car is never done. I dragged my Tub out of storage where it slept for the last couple years. Upon discovering a couple big cracks in the block (apparently I never drained it) I ****** the engine and trans.

It always rode too rough so I decided to replace the short rear leaf springs with coil overs.
The car already had Monroe racing shocks with 5/8" shafts. But no provision for converting them to coil overs. Being retired I have more time than money so I decided to make the parts needed to attach coils to these shocks.
I started with a couple pieces of 1/2" thick aluminum and using a hole saw cut the diameter to match the springs. These are the beginning of the top retainers.
 
TubCO003.jpg

More hours at the drill press with a variety of hole saws resulted in the parts needed. The top retainer is made up of three pieces of aluminum bolted together. The smallest diameter fits inside the spring. The largest diameter matches the outside diameter of the spring and the 1/8" thick piece centers the assembly in the top of the shock

There is a small steel ring, 3/16" thick that is welded to the bottom of the shock body, an area that is quite thick as it is an assembly point for the shock body to the bottom cap.

The threaded aluminum sleeve and nuts were bought here on RRR from a member. I got a whole pile of good parts for a reasonable price & used much of the stuff on my Fiat build.
 
Last edited:
TubCO006.jpg

Here's the finished assembly. The racing shocks are non adjustable but are calibrated 'very light". For this light car they work well.
And I didn't have to buy a thing.

Sam isn't overly impressed.
 
The fact that you decided it would be a good idea to weld on a shock body tells me you do indeed have a sickness![cl

They look cool though. Not at all "cobbled" looking and definately different that store bought.[P
 
Very good idea to get this thing out of hiding. It is fun to see in pix. Bet it is a treat to see real.
Thanks for posting it Bob.
 

Latest posts

Back
Top