28 Fast Four build

Rat Rods Rule

Help Support Rat Rods Rule:

This site may earn a commission from merchant affiliate links, including eBay, Amazon, and others.
Another small project that took almost four days to complete. [;)

With the big flat area on the passenger side of the dash I wanted to build a glove box that will hold the fuse panel, Stole that idea from someone smart on this site, trying to get my fat round body under the dash to change a fuse is almost impossible.
Once again trying to come up with a plan was almost as hard as the execution. I took a piece of 18 gauge sheet the depth of the box plus 1x1/8" 4 feet wide. I then bead rolled a 3/8"bead in 1"from one edge. Next step was to break it 90 degrees on the inside edge of the bead roll to form the frame as well as the insides of the box. I then cut the bead rolled edge at 45 degrees and the inside at 90 for all four pieces.
Next was to tack it all together, and weld a bottom in the box. Figuring out the hinge was really good for Mr. Budwiser :D
It will be fastened into the dash with 5/32 copper machine screws, as it can't be installed in the dash till after the dash is bolted into the car.

attachment.php


attachment.php


attachment.php


attachment.php


attachment.php


attachment.php


attachment.php


attachment.php


Continued
 

Attachments

  • Resize of Glove box 001.jpg
    Resize of Glove box 001.jpg
    96.7 KB
  • Resize of Glove box 002.jpg
    Resize of Glove box 002.jpg
    94.7 KB
  • Resize of Glove box 003.jpg
    Resize of Glove box 003.jpg
    95.9 KB
  • Resize of Glove box 004.jpg
    Resize of Glove box 004.jpg
    84.4 KB
  • Resize of Glove box 005.jpg
    Resize of Glove box 005.jpg
    90.2 KB
  • Resize of Glove box 007.jpg
    Resize of Glove box 007.jpg
    82 KB
  • Resize of Glove box 008.jpg
    Resize of Glove box 008.jpg
    51.9 KB
  • Resize of Glove box 009.jpg
    Resize of Glove box 009.jpg
    63.6 KB
Continued from last post

attachment.php


attachment.php


attachment.php


attachment.php


attachment.php


attachment.php


attachment.php


attachment.php
 

Attachments

  • Resize of Glove box 010.jpg
    Resize of Glove box 010.jpg
    69.1 KB
  • Resize of Glove box 011.jpg
    Resize of Glove box 011.jpg
    71.8 KB
  • Resize of Glove box 012.jpg
    Resize of Glove box 012.jpg
    110.5 KB
  • Resize of Glove box 013.jpg
    Resize of Glove box 013.jpg
    82.4 KB
  • Resize of Glove box 014.jpg
    Resize of Glove box 014.jpg
    74.6 KB
  • Resize of Glove box 015.jpg
    Resize of Glove box 015.jpg
    88.9 KB
  • Resize of Glove box 016.jpg
    Resize of Glove box 016.jpg
    84.8 KB
  • Resize of Glove box 017.jpg
    Resize of Glove box 017.jpg
    84.1 KB
WOW! [cl [cl :D :D :cool: :cool:
you could have made a "Ash Hole" cover for the 37 Chevy that Crank is working on.
Speaking of which....
Crank isn't far off on the belt sander idea for the directional sanding. Get a Cheapy. Heavy Grit. Change the belt often and away you go. "Can't get enough of that Sugar crisp..."[ddd
Torchie
 
Looks good... how many Budweisers? [S


Here's a redneck idea:

Years ago, I made a dash panel for my Murder Boat. It was flat aluminum and I wanted a brushed finish. I don't own a belt sander, so I made a "drum sander" from a coffee can. I made a mandrel from a long 1/2" bolt, used the threaded portion, a couple big washers and double nuts to fix it through the bottom of the can, cut the hex head off. I screwed four 6" sanding discs to the can at 3, 6, 9 and 12 o'clock... effectively, creating an oversized, extra flappy, flappy flap flap wheel... anyhow, I chucked the can flap drum in my 1/2" cordless and made short work of the panel.

.
 
Looks good... how many Budweisers? [S


Here's a redneck idea:

Years ago, I made a dash panel for my Murder Boat. It was flat aluminum and I wanted a brushed finish. I don't own a belt sander, so I made a "drum sander" from a coffee can. I made a mandrel from a long 1/2" bolt, used the threaded portion, a couple big washers and double nuts to fix it through the bottom of the can, cut the hex head off. I screwed four 6" sanding discs to the can at 3, 6, 9 and 12 o'clock... effectively, creating an oversized, extra flappy, flappy flap flap wheel... anyhow, I chucked the can flap drum in my 1/2" cordless and made short work of the panel.

.
Great tip Crank but good luck finding a metal coffee can anymore.
One of the few left is "Chock full o nuts." Which I like but my wife doesn't. Never could figure out the name......[S
Torchie
 
Nice work on the glovebox.
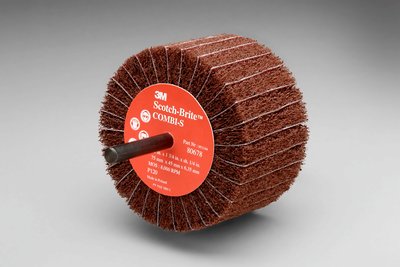
These work really good for what you're doing. Scotchbrite.
Scotch-Brite™ Combi-S Wheel 80678, 3 in x 1-3/4 in 1/4 in Shank

3mtm-combi-s-wheel-3-in-x-1-3-4-in-x-1-4-in.jpg
 
WOW! [cl [cl :D :D :cool: :cool:
you could have made a "Ash Hole" cover for the 37 Chevy that Crank is working on.
Speaking of which....
Crank isn't far off on the belt sander idea for the directional sanding. Get a Cheapy. Heavy Grit. Change the belt often and away you go. "Can't get enough of that Sugar crisp..."[ddd
Torchie

Thanks Torchie

That's too cool![cl[cl[dr

Thanks KC

Looks good... how many Budweisers? [S


Here's a redneck idea:

Years ago, I made a dash panel for my Murder Boat. It was flat aluminum and I wanted a brushed finish. I don't own a belt sander, so I made a "drum sander" from a coffee can. I made a mandrel from a long 1/2" bolt, used the threaded portion, a couple big washers and double nuts to fix it through the bottom of the can, cut the hex head off. I screwed four 6" sanding discs to the can at 3, 6, 9 and 12 o'clock... effectively, creating an oversized, extra flappy, flappy flap flap wheel... anyhow, I chucked the can flap drum in my 1/2" cordless and made short work of the panel.

.

Thanks Doc about 6 and 3 failed attempts, your drum sander sounds like it could draw blood:rolleyes:

Nice work on the glovebox.
These work really good for what you're doing. Scotchbrite.
Scotch-Brite™ Combi-S Wheel 80678, 3 in x 1-3/4 in 1/4 in Shank

Thanks OI one of those might just work, there are so many tight corners to get into on the dash.
 
Man.... glove box is cool..[cl[cl

I've used a 3M red scotch brite pad before, just get all the angles
and corners first, then sraight line by hand with the rest...(I'm to
cheap for the fancy stuff :rolleyes:)
 
Man.... glove box is cool..[cl[cl

I've used a 3M red scotch brite pad before, just get all the angles
and corners first, then sraight line by hand with the rest...(I'm to
cheap for the fancy stuff :rolleyes:)

You and I are on the same page there, fbp! Also, you could get the corners and edges first, then use OI's idea for the areas you're able to reach with those wheels. I've used almost all of these methods, except for the coffee can flap drum. I'll file that one away for my own beer-fueled experiment. :D
 
Looking great !

Personally I wouldnt sand it.
I`d hit it with a course wire brush instead.
There will be spots that wont come out as nice as you would like when sanding, and imo those spots are going to draw all attention from how nice work you really did here.
 
Man.... glove box is cool..[cl[cl

I've used a 3M red scotch brite pad before, just get all the angles
and corners first, then sraight line by hand with the rest...(I'm to
cheap for the fancy stuff :rolleyes:)

You and I are on the same page there, fbp! Also, you could get the corners and edges first, then use OI's idea for the areas you're able to reach with those wheels. I've used almost all of these methods, except for the coffee can flap drum. I'll file that one away for my own beer-fueled experiment. :D

Wow Dozer, I'm honoured to be allowed into this merry band of magic metal smiths. That's some great building. Whoooa!
Carry on.

Looking great !

Personally I wouldnt sand it.
I`d hit it with a course wire brush instead.
There will be spots that wont come out as nice as you would like when sanding, and imo those spots are going to draw all attention from how nice work you really did here.

Thank You. [ddd

.

Thanks Guys, more food for thought Dutch. [S[S[S
 

Latest posts

Back
Top