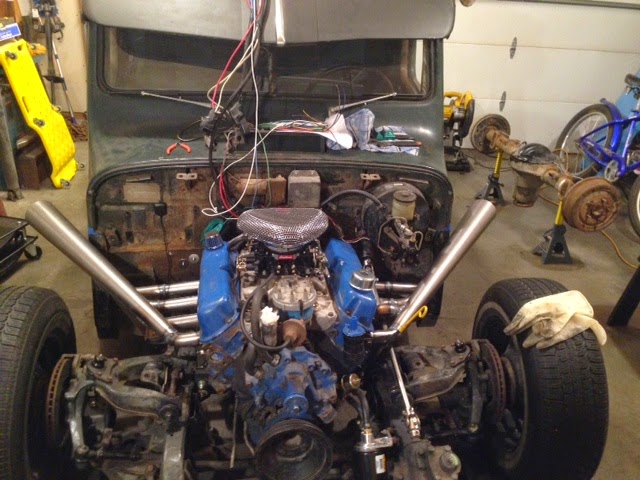
51 Willys Build

Rat Rods Rule

Help Support Rat Rods Rule:

This site may earn a commission from merchant affiliate links, including eBay, Amazon, and others.
I didn't modify the firewall other than the tunnel area to fit the trans. I cut the stock shroud that was part of the grill down as far as possible for the first stage of the build and I now have plenty of room for the radiator up front. I'm running an electric pusher fan that sits inside the grill. There are no mods to the hood. I'm not running fenders but they would fit with some tweaking of the inners if I weren't going with the lake headers. Since I'm running the lakes, there is no way I could put the fenders back on it though.

I started cleaning up the 8.8 rear end that I got for it and found out that it is a piece of junk! I was pretty annoyed by that. My budget is tight on this build and that sets me back a ways. Oh well, I guess you win some and lose some right? Now I either need to find another one or buy a used posi unit/carrier for it and learn how to rebuild a rear end. Seems like it's always something extra this time around.
 
I finished up my headers. My welds look kinda crappy but they'll do. I just barely have clearance around my steering shaft but I think it will work just fine. I need to take the boot of the collapsible joint since it will just melt if I don't.

headers.jpeg


header%2Bclearance.jpeg
 
I also built and alternator bracket and a battery tray. I'll mount the battery up under the bed inside the frame rail for now. It's pretty well protected there and hidden. The downside is that it's a pain in the butt to get at but I'll just have to deal with that...

alt%2Bbracket%2B1.jpeg


alt%2Bbracket%2B2.jpeg


bat%2Btray.jpeg
 
I guess that I will find out LOL. I need to make up some sleeves to go inside the eyes still but I figured its worth a shot.
 
I got my alternator fully installed now and also mounted my battery tray. Now it's on to wiring. Hopefully that will go fairly smoothly although it is a bit confusing sorting through wiring diagrams that tent to contradict each other for the ignition and charging circuits.

I also managed to find another 8.8 posi rear end locally for a reasonable price. I'll go get it hopefully tomorrow. This time, I'm popping the cover off of it before I bring it home though!
 
I picked up the 8.8. Looks good inside. It's a bit rusty on the outside but oh well. I'll put new brake line, hoses, pads and rotors on it and go from there.

I also decided to put a battery cutoff switch in since my battery is up under the bed and a bit of a pain in the butt to get at to disconnect. I'll make a new key for it later that is a lot less conspicuous. I'll have to look for something old to put on it to give it some flare.

battery%2Bcutoff%2B(Medium).jpeg
 
I found this cool old switch out of a Korea era jet. I think it was meant to control duel magnetos but I'm not completely sure. It's set up strangely but I think that I have sorted out a way to split the 3 switches and use them individually. I plan to run a fuel pump override, a fan override, and eventually an override for my compressor for the air ride (once I finally scrape together enough cash to set that up!)

I also have my rear end just about ready to go in. I'll need to fab some new lowering blocks for it and sort out a traction bar setup. Hopefully next winter I will be able to 4 link and bag the back but for now leaves and traction bars will do.

image.jpeg
 
I found this cool old switch out of a Korea era jet. I think it was meant to control duel magnetos but I'm not completely sure. It's set up strangely but I think that I have sorted out a way to split the 3 switches and use them individually. I plan to run a fuel pump override, a fan override, and eventually an override for my compressor for the air ride (once I finally scrape together enough cash to set that up!)

I also have my rear end just about ready to go in. I'll need to fab some new lowering blocks for it and sort out a traction bar setup. Hopefully next winter I will be able to 4 link and bag the back but for now leaves and traction bars will do.

image.jpeg
With four positions on each switch, and a toggle, you could set up an ignition lock with an almost unbreakable code. That would be fun.
 
That's a pretty cool idea. I'm already wired on my ignition so I don't think that I want to take the time to mess with it but it would be kind cool to not have a key at all and just run that as a coded ignition switch.
 
I got my 8.8 stuffed in this week. I had to cut the flanges off that seem to just be there to protect the ABS sensor to clear the cross member in front of the rear end on my frame. I made a set of lowering blocks too. The factory bumps where a bit tall so put so low profile bumps in. We'll see if I end up wanting some that are a little thicker and softer....

8.8%2Bcut%2Bflanges.jpeg


8.8%2Bclearance.jpeg


8.8%2Bfactory%2Bbumps.jpeg


8.8%2Blow%2Bbumps.jpeg
 
I got my traction bars built and installed. They are a modified slapper style. Rather than running them under the springs, I put them next to and parallel with the springs. With the lowering blocks, running them under would put them way to close to the ground. I have the fronts "bolted" to a bracket. The bolt is loose and rubber mounted and acts as a downward stop as well as placing the rubber bumper for the upward stop.

t-bar%2B1.jpeg


tbar3.jpeg


tbar4.jpeg
 
I also mounted up my shifter. I will likely fab a new lever for it at some point to get rid of the chrome but it'll do for now. It's a B&M unimatic. I'm still thinking about what to do for a shift knob on it too.

shifter%2B1.jpeg


shifter%2B2.jpeg
 
Well, I managed to get my front end together over the last week and a half or so. I'm using Slam Specialties bags and bought a bracket kit from Suicide Doors. The bracket kit was more or less a waste of money but it wasn't all that expensive I guess so it wasn't too bad. I ended up only using the upper bracket from the kit and cutting it way down to fit my setup. I cut my own gussets for it since that was easier than modifying the ones from the kit. The lower plate didn't fit at all and I needed a riser anyway. I machined an aluminum plate that is notched out for one tab of my lower ball joint. The lower end of the bag is fully bolt in without modifying the lower control arm other than grinding off the weld nuts that were there for the original shock mounts. I'm running the factory bumps for both directions of travel. With it bottomed out on the bumps, the front suspension cross member is the lowest point and sits about 2 inches off the ground. I figure this will give me emergency clearance if lose air in my bags. I can still limp very slowly home or at least won't tear stuff up!

For now, I just have schrader valves on each bag and will run them static until I can save up for onboard air. Hopefully that won't be too far down the line but I need to get the truck running and driving first and make sure that I have funds for all the little stuff that adds up so fast for that.

I outboarded the shocks and re-did the brackets for the brake hoses. I also got my drive shaft back from the shop so I need to get that stuffed in. Finally, I bought a baffle kit for my lake headers and built them up and installed them so hopefully my ears won't bleed when I finally get to fire this thing up!

bags1.jpeg


shock%2Bmount1.jpeg


shock%2Bmount2.jpeg


bags2.jpeg


bags3.jpeg


bags4.jpeg


baffles.jpeg
 

Latest posts

Back
Top