"Don't Know" Build start

Rat Rods Rule

Help Support Rat Rods Rule:

This site may earn a commission from merchant affiliate links, including eBay, Amazon, and others.
I went and picked this thing up over the weekend. The inside is shot, along with the pan. But, the sheet metal is in fairly good shape. We think it's a '65 model. Type 14. Whatever that is. I haven't looked it up yet. I've got some good leather Volvo seats and I'm going to build a dashboard. So far, this project is into 2024 for completion.:eek:


can't wait to see how this turns out! I have always wanted to see a front engine Ghia. Have wanted to build a blown and tubbed Ghia. I think this build is as close as I will ever get to actually seeing one! Good Luck
 
Got the front end figured out.

I don't know if this is going to hold up to a wheelie or not but, it's all I've got right now. It took a little cutting and grinding and a lot of headaches. Now I've got to take it back apart and finish the welding. Then, I can set my dummy eng/trans in the frame and make the mounts for that. Then the rear suspension. It's never going to end. lol.[;)
 

Attachments

  • Frontend3.jpg
    Frontend3.jpg
    140.8 KB
  • Frontend1.jpg
    Frontend1.jpg
    177.5 KB
man your lucky.i dont even have rock in my driveway.lol can relate to if you drop something wouldnt know how to act to be able to find in under 15 minutes[cl

When ya work over the gravel, grass, or just outside, stick a couple big magnets under what your working on. I have some big old speaker magnets I use. Sometimes I stick one on the firewall to hold my sockets too.
 
Slow progress

I made a little headway.I did all the measurements and hopefully got the frame to body supports in the right place. I still don't have a clue about building a frame so this thing may wind up weighing 5000 lbs. I got the motor mounts made and tacked in. I have an 87 Dodge truck I was eyeing the rubber mounts to use. Went to the local parts supply to look at one up close and measure. He looked up the price and I got both mounts for 8 bucks. It was worth that, not to have to pull the old ones off the truck. Anyway, I got the trans crossmember almost fab'd up and have to do the welding on it and the dummy motor/trans can get out of my way. The 9" Ford I had coming didn't happen. Then I had a 10 bolt Chevy coming and that fell thru. I can work on the radiator support until I can trade or barter for a rear end. More later.
 

Attachments

  • Motormount2.jpg
    Motormount2.jpg
    120.8 KB
  • Transmount1.jpg
    Transmount1.jpg
    140.5 KB
  • Crossmembermount1.jpg
    Crossmembermount1.jpg
    83.3 KB
  • Motormount3.jpg
    Motormount3.jpg
    175.8 KB
  • Frame1.jpg
    Frame1.jpg
    113.8 KB
Trans mount/ crossmember

I got this thing fabbed and tacked in place. I'm trying to build with the idea of having to work on it. Build it where the whole thing doesn't have to come apart to fix one simple thing. This crossmember should help stiffen up the frame along with a couple of lengths of 2" pipe placed across and inside the channel. So far, the frame weighs right at 220 ponds.(not counting the 75 or so for the front end.) I'm glad I got a big block. I may need the extra torque to get this thing rolling. :)
 

Attachments

  • Mount 1.jpg
    Mount 1.jpg
    131.9 KB
  • Mount 2.jpg
    Mount 2.jpg
    125.2 KB
  • Mount 3.jpg
    Mount 3.jpg
    132.7 KB
  • Mount 4.jpg
    Mount 4.jpg
    145.9 KB
Radiator

I should have paid attention in geometry class. It took a while to figure these angles out. I wound up laying it out on the shop door and taking measurements. My teachers would be proud. The radiator seems a little large but it will be about three inches lower than the bottom of the windshield. The fan shroud came off an 85 Toyota pickup and it works great, with a little modification, with the Volvo electric fan. There should be 1/2" clearance between the water pump shaft and the fan. I will sure be amazed if all this works right the first try.:D
 

Attachments

  • C-clamp design.jpg
    C-clamp design.jpg
    122.6 KB
  • Rad bracket.jpg
    Rad bracket.jpg
    166.4 KB
  • Radiator 1.jpg
    Radiator 1.jpg
    151.6 KB
  • Fan 1.jpg
    Fan 1.jpg
    139 KB
  • Shroud.jpg
    Shroud.jpg
    130 KB
Just about finished the fan and shroud set up. I built the radiator support and I have to go stare at it a while to figure out how to hold the shroud/fan in. I'll run some 3/8" cold roll up to the firewall from the radiator support, if I ever get that far. That's a Dodge radiator, Toyota shroud, and a Volvo fan, going to cool a Ford engine. Almost how International and AMC built their vehicles.
 

Attachments

  • Almost done with fan 2.jpg
    Almost done with fan 2.jpg
    148.9 KB
  • Almost done with fan.jpg
    Almost done with fan.jpg
    127.2 KB
most original concept. Frame looks heavy enough, but don't think the front end will handle the weight very well (NO WHEELIES!).

Can't quite understand how that radiator is going to fit under the Ghia body work. Does the front sheet metal go away? Did I miss reading something in the thread?

Keep it coming. Interesting build.
 
No front sheet metal. The right fender was all dented and rusted so I figured I didn't need it anyway. Yea, I know that front gear isn't going to take too much punishment but, it's all I have right now. Maybe I'll run across something later. Thanks.
 
I'm not sure if this is going to work but, it's going to have to try anyway. The Ghia pic is what I'm hoping to make this thing look similar to. I haven't got much done this week. Looking for a job mostly. And my "buddy" that was loaning me his port-a-band saw, decided the channel iron was too hard on it. So, it's back to the torch and grinders. That slows things down a lot. More later.
 

Attachments

  • Frame rear 1.jpg
    Frame rear 1.jpg
    136.8 KB
  • Frame rear 2.jpg
    Frame rear 2.jpg
    158.1 KB
  • Ghia.jpg
    Ghia.jpg
    77.4 KB
Well, I managed to get a rear end sitting under it. I'm just kind of lost again about what to do. I had to take a day off and just not even look at it. There's all sorts of ways to make a suspension but, most take something in short supply around here:money. I'll let 'er sit for a couple of days and see what comes around. I did manage to narrow down the Ghia year model. It's a '61. I think if I ever have to build another, it'll start with something that at least has a floorboard in it. Later.
 

Attachments

  • Rear 1.jpg
    Rear 1.jpg
    127.6 KB
  • Rear 2.jpg
    Rear 2.jpg
    125.3 KB
I managed to get a little done on this rear suspension. If anyone sees something that is not going to work, please let me know. As I stated before, I don't have a clue. I've set the frame in pretty much the ride height I need. As you can see by the pics, there's still a couple of inches travel in the arm before hitting the rubber bumper. I figure if I can get it close, if the body weighs more or less than figured, I can adjust ride height by raising or lowering the top spring pad. Does that sound resonable? I've got to put the engine/trans in place so I can get a good idea of where to rotate the rear and maybe get it close enough, before welding the pads back on the rearend housing. It's all pretty much guess work on my part. Later.
 

Attachments

  • Rearview.jpg
    Rearview.jpg
    122.4 KB
  • Spring.jpg
    Spring.jpg
    82.5 KB
  • Arm.jpg
    Arm.jpg
    119.8 KB
  • Bumper.jpg
    Bumper.jpg
    105.6 KB
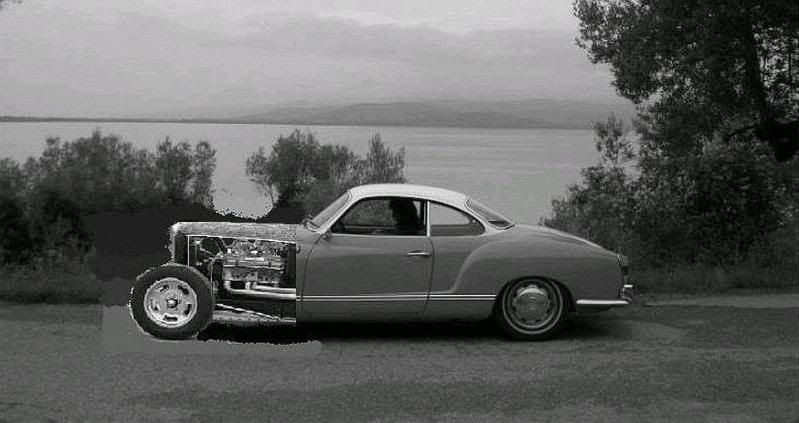
Now that would be different, a Ghiarod.
Photoshop a hood on it from the body line at the cowl to the rad, leave the sides open.

attachment.php
 
Photoshopped a hood on the Ghiarod.

If you drop the top of the rad lower so hood runs level to the body instead of uphill then I think it'd look pretty darn sweet.

Ghia.jpg
 
I'm not sure exactly where the radiator is going to sit in relation to the windshield. According to my measurements, the top of the rad should be about three inches lower than the bottom of the windshield. But, my measuring has been known to be a little "off". That's why I never went into carpentry. At least with steel, you can weld up where you cut it too short. I'll know more in a couple of days when I attempt to set the body on. Right now I'm looking for about a foot of 1.25in ID pipe and about 4in of five inch pipe. I'd be tripping over it if I didn't need it. Later.
 
I managed to get some done this week. Found a piece of 1.25" ID pipe at a steel salvage yard. Only piece in the whole joint. Got the bushings in and hangers mounted. Welded the pads on the rear end and got it where it needs to be. Now, the search is on for 3.5 X 9" U-bolts. I wound up taking on an engine job in a 98 Escort. I used to be pretty good with Escorts back in the 80s. Boy these newer ones sure have a bunch of junk on 'em. It just makes me make sure I build this thing with future repairs in mind. Keep it simple. Might have a job coming up for the next three weeks so at least they'll be a little $$ for the small things like U-bolts. Later.
 

Attachments

  • Bushings.jpg
    Bushings.jpg
    103.2 KB
  • Hangers.jpg
    Hangers.jpg
    113.5 KB
  • Pads.jpg
    Pads.jpg
    103.6 KB
  • Rear 3.jpg
    Rear 3.jpg
    111 KB
  • Rear 4.jpg
    Rear 4.jpg
    115.4 KB

Latest posts

Back
Top