Help! Large panels warping after welding...

Rat Rods Rule

Help Support Rat Rods Rule:

This site may earn a commission from merchant affiliate links, including eBay, Amazon, and others.

serrata

Well-known member
Joined
May 18, 2012
Messages
91
Location
Orlando, FL
I'm just having a terrible time learning how to weld flat sheetmetal on bodywork.

I've done okay on the curved areas on the back of my 33 chevy, but the roof is giving me fits. When I tacked the main sheet on the roof, it lined up great and fit perfectly. Once I welded the seams, everything in the flat areas warped and rippled horribly. I've tried several things I've found on youtube videos:

- Heating spots in the middle of the rippled area and quenching it with cold water. This seems to have minimal effect, event when done over and over.

- Hammering the seam after grinding the bead down seemed to work somewhat in one area, but others doesn't seem to do anything to flatten out the buckled areas next to it.

The sheetmetal is 18 gauge mild steel.
What advice can you guys give me?
 

Attachments

  • 20161017_002458.jpg
    20161017_002458.jpg
    108.9 KB
  • 20161017_002411.jpg
    20161017_002411.jpg
    124.3 KB
I use the weld an inch and cool with an air nozzle, which works better for me along with, moving to a completely different area of the panel for the next weld bead.
If you have an english wheel available, you can pre-stretch the edges a little that will help too.
It takes quite awhile to get a panel welded in this way but warping is really minimal.
 
Last edited:
to tackle that ,you need to understand what`s happening first. When the metal is heated ,it expands. Once cooled down the surface has shrunk more than it was before heating . That`s why you get the distortion. So if you want to get rid of the distortion, you need to stretch the shrunk areas. Rule of thumb is the colored metal is where the shrinking happend. Big problem is mig welds are thick and very hard and almost impossible to stretch, and when you grind them down to the same thickness as the surrounding sheetmetal, (another round of heat and shrink) there`s a big risk they crack when you hammer them. In your case the panels are even more difficult to fix because of the heating / cooling you did, because you tried to fix the problem in an area that wasnt the problem area. Cant help with that without the panel under my hands...
Now this is all hindsight , or looking a cow in the a$$ ,as we say here,, but it may help in the future... imo when you weld a panel ,you need to try to get a very even heat input (color) so you get very even distortion ,which will be much easier to remove. You also need a soft weld to be able to stretch it after cooling. In think the best way to weld panels is make it fit seamless and gas weld without use of wire, and weld all the way in one pass. Yea, it will distort ,and probably a lot too with a flat panel, but the metal and weld will be soft and uniform and easy to stretch. Downside is rusty panels on our crappy old rides tho :D never easy...

In your case, I think I`d hammer & dolly right along the welds ( not on them) but it`s not easy to "read" the panel. More coloring = more on dolly hammering. Using a heavy slapper instead of a hammer helps too, as you raise the low areas when hitting on dolly but at the same time shrink the high areas when hitting off dolly. Remember your problem is not where the ripples are, it`s where the welds are

Hope theres something in here that helps... :eek::rolleyes:

Great explanation Dutch
 
Thank you Dutch. I'm going to reread that and reread that.
My '34 Plymouth is a botched project that I thought I could save. All of the patch panels and the roof insert were welded in quickly, so the whole car is warped. I will use your advice.
This is why this is the best forum on the net.
 
I was gob-smacked when I welded a lug onto the nice flat floor of my old rod. the whole floor turned to a rippled wave pool! It calmed down a little as the weld cooled, but was still a big of an eye sore.

I've seen guys flattening distorted panels with a gas torch and heating small circles in strategic places. It is a bit of an art, but works incredibly well.....when you know what you are doing....

Heated metal doesn't really shrink per se, as it cools, just it has compressed some material around the area you welded as it expanded, and that is what causes the distortion afterwards. But the effect is exactly the same.
 
Thanks guys. This helps. I'm going to try some more this weekend to see if I can flatten things out a bit with the above advice!
 
I was gob-smacked when I welded a lug onto the nice flat floor of my old rod. the whole floor turned to a rippled wave pool! It calmed down a little as the weld cooled, but was still a big of an eye sore.

I've seen guys flattening distorted panels with a gas torch and heating small circles in strategic places. It is a bit of an art, but works incredibly well.....when you know what you are doing....

Heated metal doesn't really shrink per se, as it cools, just it has compressed some material around the area you welded as it expanded, and that is what causes the distortion afterwards. But the effect is exactly the same.


heated metal does shrink, period. actually ,it already does when you can see small puffs of steam appear when the metal is cooled with water, before temperatures are high enough to color the metal. If the distortion would be caused by compression from expansion, it would be flat again when cooled.

There are 2 ways to remove distortion. You either stretch where the metal has shrunk, or you shrink where it didn`t shrink, which is why heating with a torch helps flattening panels too. When a panel has impact damage ,and therefor is stretched, working with a torch to shrink that area sure helps, but you do need to know what you`re doing.
 
I would take a cutoff and cut most of those welds out. I'm with Dutch on the wire feed welds but that's the tool and skill most of us have. I used to be able to hammer weld and that is the best because done right, the work is all done while it's being welded in.
With my wire feed, I like to use a heat sink where I can. I would cut most of the welds, get things straightened back up. Then bend a piece of flat bar to the roof contour and cleco it right next to the weld, just enough room so you don't weld to it. Then take your time and move around, a little here and a little there allowing cool down in between
I also have some big thick copper bus bars I clamp up right behind the weld on old thin parent metal. It is a great heat sink and allows you to not blow holes.
 
What you say makes sense. I'm going to try some trial and error to see what works best on the ugly welds I made. Worst case, I'll just cut the welds and do small lengths at a time.

heated metal does shrink, period. actually ,it already does when you can see small puffs of steam appear when the metal is cooled with water, before temperatures are high enough to color the metal. If the distortion would be caused by compression from expansion, it would be flat again when cooled.

There are 2 ways to remove distortion. You either stretch where the metal has shrunk, or you shrink where it didn`t shrink, which is why heating with a torch helps flattening panels too. When a panel has impact damage ,and therefor is stretched, working with a torch to shrink that area sure helps, but you do need to know what you`re doing.
 
I noticed a copper spatula in the HF welding aisle. I bought one. I wasn't sure what it was for, but now it makes sense. I'll clamp it behind the sheet to reduce my blow-through. I'm kinda excited about the possibilities with this. I've been welding sheet metal panels for so long now with this project, I'm so used to just dealing with globbing up the weld to fix the blow-throughs everywhere and then grinding like crazy. Crappy HF welding machine. :mad:

I would take a cutoff and cut most of those welds out. I'm with Dutch on the wire feed welds but that's the tool and skill most of us have. I used to be able to hammer weld and that is the best because done right, the work is all done while it's being welded in.
With my wire feed, I like to use a heat sink where I can. I would cut most of the welds, get things straightened back up. Then bend a piece of flat bar to the roof contour and cleco it right next to the weld, just enough room so you don't weld to it. Then take your time and move around, a little here and a little there allowing cool down in between
I also have some big thick copper bus bars I clamp up right behind the weld on old thin parent metal. It is a great heat sink and allows you to not blow holes.
 
I noticed a copper spatula in the HF welding aisle. I bought one. I wasn't sure what it was for, but now it makes sense. I'll clamp it behind the sheet to reduce my blow-through. I'm kinda excited about the possibilities with this. I've been welding sheet metal panels for so long now with this project, I'm so used to just dealing with globbing up the weld to fix the blow-throughs everywhere and then grinding like crazy. Crappy HF welding machine. :mad:

Hey don't let the HF machine get ya down. That's what I started on! If you can learn how to work with that machine, A new machine will be an absolute dream :D
 
^^^I agree^^^
If you can learn to weld with a barely adequate machine then, when you get a good one, it lets you see how good you've gotten :cool:
The copper paddle or plate really is a helping hand.
The panel clamps they sell are great too. I've got about 50 of them.
I've been welding for 50 years and I still deal with blow through and gommed up messes, on rusted bodies.
Nature of the beast :(
 
metaluragy 101

In order to get the mig wire to feed the alloy has more carbon than Ideal. I still like to follow bill hines method and use oxy acety with a softer wire. . I would like to see a softer wire that would work in a spool gun.
Over 50 years ago I took a metalurgy college class. the instructor had a wire stretched across the front of the class and wired in series with a light bulb. when he turned on the light the wire started to heat and expanded, the wire started to sag down, then all of a sudden it started to shrink and tighten up and was glowing red. The instructor explaned that at the critical temperature the molecule changed shape as the iron, carbon and other elements re- arranged the crystal structure. If you cooled the metal rapidly the tighter structure was "frozen" in that shape. slow cooling allowed the molecule to rearrange back into the lower temperature structure.
 
I went to a local machine shop for some copper or brass block as backer for plug welding some bolt holes
he told me all I needed was some scrap aluminum and he gave me some 3/16 scrap bits and they work great.
 
Good replys from everyone. Here is what I do on large panels...single spot welds spaced far away from each other (like 10-12") and keep filling in with single spot welds until the entire weld is done. Do not come back near a previous weld until the metal has cooled completely to room temp. I also use the HF copper backer to suck some off the heat. You have to have lots of patience for this method and force yourself to find other work to do but it works well for me. A 3 foot weld may take me a couple days to complete if I'm following my own rule of being patient. Attached is a pic of the spot welds I mean. This is just a very short crack I was just fixing on my model A cab but gives you the idea of what I mean just doing spot welds. Hope my method gives you some help!
 

Attachments

  • SpotWeld.jpg
    SpotWeld.jpg
    49.1 KB
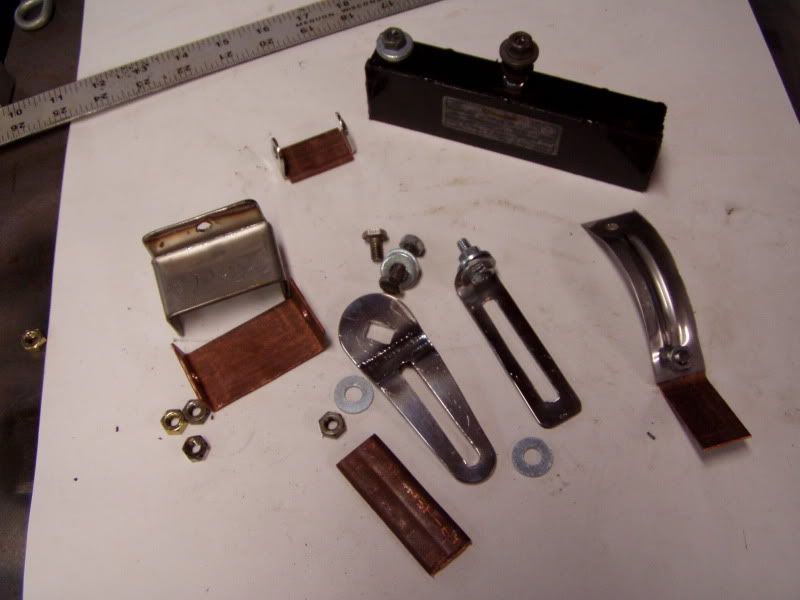
Speaking of using a copper back up, several years ago I came up with this gizmo to help me welding holes in the firewall.

P1011030.jpg


A magnet from Harbor Freight a scrap of stainless, and a piece of flattened copper pipe. I could stick in inside the firewall and weld up the hole without a blow thru. I found it useful welding in new panels also dependent on where it was on the body.

P1011033.jpg


I later made some accessories for different situations.

P1011036.jpg


P1011041.jpg


P1011009.jpg


Back side of the panel using the copper back up.

metal.jpg


Might be of some use to prevent blowing thru.
 

Latest posts

Back
Top