
You are using an out of date browser. It may not display this or other websites correctly.
You should upgrade or use an alternative browser.
You should upgrade or use an alternative browser.
The Roofus Special
- Thread starter Flipper_1938
- Start date
Help Support Rat Rods Rule:
This site may earn a commission from merchant affiliate
links, including eBay, Amazon, and others.
Flipper_1938
He recycles the right way
hahaha! This thread is so long that I had to go back and re-read it all to re-capture the essence of the build! Darned A.D.D. brain fog! Still looks good! [P
Yeah, it's one of those "what a long strage trip its been" kinda builds....and its a long ways from being done. But, I am really anxious to make some serious progress on it.
Flipper_1938
He recycles the right way
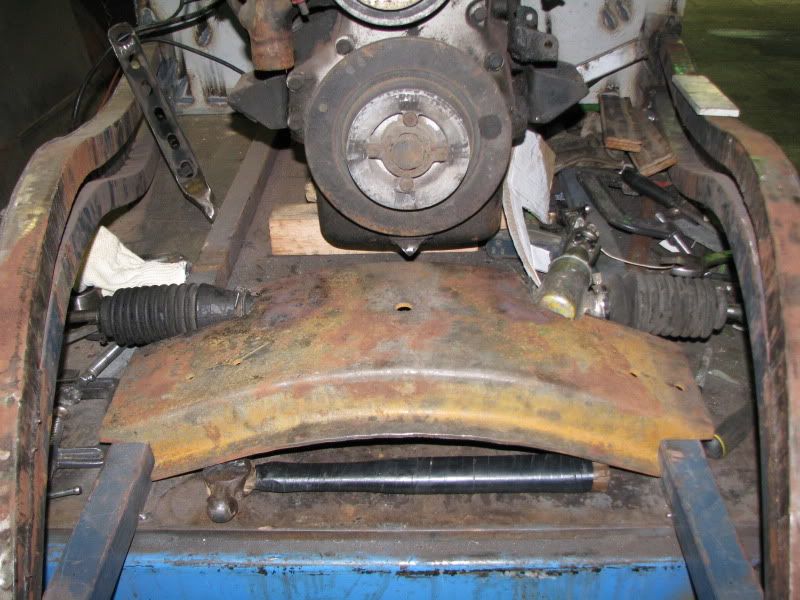
Actually mounting the steering rack was one of things that I somewhat dreaded doing.
The arched front crossmember looked cool, but was not a very friendly location for clamping down the rack. But it was something that had to be done. ...so I did it.
The plan was to mount it with two clamps. One clamp would control front to back and sis to side posioning. The other would just be front to back.
Once again, the raw materials were junk from the barn. I think this piece of heavy wall tubing used to be a physical therapy machine that dad bought cheap at an auction (for the metal).


I decided to use 7/16 bolts for mounting it. He I am checking to see if I have room for these nuts. I ended up welding the nuts to the underside of the mounting bracket.

Here it is welded to the saddle that the rack tube rests in.

Now the other side of the saddle is tied to the crossmember

The arched front crossmember looked cool, but was not a very friendly location for clamping down the rack. But it was something that had to be done. ...so I did it.
The plan was to mount it with two clamps. One clamp would control front to back and sis to side posioning. The other would just be front to back.
Once again, the raw materials were junk from the barn. I think this piece of heavy wall tubing used to be a physical therapy machine that dad bought cheap at an auction (for the metal).
I decided to use 7/16 bolts for mounting it. He I am checking to see if I have room for these nuts. I ended up welding the nuts to the underside of the mounting bracket.
Here it is welded to the saddle that the rack tube rests in.
Now the other side of the saddle is tied to the crossmember
Flipper_1938
He recycles the right way
Even though this was some pretty heavy material, I gusseted one of the sides.

Same thing on the other side.


Same thing on the other side.
Flipper_1938
He recycles the right way
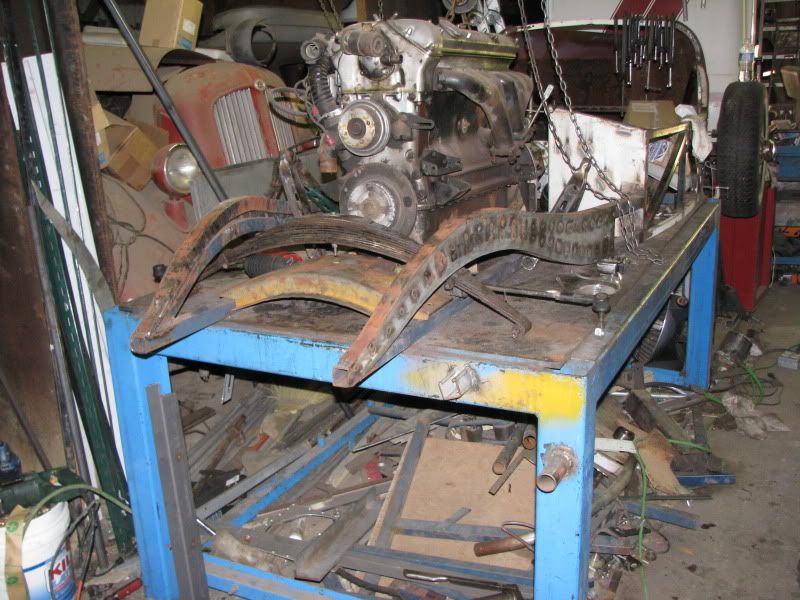
Now to start fabbing up the straps.
I started on the end that I just made the bases.

The other end of the straps will be secured by nuts and bolts through the flange of the crossmember.

just connect the dots.


I started on the end that I just made the bases.
The other end of the straps will be secured by nuts and bolts through the flange of the crossmember.
just connect the dots.
Flipper_1938
He recycles the right way
...and then gusset the hell out of it so that the bends in the straps stay where they are supposed to be.

Other clamp done. Guset was done differently (clamp on this side is farther outboard...less ground clearance), but should be plenty beefy.


Boots look like crap.

Other clamp done. Guset was done differently (clamp on this side is farther outboard...less ground clearance), but should be plenty beefy.
Boots look like crap.
Flipper_1938
He recycles the right way
But they are necessary. An exposed rack would be disasterous.

The spring should block out most of the view

Oh yeah, the u-bolts I bought were too small. They won't work
The spring should block out most of the view
Oh yeah, the u-bolts I bought were too small. They won't work
rainman
Rough Rodder
In my opinion with everything you've got to look at the boots will hardly be noticed. That looks like an awfully big stack of springs do you have any idea if the rating will be close? Love the way you mounted the rack.
Flipper_1938
He recycles the right way
In my opinion with everything you've got to look at the boots will hardly be noticed. That looks like an awfully big stack of springs do you have any idea if the rating will be close? Love the way you mounted the rack.
I'd be real surprised if I didn't have to adjust the leaf count on that spring pack.
Flipper_1938
He recycles the right way
Time to start thinking about how to attach the spring to the control arm.
I currently have two ideas. The first is to cut the spring hangers off of the ford wishbones and then cut them apart so that the pivot can be rotated to the right orientation and the welded and ground to look like they were forged that way....and then welded to the top of the control arms. The gooseneck would be pointed up.
The ford parts look like this. The shackle part would be turned 90* or so.

The other idea is to fab up something like the t-bucket I saw at Bonneville. Not nearly as "old looking", but should be functional.

Anybody got any better ideas?
I currently have two ideas. The first is to cut the spring hangers off of the ford wishbones and then cut them apart so that the pivot can be rotated to the right orientation and the welded and ground to look like they were forged that way....and then welded to the top of the control arms. The gooseneck would be pointed up.
The ford parts look like this. The shackle part would be turned 90* or so.
The other idea is to fab up something like the t-bucket I saw at Bonneville. Not nearly as "old looking", but should be functional.
Anybody got any better ideas?
rainman
Rough Rodder
Flipper could you do a little sketch of you're first idea I don't quite follow you?
Never mind I went back and read it, understand now. The way you were talking about is how I did mine except I put them on the inside of the control arm. My frontend is suicide style tho. It seems to work very well.
Never mind I went back and read it, understand now. The way you were talking about is how I did mine except I put them on the inside of the control arm. My frontend is suicide style tho. It seems to work very well.
Flipper_1938
He recycles the right way
Flipper could you do a little sketch of you're first idea I don't quite follow you?
Never mind I went back and read it, understand now. The way you were talking about is how I did mine except I put them on the inside of the control arm. My frontend is suicide style tho. It seems to work very well.
For those that haven't figured out what I was talking about. Actual placement may be in a slightly different spot.

Flipper_1938
He recycles the right way
Went to the Pumpkin run today and hit the swap meet. I bought another set of square u-bolts. Hopefully these will work.
I also bought a gas tank of unknown origin. I'm guessing teens or twenties. it has a built in gas gauge (go to the back of car to check fuel level).
And a spare tire cover that I plan on cutting into cycle fenders.
I also bought a gas tank of unknown origin. I'm guessing teens or twenties. it has a built in gas gauge (go to the back of car to check fuel level).
And a spare tire cover that I plan on cutting into cycle fenders.
Flipper_1938
He recycles the right way
Pics of the tank


Flipper_1938
He recycles the right way
spare tire cover. It is BIG!


Flipper_1938
He recycles the right way
Somebody on the HAMB said 32-34 Cadillac and I think they are right. Inlet and gauge are spaced far enough apart to clear a luggage rack.
and the spare tire cove looks like this 1933 lasale

and the spare tire cove looks like this 1933 lasale