1933 Pontiac

Rat Rods Rule

Help Support Rat Rods Rule:

This site may earn a commission from merchant affiliate links, including eBay, Amazon, and others.
I had a chance to work on the frame today so I widened the 9"ford rear, installed the side bracing and installed the rear 4 link suspension [;)

attachment.php


attachment.php


attachment.php


attachment.php


The two cross bars are just for spacing the frame rails and will be removed when I tie the center together.
Tomorrow I will do that and install the frontend [;) [;) [;)
 

Attachments

  • 72.jpg
    72.jpg
    76.6 KB
  • 73.jpg
    73.jpg
    103.2 KB
  • 74.jpg
    74.jpg
    97.9 KB
  • 75.jpg
    75.jpg
    91.2 KB
It's now a roller [cl
attachment.php


attachment.php


attachment.php


attachment.php


attachment.php


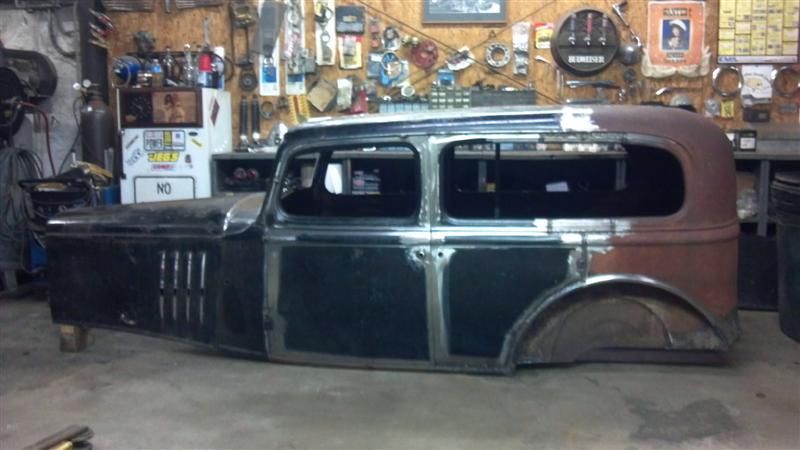
I'll be channeling the body 5" to drop it down over the frame [;)
 

Attachments

  • 78.jpg
    78.jpg
    78.6 KB
  • 79.jpg
    79.jpg
    95.7 KB
  • 80.jpg
    80.jpg
    118.5 KB
  • 81.jpg
    81.jpg
    122.7 KB
  • 82.jpg
    82.jpg
    104.4 KB
Nice work and I like your choice in wheels. (I LOVE aluminum slots - too bad they don't make 'em 14'' wide. :mad:)

Question on the direction change: Do you plan to run the hood and shell? I think it'd look killer on your new platform...
55.jpg


.
 
It's coming along very nicely. Very nice frame work.

I assume you used 3/16" or 1/4" for the frame notch. How did you make the smooth bend? That looks perfect.

I'm an amateur and haven't completed a build yet, but I have questions from an engineer point-of-view. The answers will be very useful to me since, as you know, I'm building a 33 Chevy four door that has the same frame and body as your Pontiac. :) (much, much thanks for the hinges, BTW)

...The lower rear 4 link bars don't look like they're spaced very far apart. I would have spread them our farther to better handle twisting torque on the rear end. Was there a reason for this?

Also, the top 4 link bars don't have much of an angle to them. Was this on purpose to allow more freedom for up and down movement of the rear-end?

3/16 on the notches. I rolled the top and bottom plates to match the arch of the C notches. Since the C notches are completely boxed and are not structurally taxed, they don't require the thicker metal.
I used my plasma (hand held) with a 3" diameter magnet with a hole in the middle, a lag bolt through it and used the point as a pivot.

attachment.php


attachment.php


On the 4 link I wanted the bars inside the frame rails because of the ride height. 4 link rear suspensions on drag cars are only 24" apart, these are 30". The pic is a little deceiving.
The upper bars have the least amount of angle I thought I could get away with, if it isn't enough I'll install a panhard bar.
 

Attachments

  • 2014-03-29_18-48-37_611.jpg
    2014-03-29_18-48-37_611.jpg
    68.1 KB
  • 2014-03-29_18-48-49_48.jpg
    2014-03-29_18-48-49_48.jpg
    64.1 KB
Nice work and I like your choice in wheels. (I LOVE aluminum slots - too bad they don't make 'em 14'' wide. :mad:)

Question on the direction change: Do you plan to run the hood and shell? I think it'd look killer on your new platform...

55.jpg


.
Doc, I'm still looking into it. Not sure all will still work out though :confused:
 
Right after I posted the last group of pics, I went to the shop and dropped the body 3" down over the frame so, I guess that part is done already.

attachment.php


Then mocked up the Nailhead n 4 speed :cool:
Man is it shorter than the straight 8 I pulled out :eek:

attachment.php


attachment.php
 

Attachments

  • 83.jpg
    83.jpg
    103.3 KB
  • 84.jpg
    84.jpg
    106 KB
  • 85.jpg
    85.jpg
    97.7 KB
I liked it better before you dropped it. :( The radius of the wheelwell matched the tire, now it's covered up.:(

Just my two cents, take it for what it's worth.:D
 
This thing is looking sweeeeet!
I'm with Bama on the pre drop look. The side view in the first set of pictures looks spot on to me. I know, I only get a vote with a paid donation to the build. So carry on, it's gonna be super nice.

Whats the plan on the front with all the room in front of the nailhead?

Thanks folks, for the reply posts.
First off I take all comments on this build as help and think the suggestions over quite a bit before I do the next step.

Pops, by the time I cut the grill shell down and mount the radiator, the gap will fill up fast. If not, I will move the engine forward a few inches.
Forgot to mention, this is a 401 Nailhead out of a 66 Buick Gran Sport.
I agree with the people on the first pic showing the wheel well. I like the looks of the body covering the frame too so, I will have to study this a little :confused:
 

Latest posts

Back
Top