41 chevy 1/2 ton project Fenix

Rat Rods Rule

Help Support Rat Rods Rule:

This site may earn a commission from merchant affiliate links, including eBay, Amazon, and others.
skip yours looks like how mine is mounted, as far as distance from the column.

I have checked the column shifter for operation and a bunch of other clearances and everything is good. I am pulling the 41 on the trailer apart today and tomorrow and should be back on this 41 monday, hoping to drive it soon!
 
I picked up a rcsb s10 driveshaft. I havent found the caps because I rearranged the garage to put the plasma table by the door. ironically the caps are also in the bag with the gas tank strap bolt. eagle eyed readers will notice the chain is stuck under the trans. I need to take the mount bolt out haha

IMG_6008_zpstm2yqbb9.jpg

IMG_6009_zpsrjdyzvl2.jpg


here is that heater connector that was rotted off. I am picking up a 1/2" tap tomorrow to clean the threads.
IMG_6016_zpsmppaekt0.jpg

IMG_6018_zpsrnoiipne.jpg


put on new brake lines along the frame, the old ones were suspect. and new hoses. brackets need a squirt of paint but I still have other stuff on the frame to paint too.
IMG_6017_zpsbp7t7gsp.jpg


before I weld up the body mounts I got the shift linkage in, pretty easy, I just mimicked the frame mount 9 3/4" rearward.
IMG_6013_zpscqmmqauy.jpg

IMG_6015_zpsbsesj3vo.jpg


then I welded up the backs of all the mounts with a support. You can see I raised the front mounts 3/8", I measured and they were low.
IMG_6019_zpsrqzovduh.jpg


since I burned those in so hot I was on 30 minute fire watch (always wait 30 minutes after welding before leaving the area in case a stray spark is smoldering) so I welded up the headlight switch hole and some other holes on the dash
IMG_6020_zpsbaqv69pk.jpg


and gave it a thick coat of primer to sand back with some 180 tomorrow.
IMG_6022_zpsykndsa0g.jpg


no big warping, pretty ok by me. I got the rear brake line replaced, I used two 60" premade lines with a union because flaring two ends on a custom length was seeming to be as much fun as a cactus enema. I got the steering column mounted to the firewall with a bracket, and the upper mount welded and strong. I also got the front core support mounts welded on, so as soon as I bolt the gas tank in (oh I put in new gas tank straps too, the last vestiges of rusty stuff from the donor I think) I can put the body back on and wire the truck up!
 
I found the right tap today, every tap on the shelf was 4 dollars, except this one. something tells me they know it is the "GM stupid heater fitting" size because it was $18.99. supply and demand, people! economists reading this are huddled together and saying things like "hee hee hee if all else stays equal" and "thirty basis points" while rubbing their hands together hunched over like a mantis. anyway

IMG_6026-1_zpspwwwyjmk.jpg

I have to take it back out and vacuum out the shavings but it fits
IMG_6027_zpskqnyhjqw.jpg


coat of paint on the dash, looks red but its brandywine/burgundy. I like this color a lot.
IMG_6033_zpssbu7y6by.jpg


I was getting tired the other day cutting parts on the plasma table then taking them to the vice on my bench to grind. it is all of 10 feet away after all. so I thought about grabbing one of the extra rims in the back yard and getting some pipe at the yard, and building a nice vice stand for that 6" monster vice my wife got me last year.

then I came to my senses and hopped on craigslist. $30. work smarter not harder.
Screen%20Shot%202017-03-30%20at%205.43.41%20PM_zpspghkgheu.png


a couple holes and whoop whoop. grinder rest and hammer hole and everything. spoilt!
IMG_6032_zpss8bxbikc.jpg


I need to do the frame trim for the fenders I have been avoiding, and put the exhaust and gas tank back in. more coming
 
check out my fancy shop vac attachment to clean all the shavings out of the intake from that heater fitting haha. its a QT cup with some 1/2" airline in it. the vac sucked to the bottom of the cup and I wiggled the airline around in the intake. worked awesome.
IMG_6082_zpsuno2gpc6.jpg


trimmed the frame. I was putting this off like crazy. I trimmed it for the cab and it was perfect but forgot the fenders hang under the cab.
IMG_6080_zpsgfnnf01l.jpg


also took care of the fuel lines in the front. on the earlier s10 frames the fuel lines run through the frame all the way to the front crossmember and then come out pointing to the front. I could have used longer rubber lines but I was worried about them getting caught up in the belt. so I cut the frame, bent them 90 degrees where they pointed at the engine and then welded back up so the plastic clip still isolated them. I put the clamps on after this picture.
IMG_6072_zps2acqrzcp.jpg


I was pretty timid about welding around all those open fuel lines so I didnt put the tank in till that was done. tanks in, plumbed, wired, exhaust is moved and in, hung with a turndown.
IMG_6074_zpslpijf0eb.jpg


I may take it to the exhaust shop and have the exhaust split with some cherry bombs but honestly, I like when the truck is quiet and modern more than rumpity rump.

look at all this kitty litter.
IMG_6079_zps85hnhb1j.jpg


I was doing that heater fitting last week and had to move the trans dipstick slightly to get more room. well in the true fashion of this donor I guess that is all the stress the dipstick tube could take because there was a small puddle where it was leaking. I picked up a new one and installing it was a red fountain of fun.

the dash was painted but looked like shhhhhhhhhhh-iny garbage, yeah. I wasnt looking forward to sanding it all off so I planned to take it to the local soft stripper Monday, but when I got the frame ready for the cab it was raining. so I used my cup brush and then a red roloc to smooth out all the rough stuff and put another topcoat on it. it came out GORGEOUS this time, very little blemishes and I only "signed my name" (had a run) just barely in one spot. I have some 2000 grit so I can fix that.
IMG_6076_zpsbse48o2e.jpg
 
PLONK

IMG_6085_zpsa0rclubj.jpg


perfect fit
IMG_6092_zpsnkijsmmz.jpg

IMG_6087_zpscgp8eye7.jpg


I lowered the drivers side of the motor 1/2", when I put a level on the TBI I noticed it was crooked. and I raised the cab 3/8", so thats almost a full inch of clearance gained for the steering. I wondered how the shifter linkage would line up with the column, and it looks great. just need to straighten one of the bends slightly to make up the inch and half it is low.
IMG_6086_zpsaryshh9f.jpg


cut out the core support for the rad, looking like a good fit too.
IMG_6093_zpsmekmfrh6.jpg
 
Looking good. Kinda wish mine would have been a complete truck to do like yours. But maybe the next one I do will be.
 
front clip on, still needs to drop an inch but looks way better than it did
IMG_6111_zpsygjnnzke.jpg

IMG_6108_zpskms9smoq.jpg


lines right up on the support bar and on the new core support mount I designed
IMG_6112_zps9jzbsx4f.jpg


The 19x22 fits the 47-55 trucks but just barely doesnt fit the 41-46. I could have made it work, I actually called a couple aluminum welders today, I needed the lower outlet cut off and turned so it went outward instead of inward, and a trans cooler installed. the guys that would do it wanted $200+. probably should have taken it in person, probably a lot of high quoting done when you cant see what your are talking about. anyway I measured the ACTUAL size (hint, it aint 22)
IMG_6101_zpsoy7vj53v.jpg


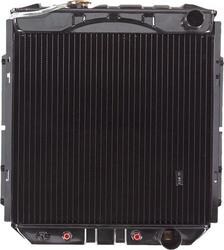
and started looking online for radiators. I remembered my friend Bartman who is doing a 51 on an s10 had a mustang rad so I texted him, last I talked he was on the fence about using it and I didnt feel like ordering one for ebay and waiting a week. He didnt want to sell but told me some auto parts stores had them in stock, so I looked around and sure enough
IMG_6103_zpsdlbwsa2k.jpg

IMG_6106_zpsf7uxytyb.jpg


its from a 302 auto so the trans cooler is in there too, saving me a step. but its narrower and the bottom outlet is further inboard, so to keep the clutch fan I will need to modify my fancy core support mount. good thing I hadnt welded it up yet haha, procrastination is sometimes just common sense.

working all weekend, stay tuned!
 
I'm using an early Mustang radiator in my 39. It fits great, but the lower hose connection is on the left side, so I had to run a long lower hose under the fan. SBC lower hose is on the right side. Not a huge big deal.
 
they had two, one with the lower outlet on the drivers side and one with it on the passenger, I picked the one with the outlet on the passenger side. it is murray part number 433259 for a 65 mustang 302

8010130.jpg


the s10 normally has the upper rad hose on the drivers side but the 4.3 rad outlet is straight up, so I can go to either side.

the other one I looked at was murray 433340, 67 mustang, it was wider and taller but thinner, I went with the 65 so I had a couple extra inches to move it around.
 
A little trick when tapping holes in manifolds and other already installed parts is to dip the tap in grease then tap the hole. The grease will capture almost all the thread cuttings.
 
Last edited:
up till now I had only placed the steering column by critical measuring, I hosted a family dinner today so not much truck work but I DID throw the extra dash I have in the truck to check clearances. I shouldnt have worried, I measured everything so exactly and used a plumb bob to place the column, it has 1/8" clearance to the bottom of the dash and is centered exactly on the original column mount holes.
IMG_6113_zps55p3alnv.jpg

51338478536__46527374-EDE1-4E19-8A52-ECB35CAC3C82_zpstsuywe5w.jpg
 
got the front trimmed and dropped, fit is peeeerrfect now.
IMG_6116_zps0fcxspbq.jpg


I really like the stance so far. I may need a small block in the rear to get it where I want it but we will see.

the reason I know its in the perfect spot is because the upper brace lines up. but it had some broken bolts in it so I had to do some repair and finish with a squirt of paint
IMG_6118_zpsutwwsnzh.jpg

IMG_6122_zpse4exextm.jpg

IMG_6126_zpspiizco89.jpg


I flipped my unfinished core support mount around and I will trim it straight across to let the radiator slide down past it so I dont have to move the lower rad outlet and can keep the mechanical fan. I will tack it together and pull it apart and brace it. the good news is that solves my problem with the power steering lines too.
IMG_6117_zpstppxklxo.jpg


I threw a board in to act as a seat to check pedal locations and I think the buckets are going to be perfect.
IMG_6119_zpsiedkzfeo.jpg

IMG_6127_zpsb9etpbnt.jpg


I was putting off the repair of the windshield crank in case I got the one pulled from the other 41 and it was ok but thats a pipe dream to throw a windshield/dash/windshield crank pull in the middle of working on this one. so I did the repair, I used a high brass plug and center drilled the oval-ed hole that was keeping the gears from meshing then center drilled the brass plug for the shaft, then pressed it all together in the vice.
IMG_6123_zpsbf0mgwre.jpg

IMG_6124_zpskjogu9pt.jpg


it works well, it has a tough spot so I need to take it back apart and I will probably put the tough spot at 3/4 extension since the windshield will never get opened more than an inch or two
 
my wife was talking about how much she had to get done before easter, turns out she was saying "me" but meant "WE". I planted trees and bushes and cleaned up the driveway and laid a couple hundred feet of casing and baseboard. she planted azaleas and watered them. no, kidding, she did a lot more than that but thats how I felt at the time. she was making fun of my grumpiness over navigating 16ft long baseboards through the house and I told her she could always HIRE this work done, those guys make mints. she quieted down.
easter came and went but not without some drama, some of my close family is just bananas, I dont know how these kids do it. My oldest was a handful but that was just the "parents burden", she calmed down when she had to support her own life. anyway. lots of continuing stuff going on so only a couple hours in the shop, but good ones.

I wasnt happy with my booster hole and needed the pass through for the harness. the fusebox mounts to the back so I just trimmed up the firewall piece and welded it in. same with the booster hole, you cant see it but I used asphalt backed tape to give a nice sealing touch behind the booster. fuse box is in a nice spot under the dash too. wont be able to do this with the next one, its a 5 speed, but it also has a different harness too so lucky me.

IMG_6197_zpsmbjddpew.jpg

IMG_6198_zpswesffi7w.jpg

IMG_6199_zpslimojipv.jpg

IMG_6200_zpspfqv21kp.jpg
 
daughter stole the phone cord with the usb connector, so I have been using a charge only cord.

had a great couple weekends with the family, fixed up my office with a bed and finished the bathroom so a close family friend could stay with us a couple weeks, new job here in town, he is from tulsa.

got some work done previously, the daughter who steals the phone cord is on summer break and never home (mostly) so I picked up another cord.

pulled the doors apart, the windows were jammed and the passenger latch had sat in the field with the window slightly down and the door handle at a 45 degree droop. the latch refused to work, penetrant didnt work, 50/50 acetone/tranny fluid didnt work, heat didnt work.
IMG_6255_zpstpug7oxj.jpg


I pulled the latch and soaked it in vinegar for about a week. it looked better but didnt work still. I ground out the attachments and started grinding out serious rusty crust.
IMG_6316_zpswuzkkwj4.jpg

IMG_6318_zpsnh4pkqyr.jpg


I had to tack weld it back together since the way it was assembled previously was with little tabs that got smashed over to make the assembly. easy peasy though. I replaced the compression spring inside so the door handle would stay at 90 degrees, it is really smooth now
latch_zpsjchppzsq.gif

IMG_6321_zpsgnxstuda.jpg


works great now, inside handle hooked up and working. need to install the new window weather stripping/felts because the way the assembly works is to put the window in the channel and then put in the regulator/door latch assembly. I picked up the window kit and some stainless 55 taillights from bowtie bits today.

pedals in and hooked up
IMG_6259_zpsfnrswp1a.jpg


you might notice I am missing about 1/3 of the floor.
IMG_6332_zpssmjf08rm.jpg


I have another in the parts pile but rather than "paying it forward" like I always do and borrowing parts from the next truck, I decided to make the missing piece. I picked up a sheet of 20 ga and made a wooden buck to pound on.

IMG_6330_zpsepvrdi3i.jpg

IMG_6331_zpshhafzfhx.jpg


I also got the kydex installed in the grille area to make the air scoop to the radiator, and picked up all the fittings to hook up the trans cooler. I also cut another set of 47-54 s10 mounts for a local guy, that took the rest of the day.
 

Latest posts

Back
Top