junkskunk's 52 ford

Rat Rods Rule

Help Support Rat Rods Rule:

This site may earn a commission from merchant affiliate links, including eBay, Amazon, and others.
well, jmc, I am not going to be so anal about the way it all turns out because this is supposed to be fun to build not to be a show car. I have many flaws in it so far but this is my first rat rod build so I am learning as I go. Yes I have sat in it and yes I barely fit, I have no head room left, so I guess I will have to build a strong center console since I will be leaning on it a little so my head doesn't bang the roof every time I hit a bump. I am going for the most chopped up rat on the coast and there are quite a few down here. I recently went to a rat rod show and saw some insane rats but no one had a truck as cut up as mine, I feel really proud of myself. I am also going to get a little artsy with the suspension and use a stop sign post as my two link on the front end. It will be safe first and then look really trick. A few pics of the roof welded up. OK I cheated a bit and simply welded my filler metal from the bottom, I will later use something like metal to metal body filler ti fill it in. I'm in a hurry but I can live with it.:cool:


Just a thought, but it looks like your going basically scratch built so maybe scrap the tall frame and build it out of 2x4 boxed tubing. That'll give you a couple more inches in the cab.
As far as cheating with filler metal from the bottom, I have you beat! I tried your technique first and then soon realized that I have failed, SO:
photo-45.jpg


this is the inside. Kinda dark but there is almost a 1" gap from the original roof metal to the new piece on the top now :eek:
photo-44.jpg


Here's the hack job inside with light.
photo-46.jpg


The chop is not my proudest part by any means, but ya gotta learn somehow :)
This too is my first build so I'm learning a TON along the way. In fact I was just telling a buddy that when you looked at these trucks (before building one) they look so simple that you think anyone can do it, but now that I'm in the thick of it, I've grown a new respect for everyone willing to jump into something like this and make a thousand different parts work as one.


After all that brain damage, it's not lookin too bad.
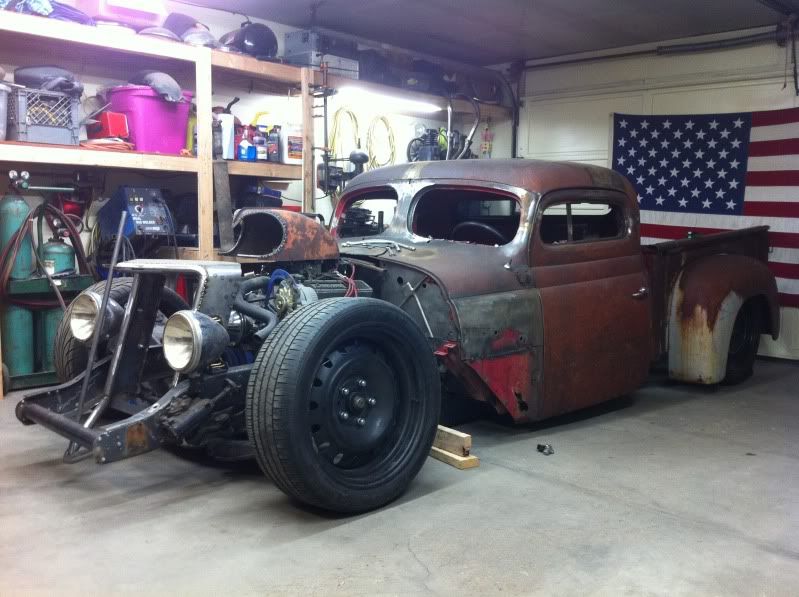
photo-21.jpg


Keep up the good work!
 
jmc, I love your truck. [dr yeah the gap thing is a flaw but at least its on the inside! Lol does your truck run? If so at least you can drive it. I wish I could get in mine and cruise. Its funny what one can do with an old rusty truck and some metal. Everyone who sees our rats thinks its so easy to build one until you're in the middle of buildind one. That's why it feels good to be among other people who have rats we all know how it really is. Blood sweat and tears make it happen. Although I haven't got any tears yet.
 
Last edited:
jmc, I love your truck. [dr yeah the gap thing is a flaw but at least its on the inside! Lol does your truck run? If so at least you can drive it. I wish I could get in mine and cruise

It's not quite running yet. Still working on it. Just got the brake master cylinder yesterday out of a 79's Chevy van and got the pedals mounted. I've been working on it for almost a year and a half now but I think it'll be on the streets this summer :D that's the plan at least.


I noticed you are going to rn air on yours and were talking some sort of trick setup. You should check out cenpen. They make a air bag setup for the front with hidden bags and works with solid I beam axles.
http://www.cenpen.com/new.htm
I was going to use them, but I decided to do IFS for better handling. I haven't delt with cenpen so some research might be necessary.


You should check out the video in my sig line, it might give you some ideas for yours.
 
ok got a little work done lately but haven't been posting sorry guys. I'll just post the pics and show what I been up to.
I think I'll cut the front frame section a little more seems too long compared to the rear tire.( the rear tire is the original the new ones have more sidewall almost to the top of the roof.)
P.S. before I post any more pics I'll rake under the truck again.
 

Attachments

  • IMG_20120506_191347.jpg
    IMG_20120506_191347.jpg
    97.8 KB
  • IMG_20120506_191305.jpg
    IMG_20120506_191305.jpg
    115.1 KB
  • IMG_20120506_192210.jpg
    IMG_20120506_192210.jpg
    90.9 KB
That's why it feels good to be among other people who have rats we all know how it really is. Blood sweat and tears make it happen. Although I haven't got any tears yet.

I've has the tears. Those started rolling once I figured out exactly what it takes to get one to go :)
I to thought it was easy. I mean really, how hard could it be to get one of these old rusty junk piles to go? After all, the factory already designed all the hard stuff right? NOT, you gotta redesign it all to work together.
 
i am obviously ADD or ADHD at least because I can't seem to finish anything before starting new projects. Its crazy really.[S rsfyj, I know it looks proportional in the pics but its really not, wild doesn't begin to describe it. Its not enen 4 ft. Tall. Oh I got my floor in its a Chevy hood turned upside down, now I can step on a Chevy on a regular basis, lol. I'm going to have someone take a picture of me standing by to get the full concept.
 
ok forgot to take pics but not been working on the truck, have a few things mocked up but nothing serious. mocked up the front suspension and did a little welding on the front twlinks been checking out bagged front ends going to start fabbing that up. also made a steering wheel out of a couple engine rods and spare metal, still not set on what engine I am going with. its between the ford i6 and dodge cummins diesel. I must start on the underslung rear end, simple just cut the frame and flip it upside down. been a bit lazy lately. went up to VA and d.c. on family vacation was nice but made me lazy. will post pics tomorrow maybe.
 
ok today I am flipping the rear section of the frame. first I leveled, then marked, followed by cutting. I flipped it as shown but cut out the brace for the e-brake cable, maybe a bad idea, not sure yet. I just finished welding the seam, not too bad for a vertical weld. next up grind, grind, grind[;) then weld the outside four inch piece of metal in place. repeat on the inside of the frame.[cl
 

Attachments

  • IMG_20120727_135553.jpg
    IMG_20120727_135553.jpg
    82.8 KB
  • IMG_20120728_132220.jpg
    IMG_20120728_132220.jpg
    90 KB
  • IMG_20120728_132145.jpg
    IMG_20120728_132145.jpg
    82.7 KB
  • IMG_20120728_141936.jpg
    IMG_20120728_141936.jpg
    87.8 KB
Been real busy on the home front not busy on the truck front. Been rethinking how it's put together. Gonna redo some things, framework I am going to order new mounting hardware for the front suspension, plumb the bags with copper instead if plastic tuning. Looking at getting an old school bus engine, it's a 7.3 international diesel, seems overkill but would be so insane, looking at what it would take to strengthen the frame and get it to sit without looking so enormous. It would sit on too of the frame instead of between since my frame is not as wide as the bus. Would like to use single dually wheels out back, just trying to figure out the suspension setup, maybe strut type bags (home made of course), behind the axle. new pics coming soon of what I cut up now.
 
I think you had better add some plates to those butt-welded frame areas as well...

What are you welding with? I'm just concerned about safety here...
 

Latest posts

Back
Top