Another International Build

Rat Rods Rule

Help Support Rat Rods Rule:

This site may earn a commission from merchant affiliate links, including eBay, Amazon, and others.
2007_0508CameraNew0011.jpg

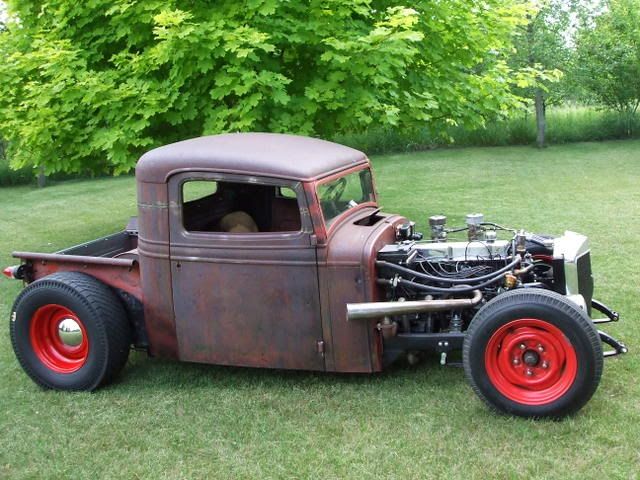
The engine is a 250 Chev 6 that found its way from Texas to Minn. in a rust free truck. The 6 was removed in favor of something bigger and treated like a red headed stepchild until I bought it for $150. It came with new CE motor mounts, otherwise I would have made my own. All I did was change oil and filter and put a points distributor in it to get rid of the large looking HEI unit. I built the intake/header. The intake is water heated. Three of the cylinders exhaust out the passenger side. The inspiration for this truck was a cover truck in The Rodder's Journal a few years ago. It was a bare metal '34 Ford with a 235 Chev 6. The writer pointed out that Chev 6's have a good side and a bad side appearance-wise. The passenger side being kind of bare. That's why I ran half the exhaust under and out on the passenger side. It gives the engine compartment better symetry. I used a brass sprint car radiator with 4 upper outlets. That, plus a heater and the heated intake accounts for all the hoses running every which way. All my other rod have small block Chevy's in them. I worried that this might be kind of under powered by comparison. I've been pleasantly surprised by the acceleration of this beast. Regarding the 2 carbs; I rebuilt them and made sure they had the same jet size. The only adjustment I made was to turn the idle mixture screws out 3 turns instead of the typical 1 1/2 turns.

I got staring at my 194 and thinking about Bobs statement about the good side and the ugly side of a chevy 6 , so I decided to try to do something about it , came up with these side plates , do they look better ?
 

Attachments

  • IM000822 (Medium).JPG
    IM000822 (Medium).JPG
    85.7 KB · Views: 30
  • IM000823 (Medium).JPG
    IM000823 (Medium).JPG
    89.6 KB · Views: 34
Thanks again Bob..... got me one of them books!!!:D


I thought i'd bring this question up again. I'm also interested to hear how you went about narrowing the front axle.


Very cool truck.
I am interested in how you went about narrowing the front axle. Angle cut,pre heat/post heat,Mig/Tig/Stick,how much did you take out????

Fred


I've also got one other question. In the rear susp. pics,,,, how is the rear spring mounted. From the pic it looks like it's bolted to the rear upright tube (frame section) is there a plate, or open section you are bolting too or is there something there I can't see from that angle?


Thanks for all your help!!!!!


BuTcH
 
P3030083-1.jpg

Here's a pic of the rear suspension. The 3/8" thick plate is welded to the vertical rectangular tubing. It is tapped for the bolts holding the spring and top plate in place.

I wrote a long PM to RRR member, ouh506 regarding narrowing an axle. I didn't save it, but maybe he did and can forward it to you. I narrow to a 46" kingpin centerline. I cut the chunk out of the middle of the axle with a cut off wheel in a 4 1/2" angle grinder. After beveling a lot I simply weld it back together. I put a 3/8" thick plate in the web of the axle on the back side, where is isn't very noticeable and weld that in securely. Stock I beam axles are forged and weld very nicely without any special requirements. I stick welded the first ones because I was comfortable with the penetration. I now wire feed them with thick wire and lots of amps for good penetration. Now the hard part, you need to get the camber correct (kingpin inclination) and make sure the caster will be the same side to side, no twist in the axle. I just use a lot of C clamps and heavy bar stock to get the axle halves in alignment. I check many times with an angle finder until I get it right. Then I tack and recheck. Sometimes I have to grind a tack weld and re adjust. If the camber is off even a degree it is noticeable on a fenderless car. The top of the wheels will tilt in or out too much depending on the error made. I use zero camber, meaning the wheels are perfectly vertical. One degree either way is ok, but more than that is noticeable. I've done 7 axles and they all work fine. Since I've done a variety of axles it never made sense to make a fixture.
 
2008_0617box0006.jpg

I finished the box (covered in another thread) and thought I'd show a pic of the right side. This is one of the few Chevy 6's with exhaustt pipes on the passenger side. I painted the rear wheels Safety Red. I think the black wheels were a little to dull.
 
2008_0617box0009.jpg

Here's the rear aluminum panel. The beads were created by Terry & Lee and T & L Custom, using a Pullmax machine. I dulled the surface with a 3M primer pad designed for sanding primer, then I shot some clear on it. RRR member, Youngster graciously gave me a foot locker. I haven't picked it up from his brother's house yet. The plan is to cut it to fit inside the box so there is some storage space. Now, if I can fix the gas tank leak tomorrow, I can drive this thing to Back to the Fifties this weekend. Anybody have a recommendation on a good exterior gas tank patch material???
 
There is a Vintage Modified class up here,that runs on paved ovals.
The rules specify inline 6 cyls,but some mods are allowed.

Several years ago,one of the guys made headers to
dump 3 cyl out one side,and 3 out the other side.

MAN did that sound GOOD !!!!

Pretty sure he laid them out,so the firing order
alternated from one collector to the other.

I will always remember that sound.
icon14.gif
 
2008_0617box0009.jpg

Here's the rear aluminum panel. The beads were created by Terry & Lee and T & L Custom, using a Pullmax machine. I dulled the surface with a 3M primer pad designed for sanding primer, then I shot some clear on it. RRR member, Youngster graciously gave me a foot locker. I haven't picked it up from his brother's house yet. The plan is to cut it to fit inside the box so there is some storage space. Now, if I can fix the gas tank leak tomorrow, I can drive this thing to Back to the Fifties this weekend. Anybody have a recommendation on a good exterior gas tank patch material???

Solder is the best way to fix a tank.
I like the truck, the chop is dead on, rear window and all.
 
This is the last entry on this build thread. I sold it. This is the hot rod I've sold in over 25 years. I sold it to a guy I see frequently. He loves it and all the attention it got all last summer. So that makes two hot rods I sold last summer. It didn't even hurt much. Gives me some money for new projects.
 
This is 5 years old but needs to go back to the top.

I think the thread is interesting even with a few missing photos.

Some nice winter reading while the snow is a couple feet deep.
 

Latest posts

Back
Top