1949 Business coupe update

Rat Rods Rule

Help Support Rat Rods Rule:

This site may earn a commission from merchant affiliate links, including eBay, Amazon, and others.
Thanks! I built the injector cleaner today and it worked great! the only thing I did different was use my battery charger for power as I couldn't get an AA battery to open the injector. Worked great, a noticeable improvement from start to finish in the injector stream. I used Seafoam for the cleaner. It was about $40 total for the parts and a new seal kit for all 6 injectors.

http://www.youtube.com/watch?v=zlO4krw2h8o
 

Attachments

  • IMG_0498.JPG
    IMG_0498.JPG
    59 KB
  • IMG_0499.JPG
    IMG_0499.JPG
    60.6 KB
Nice work Pat. If you put a graduated cylinder under the injector and use a timer for the on and off you can see if each injector is flowing the same Lbs/hour. Matched injectors goes a long way to making a smooth running motor. Extra HP too. [P
 
Wow... i'm just now catching up, looks GREAT!

At 1st glance before you put the upper plentum on it looked like an LS1 with that corvette red color[cl...

I love the addition of the logos on the motor!:D
 
Wow... i'm just now catching up, looks GREAT!

At 1st glance before you put the upper plentum on it looked like an LS1 with that corvette red color[cl...

I love the addition of the logos on the motor!:D

Thanks, I've got an LS motor in my wife's 48 coupe. I think hers will be faster, unfortunately.
It doesnt look much different but I've got a lot of hours this week altering the engine wiring harness, mounting the injectors and fuel rail, and figuring out how the hoses are going to lay out in the back. I was going to do the headers first but this made more sense when I started looking at it. The EEC, relays, etc will be mounted to a plate behind the seat so lot more wiring to change but its getting there. Also started putting the intake back together. The boxes of parts are getting emptier! Hopefuuly there's a trial engine start by the end of the month.
 

Attachments

  • IMG_0502.JPG
    IMG_0502.JPG
    60.9 KB
  • IMG_0503.JPG
    IMG_0503.JPG
    59 KB
  • IMG_0504.JPG
    IMG_0504.JPG
    51.6 KB
  • IMG_0505.JPG
    IMG_0505.JPG
    64 KB
Hey falconvan I'm a little late to the party on this build thread but I just read through it all and you've done an awesome job. Looks great!!!

-Chris
 
Thanks! These late model emgines look pretty good with a little simple detailing. I decided to build a shelf behind the seat to mount the PCM, ignition module, and the amps for the stereo, plus I'll be putting a bank of relays on it. Here it is mocked up, I'm going to work on the wiring harness and get everything lengthed/shortened to where it needs to go before I neaten it all up. This eats up a ton of time; looks like I may not make my January engine test run. Hopefully it wont take too much longer.
 

Attachments

  • IMG_0506.JPG
    IMG_0506.JPG
    37.7 KB
  • IMG_0507.JPG
    IMG_0507.JPG
    47.2 KB
  • IMG_0508.JPG
    IMG_0508.JPG
    74.7 KB
Thanks! These late model emgines look pretty good with a little simple detailing. I decided to build a shelf behind the seat to mount the PCM, ignition module, and the amps for the stereo, plus I'll be putting a bank of relays on it. Here it is mocked up, I'm going to work on the wiring harness and get everything lengthed/shortened to where it needs to go before I neaten it all up. This eats up a ton of time; looks like I may not make my January engine test run. Hopefully it wont take too much longer.

Looks like you are making progress! Fortunately, you don't have to extend wires too far! and you have a nice work area... mine is outside. Stay at it, one wire at a time and you'll be done before you know it. You still have a week from Friday :cool:
 
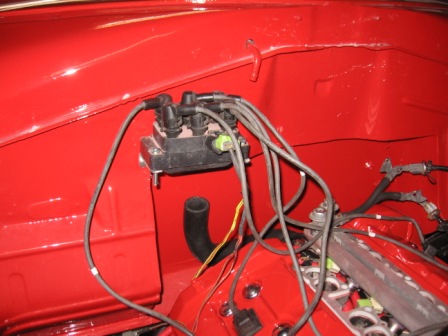
This may not look like much progress but this is several hours this week of lengthening, shortening, soldering, heatshrinking, and studying diagrams. It's coming together well other than a few PCM functions Im still researching to see if they are necessary for proper engine functions. These PCMs do engine and trans functions so some things will be eliminated. But I'm feeling confident and it's looking good. Also found a spot for the coil pack; I was going to mount it on the front of the engine but I think this will work out better.
 

Attachments

  • IMG_0510.JPG
    IMG_0510.JPG
    74.1 KB
  • IMG_0509.JPG
    IMG_0509.JPG
    57.9 KB
You're a better man than I, Gunga Din. I like wiring the simple hot rods I build but what you are doing is very impressive.
 
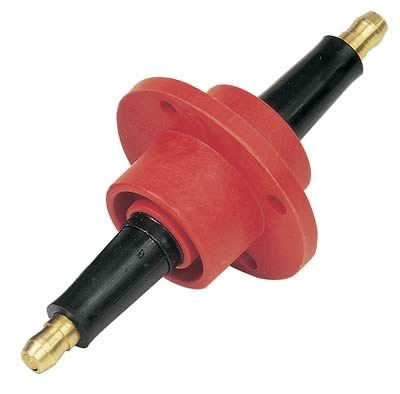
This area would look awesome with three coil wire bulk heads coming through the firewall on each side of the engine and the coil inside under the dash on the firewall.
attachment.php


msd-8211_cp.jpg
 

Latest posts

Back
Top