1955 Ranch Wagon Cruiser

Rat Rods Rule

Help Support Rat Rods Rule:

This site may earn a commission from merchant affiliate links, including eBay, Amazon, and others.
quarter panels

I did a lot of on line research and found a method of welding in panels that is supposed to be easier. You make the cuts without leaving a gap and fuse TIG weld without using any rod.

So I scribed the line, used a cut-off wheel leaving about 1/16" and used a flap wheel to grind exactly to the line. But holding the panel in place proved to be a challenge.

At any rate here's the first panel.

quarterpanel029.jpg
[/URL][/IMG]


Notice the studs above the weld? That was a T shaped dent that I found after I welded in the panel. Should have felt around inside before welding. There is well over 40 hours in trying to fix that dent. There is a brace behind it so no hammer access.

quarterpanel034.jpg
[/URL][/IMG]

quarterpanel033.jpg
[/URL][/IMG]

Here's the rear panel. The rear's were a lot easier because they had more contour.

rearpassquarter3.jpg
[/URL][/IMG]

switch1015001.jpg
[/URL][/IMG]

I started these in June and "finished" them last week. They are not as good as I would like them to be and I can't even say I'm sure they'll work - but I think they will. But I'm moving forward.
 
Last edited:
Interesting concept.
My question is this. Was this rod less form of tig welding any easier?

Sounds to me like a throwback to the real form of hammer welding. Fuse two pieces together when they become some what molten. I would imagine that hammer and dolly work is still envolved as well.

Great job on the wagon.[cl [P [P
Torchie.

There was a real learning curve to get full penetration without burning through. Once that was dialed in it went pretty quickly. The best part is very minimal grinding. The worst part is that any gap would easily became a big hole.

The hammer and dolly work is still required although the theory is that without the filler there should be less required. I still had a ton of distortion.

No matter what I do, my welds never have that hammer weld appearance. I look at the Cornfield Customs "around the shop" thread and realize I'm not even playing the same game, much less being in the same league.
 
Thanks for the response DJ.
I could see where getting both edges perfectly matched could be a problem as well as the dreaded burn thru.
I hear you on the welds as well. I'm embarrased to show mine on any site except for the "Blind welders" forum.[S
And as far as your work goes. I won't worry to much if I was you.;)
Torchie.
 
Wheel tubs

A problem I had with the quarter panels was that I couldn't get a dolly, much less a hammer between the wheel tub and the quarter.
wheeltuborig.jpg
[/URL][/IMG]

The tubs were rusted most of the way around - I had added the band at the bottom of this one to fix the rusted out part. I also made the patch panel that the vise grips are sitting on.

The part of the tub on the quarter panel side was in really bad shape, too. Even though I cut out most of it I still had a lot of the QP weld that I couldn't get to.

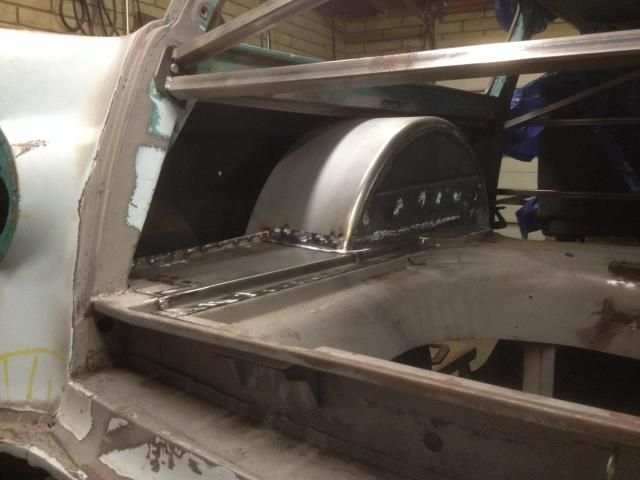
Well, I had some fenders left from the Firetruck project that were about the same size as the tubs, but more squared off so they would allow bigger tires and still fit without narrowing the frame.

So I cut out the wheel tubs - which made finishing the welds in the quarter panel possible for me.

wheeltube2.jpg
[/URL][/IMG]

The tubs were not an easy project. I had to make the pie pan for the outside of the tub then make a lot of complex shapes to fill in the gaps

wheelwell3-1.jpg
[/URL][/IMG]

wheelwell2.jpg
[/URL][/IMG]

pedals012.jpg
[/URL][/IMG]

wheelwell1.jpg
[/URL][/IMG]

I still have a lot more work to do on them, but at least I can see some progress.
 
Torchie mentioned the Blind Welder's forum - I can relate to that.

Everywhere I'm welding it seems incredibly dark. I could not see the seam on the quarter panels well enough to TIG weld them. In despiration I came up with this.

hoodlight3.jpg
[/URL][/IMG]

It's a Snap on led light I got at Pep Boys for $10. Worked well for the quarter panel seam, but not much else. Even though the light is only a few ounces it really screws up the balance on the hood.

I like that idea! I too have problems seeing where I want to weld, have tried spotlights, drop lights, etc., anything to light up the joint. I might have to get one of those LED lights and mount it on top of the helmet and give it a try.
 
Torchie mentioned the Blind Welder's forum - I can relate to that.

Everywhere I'm welding it seems incredibly dark. I could not see the seam on the quarter panels well enough to TIG weld them. In despiration I came up with this.

hoodlight3.jpg
[/URL][/IMG]

It's a Snap on led light I got at Pep Boys for $10. Worked well for the quarter panel seam, but not much else. Even though the light is only a few ounces it really screws up the balance on the hood.

Agreed DJ. I tried something like that as well after reading about it on another forum. My bigger problem was that with the light attached to the helmut I found myself tilting and angling my head and neck to get the light to shine where I needed it.[S
Using a mig I have seen where they attach a light to the gun instead. I may have to try that next.[;) [;) [;)
As I said before. I wouldn't be concerned about the quality of your stuff.[cl
Torchie.
 
Even though Ford outsold Chevy during that period, there is a reason there are more Chevies still around. The Fords had really bad rust issues (most got scrapped shortly after they were paid off according to my dad). I'm glad you are doing what it takes to same this one. It is going to be a really neat car!!!

How true!

It is interesting that Ford primed and painted after assembly and left lots of hidden areas with no coating, just bare metal. There are a lot of places to catch and trap water and dirt and no way for it to exit. You can clearly see Henry's frugal influence - no extra parts.

On the other hand, it sat since 1989 with most of the windows gone so I guess rust should be expected.
 
Yes, they were trailer fenders 11" wide x 36" diameter. There is a 1" radius on the inside edge and a sharp corner on the outside.

I bought them for the dually roadster, but they stayed behind when that project went north.
 
The dash

The Ford had the all in one steering column/ steering box. The bolts holding the box to the frame were rusted, it wouldn't even come off after I busted the heads off the bolts. The steering wheel was major league stuck on the shaft. Puller, heat, hammer and it's still in one piece.

The steering wheel is in poor shape and the horn ring busted beyond repair. Since I don't like those big steering wheels with power steering, I went for an Ididit column. I had a billet wheel that I got several years ago and didn't use, but it is the right size.

Installed the column in the original location, put the wheel on, installed the driver's seat and immediately saw a problem.

This is the driver's eye view of the speedometer

driversveiw.jpg
[/URL][/IMG]

With the original wheel it was visible under the wheel. This photo is taken a little lower

steeringwheel2.jpg
[/URL][/IMG]
 
Dash

It took a while but I finally came up with a plan. The gauges are from Speedhut. The price was more reasonable than the other major players and I really like them.

gaugepanel.jpg
[/URL][/IMG]

steeringcolumn1-1.jpg
[/URL][/IMG]


I made a filler for the top of the dash.

speedofiller2.jpg
[/URL][/IMG]

speedofiller1.jpg
[/URL][/IMG]

Here's a shot of the rubber band on the English wheel - same process as the tunnel.
filleronEwheel.jpg
[/URL][/IMG]

Cut a hole in the dash for the panel.

gaugepanelhole.jpg
[/URL][/IMG]

The radio hole (center of the dash) gets a clock where the round hole is and the AC knobs where the knobs were. The Speedhut bezels are threaded and removable. I bought 2 more for the holes on either side of the clock -they'll ac vents when I get them made.

dash1.jpg
[/URL][/IMG]

008.jpg
[/URL][/IMG]
 
Oh how did I miss this build! I'm right at home here...very rusty sheet metal, 5.3L LSX motors stuck in everything, Trailer fender tubs! I love it! And a wagon to boot...[cl[P
 
here is real cool one l found in my rod and custom mag from nov. 2O1O.

thought you might like it:D


http://www.rodandcustommagazine.com/featuredvehicles/1011rc_1956_ford_park_lane_wagon/

Later :cool:
I haven't seen that one - well I must have seen it but I don't remember it. I like the green. I sure didn't spot the change in the rear wheel openings and why didn't they show a better photo of the Mustang windshield used for the rear liftgate?

I now have 2 grilles so I doubt if I'll be putting a Chevy grille on mine.

Thanks, I did like it.
 

Latest posts

Back
Top