Roadster pickup from leftovers.

Rat Rods Rule

Help Support Rat Rods Rule:

This site may earn a commission from merchant affiliate links, including eBay, Amazon, and others.
Thanks, Sam. I know what you mean, I have a hard time getting the motivation to get started sometimes too. I was tired yesterday from a long night Friday, but once I got started I woke up a little and got moving.

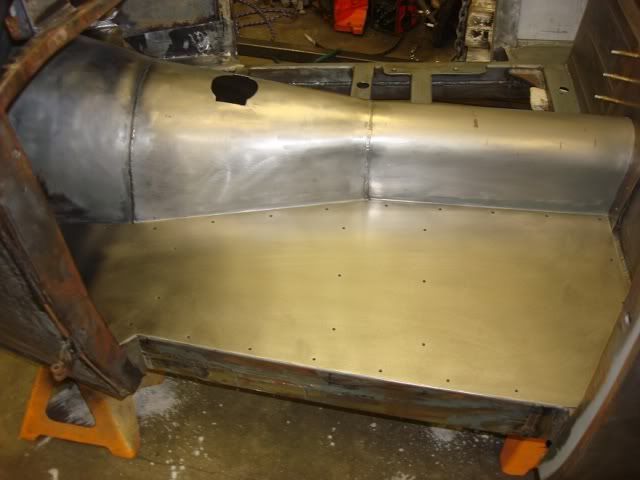
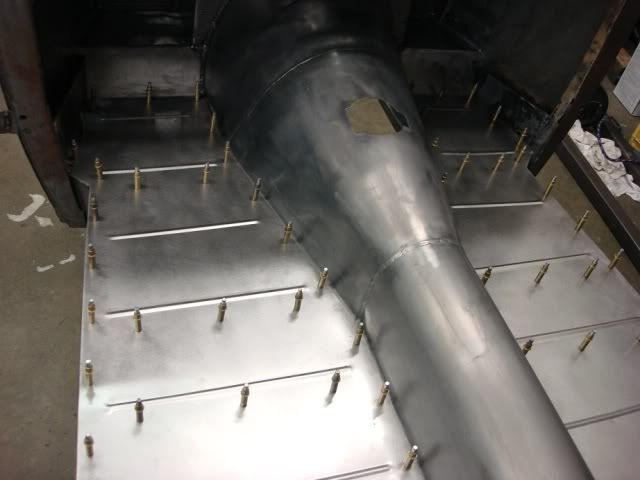
This step was a major one for me because I won't need Dan's welding help to do the next few steps and can leave him alone so he can get more done on his own project. I can cut and fit the floorboards in by myself as well as some other things. He's been good about giving up his time to help me, but I feel bad taking him away when he is in the middle of something on his own car.

Don
 
DoubleJ, you'd have to get in line. I'm ready at all times to pounce on stuff he doesn't want any more. :D The other night he and I were sitting having a cold one at the end of the night and I started mentioning all the parts I don't need to buy for this build because I have them already. Then I realized MOST OF THEM CAME FROM HIS PROJECTS! :D I figure I'm just getting even with him for all those times he stole my Playboy magazines when he was young.:p

rainman............I think he got it from him Mom. She is just "perfect", which is why she left me, I guess. :D (Well, that, and the hidden stash of car part receipts):eek:

Anyway, once I got back on building the rpu I knew what look I wanted. This one will be a little rough around the edges, I want it to look like it has been around for a long time. I will probably age the paint a little and leave the body not so perfect. It will look like an old drag altered with a Moon tank up front, skinnies up front and Firestone 8 inch slicks out back. Might even run hubcaps.......I have a set of 56 Olds caps (not the spinners) that I might use. As for color, I haven't had a red car in years, so it might be satin red, not shiny.

Here is the first mockup I did to get an idea of what it would look like.

myrpumockupnewframe015.jpg


and the rear view. It will have a very short bed, only big enough to hold the radiator (yep, going to have the radiator in back and an empty Model A shell up front), a gas tank, and battery.

myrpumockupnewframe018.jpg


I was going to use a 4 inch dropped SuperBell up front but it looked too new, so I found a NOS 1934 Ford undropped axle on Ebay and am going to run that suicided with Speedway wishbones.

very nice job[cl
 
Thanks, Chopperman. It's nothing special and I want it to be a little rough, but it will be fun.

I got a little more done on the floor. I made up some cardboard templates of the front kickup section and transferred them to the sheet metal. Now I have the front part of the floor covered and once Dan welds those in for me I can move on to the flat floor sections.

Not major progress, but I just keep nibbling away at stuff to do on it.

Don

myrpufronttoeboards008.jpg


myrpufronttoeboards009.jpg
 
Last night Dan and I welded in the two front kickup covers so that got me to the point where I could start building the floors themselves. I made a template out of construction paper and then traced it onto the 18 gauge steel. After a little trimming it fit perfect, so we drilled 37 holes in it for the Cleco fasteners, which will eventually be replaced with rivits when I mount the floor for the final time.

We are going to roll some beads in the floors to stiffen them and add some detail, and will use 3M panel adhesive first to mount them and then add the rivits.

Here are a few pictures of the floor on the drivers side laid in place. Tomorrow I will cut the one for the passenger's side and then roll beads in both of them. I'm seeing less and less daylight out the bottom of the car all the time ! [cl

Don

myrpudriverssidefloor007.jpg


myrpudriverssidefloor009.jpg

myrpudriverssidefloor012.jpg
 
Since today was July 4th Dan was off work so we headed to the shop. He worked on his Mustang project for a while and I made a template of the passenger's side floor so I could duplicate it in 18 gauge. Once I had the template transferred to the sheetmetal I cut it out and then slid it into place for a trial fit. It was pretty close and just a little grinding made it fit perfectly.

Dan then wrapped up working on his car and came to help me on mine. We drilled 37 holes in the floor panel for the Clecos and then he and I rolled 7 beads in each side of the floor to give it some extra support and dress it up a little. Eventually we will put the two floor panels down with 3M panel adhesive that Dan bought me for my Birthday, and when that cures we can put rivits in all 74 holes for some extra hold.

Here are a couple of pictures of where we ended up tonight.

Don

myrpufloorpanelsdone005.jpg


myrpufloorpanelsdone004.jpg
 
Looks awesome Don. Just don't leave your clecos in the holes with the 3M adheasive. They will never work again if you actually got them back out of the holes. [cl
 
Thanks guys. I had the same thoughts about using the Clecos to hold down the floor while the panel adhesive sets up, but Dan reminded me that we used them to hold his down and they cleaned up by holding the tip to a wire wheel. I wanted to use the final rivits to hold it down while curing, but Dan says the stuff kicks so fast that you could never get them all in before it dried. As it is, you have to race to get even the Clecos in place before that happens.

As I remember, we only had a few Clecos that gave us any fight when it came time to remove them on Dan's floor, and we did have to toss a few of them because they were really coated with the stuff.

Don
 
It was free............at least to me for my Birthday ! Dan bought me two setups. :D I did get a glimpse at the receipt and it was about $ 37 for a twin pack (one hardner and one adhesive.........you need a special caulking gun to hold both cartridges and dispense them at the same time)

Dan got me two kits because we used that much on his rpu and mine is similar in size. Plus, we just don't put a bead of it on top of the subframe we smooth it down to cover the entire top of each cross piece in the subframe. That way water can't get between the subframe and sheet metal floor.

The nozzles are kind of weird, they have spirally things inside them like those Miller Lite Vortec bottles to spin and mix the adhesive as it comes out. We get ours at the local 3M dealer/ automotive paint store in town.

Here is some info I found on the adhesive, the gun, and the nozzles on line: (click on the video to watch it)

http://www.autobodytoolmart.com/3m-automix-panel-bonding-adhesive-08115-p-11230.aspx

Don
 
Last edited:
If a person only wants a seal between the panel and subframe caulk is ok, but with the panel adhesive you really never need any mechanical fasteners at all, the adhesive is almost as strong as a weld. I am only putting rivits in at the end for cosmetics, they wouldn't be needed at all.

I figure by doing it this way the floor panels won't ever move or rattle loose, and will actually become a structural part of the car.

Don
 
Thanks, Chopperman. It's nothing special and I want it to be a little rough, but it will be fun.

I got a little more done on the floor. I made up some cardboard templates of the front kickup section and transferred them to the sheet metal. Now I have the front part of the floor covered and once Dan welds those in for me I can move on to the flat floor sections.

Not major progress, but I just keep nibbling away at stuff to do on it.

Don

myrpufronttoeboards008.jpg


myrpufronttoeboards009.jpg

A little rough??? I'll believe that when I see it!! I don't think you have it in
you!! ha ha At least not what most of us call rough!!
This thing is looking great, can't wait to see more, keep it up!!
 
If a person only wants a seal between the panel and subframe caulk is ok, but with the panel adhesive you really never need any mechanical fasteners at all, the adhesive is almost as strong as a weld. I am only putting rivits in at the end for cosmetics, they wouldn't be needed at all.

I figure by doing it this way the floor panels won't ever move or rattle loose, and will actually become a structural part of the car.

Don

if you think windshield urethane doesn't have a strong bond try to pull the windshield out of a late model car. its a adhesive not a caulk
 
Thanks, Rainman. Actually, I do have it in me to leave it a little rough. The problem is keeping my Kid away from helping me. :rolleyes::D He shames me into making things nicer than I intended.

I can see where the windshield urethane would be ok. I just wanted to use the 3M panel adhesive because it worked so well on my Son's car. That floor should be there for a LONG time. :D

Today I got a little more done, but nothing picture worthy. I got the bracket that holds the Lokar throttle cable to the top of the firewall mounted and then I started figuring out how I am going to mount the underdash brake pedal assembly. I made a plate in the shape of the top part of the firewall on the drivers side out of 1/4 inch steel plate, and will bolt that to the inside of the firewall. Then we will weld some tabs on that plate to bolt the Kugel Komponents 90 degree sideways pedal assembly to. It will also bolt to a bracket welded to the underdash support, which should make it pretty strong.

When I get more done tomorrow I will take some pictures to show what I mean.

Don
 
Panel adhesive is stronger than a weld. You dont get any of the heat / cool issues as with a weld. 2 welded panels will break next to the weld. An adhered panel you will rip the metal before the adhesive lets go. just make sure you get it where you want it before it sets!:eek:
 
Hi Don, the progress is looking great. I'm waiting on those under dash pictures of your pedal mount. We are about to start on ours and could use some ideas. I value your build decisions as they tend to lean heavy on safety and reliability not to mention good looks.
 

Latest posts

Back
Top