First Project continued... 37Ford/46International

Rat Rods Rule

Help Support Rat Rods Rule:

This site may earn a commission from merchant affiliate links, including eBay, Amazon, and others.
Thanks guys.

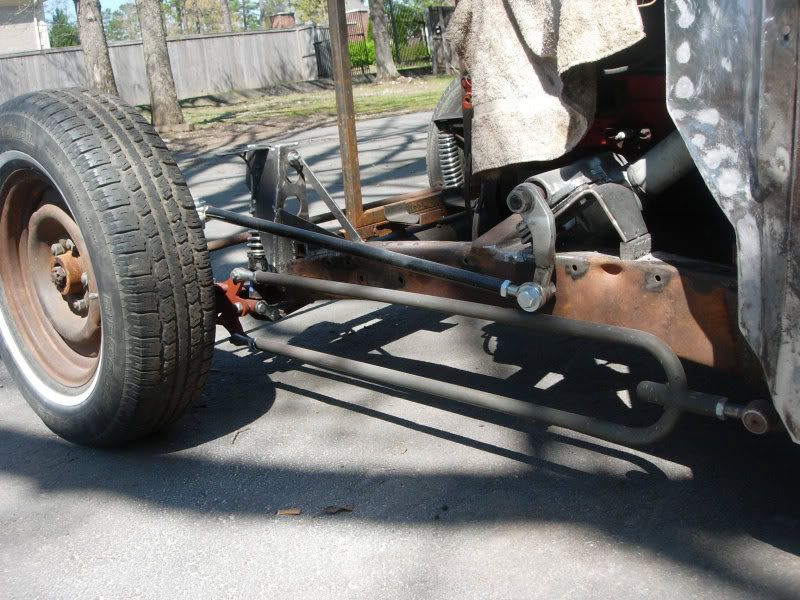
Yeah, I'm running shocks with the bags. I just have a couple straps of steel in place where the shocks will go. The trailing arms were perfect for this because they already have a bolt that sticks out on the ends as shock mounts.

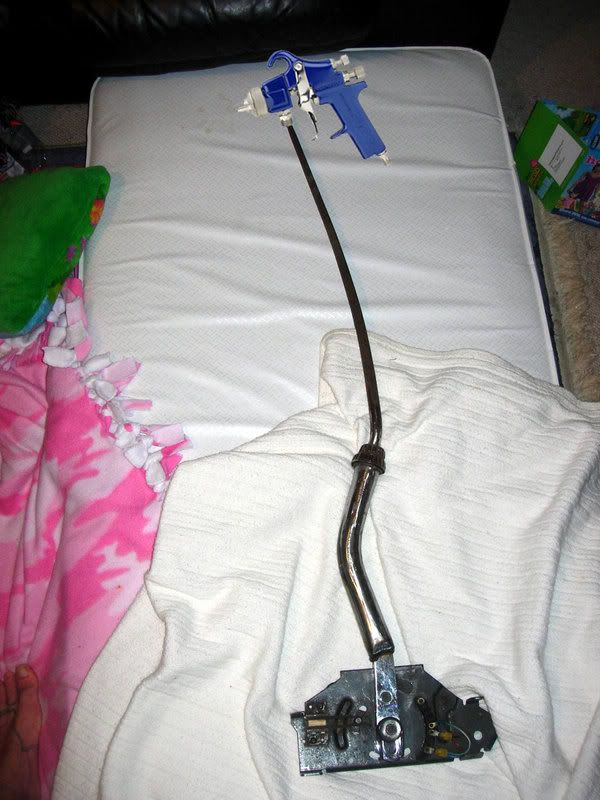
Here are the blinker/taillights... I'm going to spray them with a specific clear to make the white areas glow blue in the dark.

blinker1.jpg


blinker2.jpg
 
OK...since you asked and I have been late on getting a word in edgewise, for asthetics and appearences, the grill is usually lower then the rear hood inset. or at least when the hood is set into place, there is nothing but a down slope from the winshield to the face of the grill. Main purpose for this concept is for aero-dynamics of the wind flow at high way speeds. If your front nose is set higher then the rear of the hood line, you will creat a shear force of negative air. This will alter the handling capabilities of your ride at a high rate of speed.
It is just like the wing concept of an airplane, you creat lift on the upper serface of the wing with a negative push from the bottom. There for, even at the slightest increase of upper wing foil, you create a very dangerous situation. It will unstable your ride plane and simple. You asked for opinions and I will give you logic and dynamics for a safe ride.

Looking at the side profile of the nose, you have a negative slope to the rear of the hood line, you should drop the nose closer to 2" to negate this flaw.:eek:

Overall.....you have one bitchen ride in the works.....and maybe a 4" cresting to 8" max rise in your roof line mohawk. Tall mohawks just ripp peoples eyeballs out of socket, especially when they see you passing them on the freeway.:D

Maximo
 
Got my rear shocks mounted and the front shock mounts made. Swapped out my front leaf shackles for my shocks to mount to. Also got my air bags set up (separately). I can air them up separately so I can make sure my ride is setting perfectly level. I'm going to put braces running on the back sides of all four mounts to reinforce them.

1-14.jpg


3-12.jpg


2-14.jpg
 
I also got my shifter made. Found an old ratched shifter from the junk yard and fixed it up. Added some length with some tubing and the original 37 Ford truck shifter. It's photoshopped, but I'm going to use an HVLP spray gun for my shifter knob.

1_withKnob.jpg


2-13.jpg
 
Here are some pics of the front and gussets on the rear... and a pic of the welds up close. I know the frame is really rusty but I grind the metal until it's smooth and clean... trust me. My father in law would not be letting me do the welding if he didn't think they were strong... his grand baby will be riding in it. I know they aren't the prettiest in the world, but they are strong.

Give me some feedback on the front. There was not much room and I really had to squeeze and figure out a way for the shocks to fit because of my grill shell. I was not keen on the spacer, but I braced it really well. If there is somewhere else I should reinforce them let me know.

5-10.jpg


2-15.jpg


4-12.jpg


3-13.jpg
 
Here's how I'm setting up my airbags... NO HOSES! $4.00 for some tank valves and were god to go. I'll make a part in the bed to access the bags.

6-8.jpg


Here's my panhard bar. I'm going to lengthen it as needed.

1-15.jpg
 
I added some more bracing with the headlight mounts. I have one more strap to add on each side, but they aren't going anywhere now. I'm going to add some rod webbing to dress up the mounts some too. My father in law was going to use these headlights but decided to go with some bigger ones... so he donated them to my project. I don't really know what this means, but he said the actual lights/bulbs are halogen Jag3 lights or something like that. I guess that means there good.?

2-16.jpg


1-16.jpg
 
Well, the Studebaker steering box wasn't going to work without major modification so I found a cheap good 64 Mustang steering box. Got the bracket made and tacked on. I put a u-bolt to hold the column up ( not tightened up)... at least for now. I may try to find something better to bolt it up to. I also got some patch panel knocked out today too. GETTING CLOSE!!!!!!! I'm going to meet up with a guy this week to see about getting my drive shaft made. Still need to make my rear panhard bar, wire everything up and plumb my brakes and I think this thing will drive... We'll see!

box1.jpg


box2.jpg


box3.jpg


patchpanel1.jpg
 
Got the seal replaced on the steering column...
8-7.jpg

1-18.jpg


Got my master cylinder mounted ( I was going to try to use the brake booster but no room).

3-15.jpg


Got my tranny tunnel made... may have to modify some so it's not tacked down yet.

4-14.jpg
 
Put a spacer on my steering box mount for more clearance... may make a new one that's spaced even more.

1-19.jpg


Got my gas pedal mounted.. or at least tacked. And got my push rod for my master cylinder made and mounted. Need to get my brake lines mounted now.

3-16.jpg
 
Got a big dent out of my passenger door and did lots more welding and grinding... aka body work.

dent1.jpg


dent3.jpg


dent2.jpg


rockb1, I'll either pm you or email you.
 
I'm finally getting to the sh**** part. I was thinking of clearcoating the bare metal, but I have some rust through. So I went ahead and caked on the bondo getting ready for some flat black... and some really demented artwork!

1-22.jpg


2-22.jpg


3-19.jpg


4-16.jpg
 
Got some patches going on the inside driver door, and I replaced the door bottom completely with some sheet metal I had laying around. Gonna bondo it too.

doorPatch3.jpg


doorPatch2.jpg


doorPatch1.jpg


Here's my drag link I got from speedway. The washer makes it look closer to the hairpins than it really is. It should clear the hairpins fine... if not I'll know soon.
draglink.jpg
 

Latest posts

Back
Top